Wiki
Clone wikiDocuments Add-On / 620
Documents add-on version 6.2.x
The content of this page applies to the following version(s) of the Documents add-on:
- v. 6.2.x for JIRA 7.1 or newer
On this page:
- Documents add-on version 6.2.x
- What's new in this version?
- Why Documents add-on?
- Installation and configuration
- Bulk documents upload and migration from another Document Management System
- Working with documents and folders
- Accessing and viewing documents
- Searching documents
- Adding a new document
- Adding a new folder
- Editing a document or folder
- Deleting a document of folder
- Deleting multiple documents and folders at once
- Moving a document or folder
- Moving multiple documents and folders at once
- Locking/Unlocking Editing
- Watching documents
- Linking and referencing documents in JIRA issues
- Version history
- Setting permissions over individual folders and documents
- Activity Stream posting
- Using the Documents gadgets
- Documents REST API
What's new in this version?
Ability to move or delete multiple documents at once
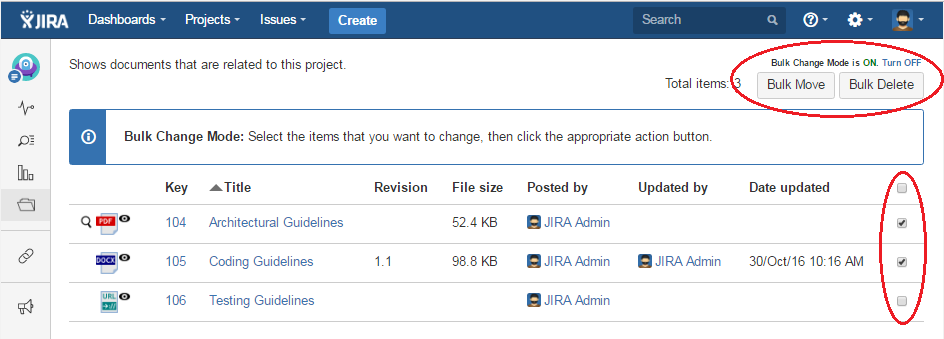
Starting with this version you can move or delete multiple documents at once. This can be done by switching to Bulk Change Mode using the link available in top-right area of the Documents page of your project.
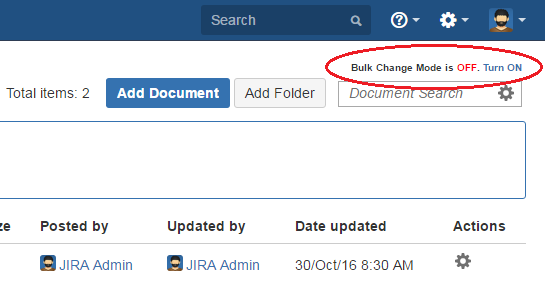
Once you enable Bulk Change Mode, select the documents to be changed by using the apropriate checkboxes available in the last column of the Documents table and then click Bulk Move or Bulk Delete buttons depending on the action that you want to perform.
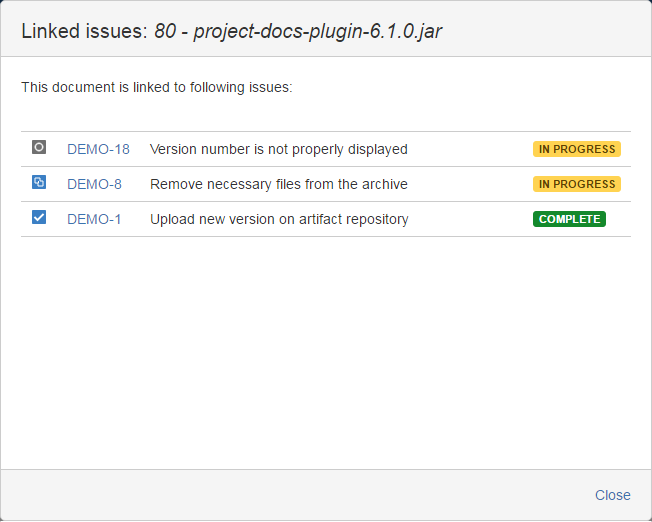
Ability to view the linked JIRA issues for a document
The newly added Linked issues menu-item allows you to quickly access the list of the JIRA issues that a document is linked to.
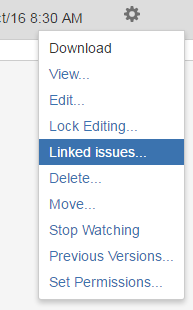
From the list you can open the JIRA issues by simply clicking their key.
Other fixes and improvements
This version comes with a couple of fixes and improvements for the notification e-mails.
Why Documents add-on?
- Makes the documents quickly accessible for the project members.
- No more project-related documents stored on people’s workstations. Everyone will know that the latest version of a specific document will be found on the Documents tab of the project.
- The documents are hosted in JIRA providing common interface for all the project related work-items such as tasks, issues and documents.
Installation and configuration
Installing add-on
This add-on is composed of a single JAR file and can be installed directly from the Universal Plugin Manager (UPM).
If you manually downloaded the JAR file, follow these steps to install it:
- Log on to JIRA as an administrator
- Go to Administration > Add-ons
- Click Manage Add-ons
- Click Upload add-on
- Select the JAR file
- Click Upload to start the installation. When the installation is done, a confirmation message is displayed.
The add-on is not fully functional at this time. You must obtain and then activate a trial or commercial license in order to use it. See Activating the add-on license.
Activating the add-on license
In order to run this add-on you need a trial or a commercial license. You can purchase the Documents add-on on the Atlassian® Marketplace or through the Universal Plugin Manager (UPM). Once you obtained the license code, you must activate it.
Follow these steps to activate the add-on license:
- Log on to JIRA as an administrator
- Go to Administration > Add-ons
- Click Manage Add-ons
- Locate and expand the Documents add-on under User-installed Add-ons
- Enter the license code in the License key field
- Click Update. If your license is valid a confirmation message is displayed on top of the page.

Configuring the add-on settings
Follow these steps to configure the add-on settings:
- Log on to JIRA as an administrator
- Go to Administration > Documents
- Click Settings under DOCUMENTS ADD-ON CONFIGURATION
- On the Settings tab, change the settings to suit your preferences. See the table below for a complete description of the available settings.
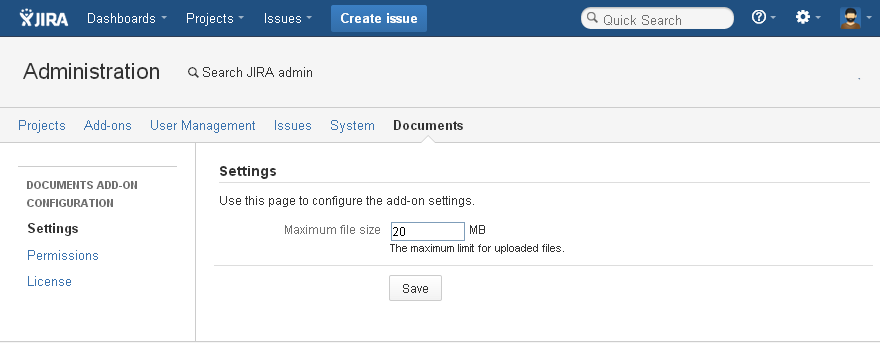
- Click Save to apply the changes.
The table below shows details about the available settings.
| Setting | Description |
|---|---|
| Maximum file size | The maximum size allowed for an uploaded file, in MB. The default value is 10 MB. JIRA administrators should keep in mind that the necessary amount of disk space is directly proportional to the number and size of files introduced into the system. |
Configuring the add-on permissions
You can restrict the access to the "Documents" tab or restrict specific privileges (create, edit, delete, move) regarding documents or folders through the add-on permissions configuration. Follow these steps to configure the add-on permissions:
- Log on to JIRA as an administrator
- Go to Administration > Documents
- Click Permissions under DOCUMENTS ADD-ON CONFIGURATION
- On the Permissions tab, check the actions that you want to allow for each project role. See the table below for a complete description of the available permissions.
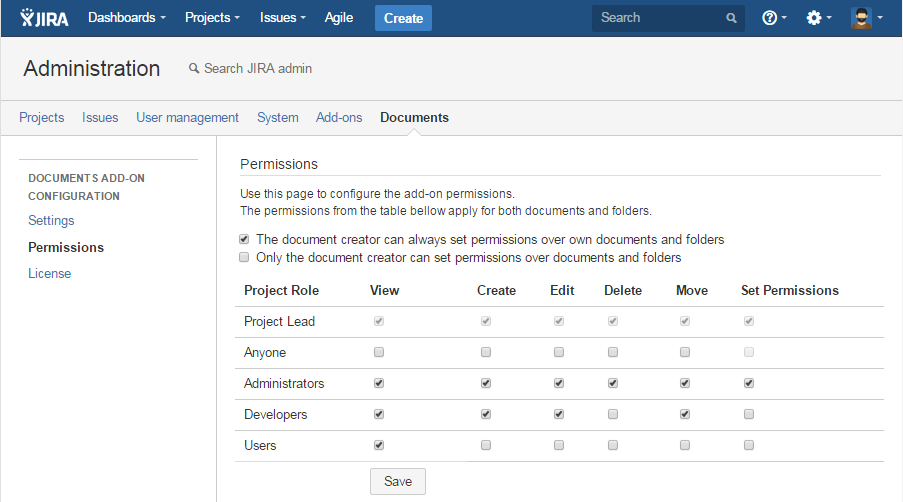
The table below shows details about the available permissions.
| Permission | Description |
|---|---|
| View | Check this option if you want the project role members to view and download the documents posted on the “Document” tab. The Documents tab will be hidden for the users that do not have this permission. |
| Create | Check this option if you want the project role members to be able to add documents and folders. The “Add Document” button will be hidden for the users that do not have this permission. |
| Edit | Check this option if you want the project role members to be able to edit documents and folders or to restore a previous version of a document. The “Edit” option will be hidden for the users that do not have this permission. |
| Delete | Check this option if you want the project role members to be able to delete documents and folders. The “Delete” option will be hidden for the users that do not have this permission. |
| Move | Check this option if you want the project role members to be able to move documents and folders to another folder. The “Move” option will be hidden for the users that do not have this permission. |
| Set Permissions | Check this option if you want the project role members to be able to restrict the access to specific documents and folders or to deny specific operations (View, Edit or Delete) for specific users or groups by setting permissions over individual documents and folders. See more about how users can set permissions over individual folders and documents here. The permissions set by the users over individual documents and folders are within the limits of the system-wide permissions that you set here. |
- If you want the document creator to be able to set permissions over his/her individual documents and folders regardless of his project role, check The document creator can always set permissions over own documents and folders.
- If you want only the document creator to be able to set permissions over documents and folders, then check Only the document creator can set permissions over documents and folders.
IMPORTANT When checking Only the document creator can set permissions over documents and folders, the settings from the Set Permissions column become obsolete being all uncheked automatically.
- Click Save to apply the changes.
NOTE If a JIRA user is member of a project role that has a specific permission but he/she is also member of another project role that does not have that permission, it is considered that the user in question has that permission.
NOTE "Anyone" includes any authenticated JIRA users; it does not include Anonymous. For security reasons, the access to the Documents tab is completely restricted for the not authenticated (Anonymous) users. Also, you cannot check "Set Permissions" for "Anyone".
NOTE The Project Lead has full priviledges and can perform all the actions on project's documents.
File storage
The files attached to the documents are stored in a newly created sub-folder named "documentsaddon" located in the JIRA attachments folder.
NOTE Do not delete or rename this folder!
Bulk documents upload and migration from another Document Management System
Documents Bulk Uploader
Documents Bulk Uploader is a Java application that allows importing files as documents in a bulk manner. With Documents Bulk Uploader you can upload the files located in a folder from your local drive (the "source folder") into a specified folder of a JIRA project (the "destination folder"). In the source folder you can have as many sub-folders as you want; the upload process will create a folder structure in Documents as the one from the specified source folder. The files are imported as documents of type File.
Documents Bulk Uploader can be used for day-by-day document import, but also when migrating from another document management system.
A list with the available versions of Documents Bulk Uploader along with the links to documentation can be found here.
Documents CLI Uploader
Documents CLI Uploader is a command line interface (CLI) Java application that allows uploading files into Documents add-on. You can use this CLI application to build your own tool for migrating documents from another document management system towards Documents.
A list with the available versions of Documents CLI Uploader along with the links to documentation can be found here.
Working with documents and folders
Accessing and viewing documents
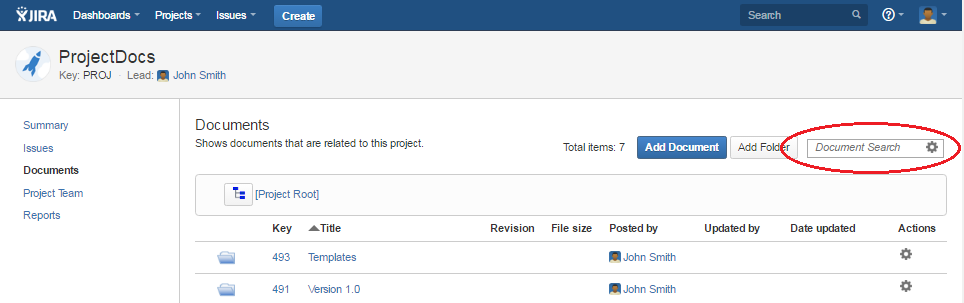
The documents of a JIRA project can be visualized on the Documents tab of that project. The project’s documents and folders are listed in a table, as shown in the picture below. To display the content of a folder, simply click the folder's icon or its name.
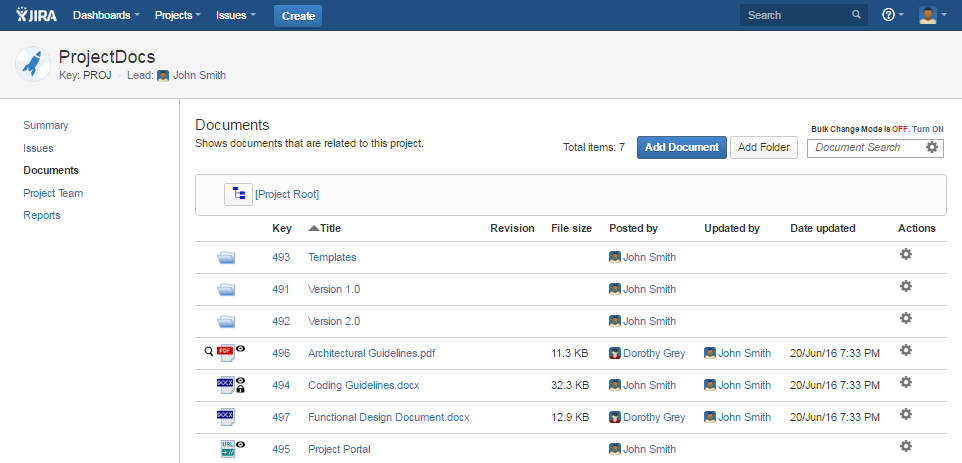
Note: The Documents tab is visible only if the current JIRA user has View permission.
The navigation bar displayed on top the Documents tab allows you to determine which folder is currently displayed. Also, it allows you to navigate to another folder by simply clicking the name of a folder.

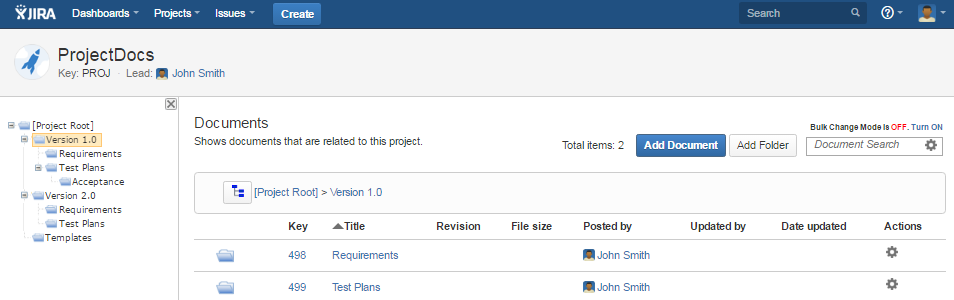
Clicking the tree icon from the navigation bar will display the Folders Navigation Pane in the left side of the page, which shows all the folders within the project in a tree structure. If you click a folder in the Folders Navigation Pane, the content of that folder is displayed in the Documents table.
The table below shows details about the columns of the documents table. You can sort the data from the Documents table by clicking a column header.
| Item | Description |
|---|---|
| Preview icon | Clicking the preview icon This icon is available only for PDF files or image files (JPG, JPEG, GIF, PNG and BMP). The icon is displayed only if the user has View permissions over the document. |
| Icon | Shows the icon of the document or folder. The add-on has its own icon set which contains icons for the common file extensions. Every File type document will have the icon specific to the extension of its attached file. If the extension is not in the icon set of the add-on, the default icon is displayed. The URL type document will always have the URL icon. By clicking the icon of a File type document the user will download the file attached to the document. On the other hand by clicking the icon of a URL type document the user will open the URL using the default browser of the system. By clicking the icon of a folder the page will display the content of that folder. |
| Icon indicators | The icon indicators are small icons displayed near the regular icon of the document that indicate specific states of the document. For example, if the document is locked for editing or not. In this version the following indicators are available: – indicates that you are a watcher of the document – indicates that you are a watcher of the document (black) – indicates that the document is locked for editing by you. A tooltip showing the locker, lock date and the lock message is displayed when hovering the mouse pointer over it. (black) – indicates that the document is locked for editing by you. A tooltip showing the locker, lock date and the lock message is displayed when hovering the mouse pointer over it. (gray) – indicates that the document is locked for editing by another user. A tooltip showing the locker, lock date and the lock message is displayed when hovering the mouse pointer over it. (gray) – indicates that the document is locked for editing by another user. A tooltip showing the locker, lock date and the lock message is displayed when hovering the mouse pointer over it. |
| Key | The key of the document or folder. It uniquely identifies the document within the JIRA system. It has numeric value and is automatically generated during document or folder creation. |
| Title | The title of the document or folder. If the title is too long it will not be entirely displayed. The title is fully displayed in the tooltip that is shown when hovering the mouse pointer over it. By clicking the title of a File type document the user will download the file attached to the document. If the user clicks the title of a URL type document, he will open the URL in the default browser of the system. By clicking the title of a folder the page will display the content of that folder. |
| Revision | Shows the value of the Current Revision attribute of the document. A tooltip is shown when hovering the mouse pointer over it. This tooltip displays a text that consists of the concatenation of the following document properties: Revision Date, Revision Author(s) and Revision Notes. It is always empty for folders. |
| File size | The size of the file attached to the document. This column only applies for File type documents. It is always empty for URL type documents or folders. |
| Posted by | Shows the JIRA user that posted the document or created the folder. |
| Updated by | Shows the JIRA user that made the latest update of the document or folder. It will be empty if the document or folder was never updated. |
| Date updated | Shows the date and time of the latest update of the document or folder. It will be empty if the document or folder has never been updated. The date is displayed in the format and time zone of the current JIRA user. |
| Actions | The actions available for each document or folder. Possible actions are: Download – use this action to download the file attached to the document. It is only available for File type documents if the current user has View permission. Open URL – use this action to open the URL of the document. It is only available for URL type documents if the current user has View permission. View – use this action to view document properties in a read-only page. It is available for both File and URL document types and also for folders if the current user has View permission. Edit – use this action to edit the document. It is available for both File and URL document types and also for folders if the current user has Edit permission. Delete – use this action to delete the document or folder. It is available for both File and URL document types and folders if the current user has Delete permission. Move – use this action to move a document or folder to another folder within the same JIRA project. It is available for both File and URL document types and also for folders if the current user has Move permission. Watch – use this action to start watching a document. It is available for both File and URL document types if the current user is not already a watcher of the document. Stop Watching – use this action to stop watching a document. It is available for both File and URL document types if the current user is already a watcher of the document. Previous Versions – use this action to access the previous versions of a document. It is available for both File and URL document types if the current user has View permission. Set Permissions – use this action if you want to limit the access to the document or to deny specific operations like Edit or Delete for specific users or groups. It is available for both File and URL document types and also for folders if the current user has Set Permissions rights. NOTE: The Project Lead can perform all the above actions on all the documents of the JIRA project. |
Searching documents
You can search for documents or folders by typing a text (and then pressing Enter) in the search box available on the Documents tab of the project.
Optionally, you can use the advanced search options to make the search operation more precise.
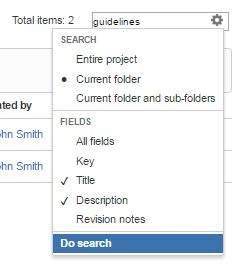
The search is text-based and covers the following properties of the documents: Key (document number), Title, Description, Current Revision, Current Revision Author(s), Current Revision Notes and the name of the attached file. Only the documents of the currently active JIRA project are included in the search.
NOTE: The search does not include the content of the attached files. The previous versions (version history) of the documents are also not included.
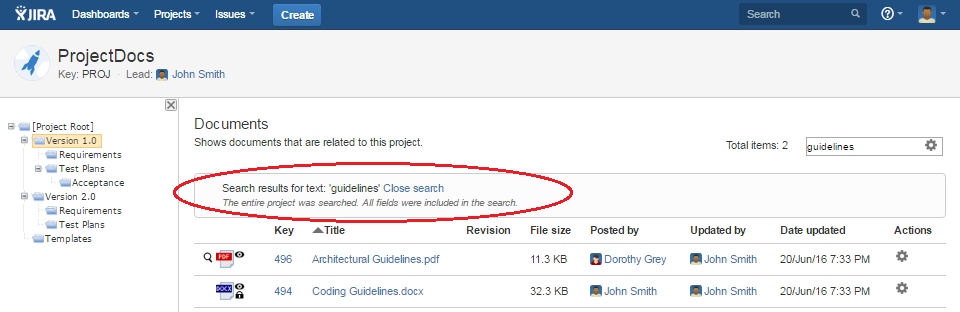
The search results are displayed on the Documents tab of the project.
Follow the next steps to search documents:
- In JIRA, go to Projects.
- Make sure you are on the right project.
- Click the Documents tab. You can also navigate to a folder belonging to that project.
- In the Document Search box, type the text or the document number that you want to search for and then press Enter. The search results are displayed on the page.
- Optionally, click the icon from the search input field and select the advanced search options. Press Enter or click Do search for the selection to take effect.
Adding a new document
Follow these steps to add (post) a new document:
- In JIRA, go to Projects.
- Make sure you are on the right project.
- Click the Documents tab and navigate to the folder where you want to add the document.
- Click the Add Document button. The Add Document page will open.
NOTE The Add Document button is available only if the user has Create permission.
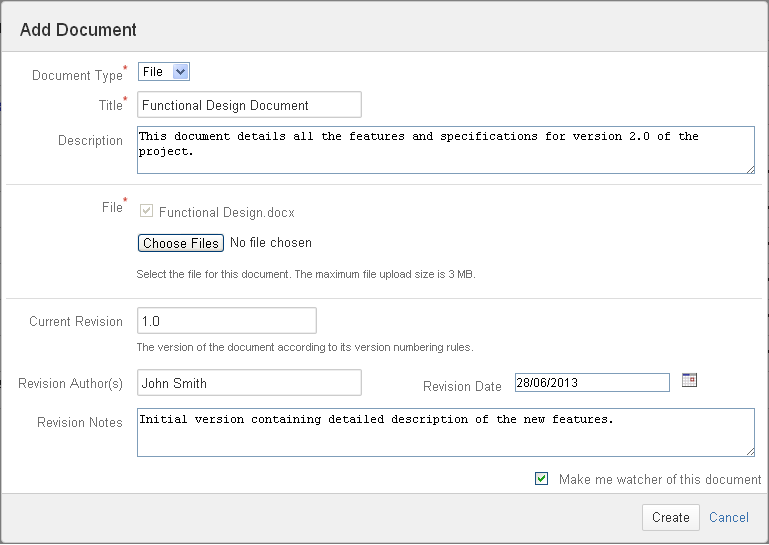
- Choose the Document Type for the document that you want to add:
File – choose this type if the document that you want to add is a file.
URL – choose this type if the document that you want to add is a link (URL) to a web page or to a document hosted by an external system accessible through web. Also, choose this in case you want to specify an FTP path.
NOTE Once the document was added, its type cannot be changed. - Enter a Title (or a name) for your document. This field is mandatory.
- Optionally, enter a short Description for the document.
- If you choose to add a File type document, you must attach a File. Use the Choose file button to upload the file. The file that you select cannot exceed the maximum file size configured by the JIRA administrator.
- If you choose to add an URL type document, you must specify the URL of the document.
The URL that you specify must include the protocol ("http://", "https://", "ftp://" or "file:").
NOTE From security reasons, most of the browsers do not allow opening links of type "file:". This means that you will not be able to open the file by clicking the links available on the Documents tab. Be aware of this limitation when using URLs of type "file:"!
- Optionally, if you use a version numbering for your documents, type the current version of the document in the Current Revision field. You can also specify additional info about the current version of the document:
Revision Date – the date when the version of the added document was created.
Revision Author(s) – the name of the person(s) who created the version of the added document.
Revision Notes – a short description of the changes made to the version of the added document. - Keep Make me watcher of this document checked if you want to become watcher of the document.
- Click Create. If all the required fields were properly completed, the document is added and displayed in the Documents table. A message with the result of this action will pop-up on top of the page.
Adding a new folder
Follow these steps to add a new folder:
- In JIRA, go to Projects.
- Make sure you are on the right project.
- Click the Documents tab and navigate to the folder where you want to create the folder.
- Click the Add Folder button. The Add Folder page will open.
NOTE The Add Folder button is available only if the user has Create permission.
- Enter a Title (or a name) for your folder. This field is mandatory.
- Optionally, enter a short Description for the folder.
- Click Create. If all the required fields were properly completed, the folder is added and displayed in the Documents table. A message with the result of this action will pop-up on top of the page.
Editing a document or folder
Follow these steps to edit a document:
- In JIRA, go to Projects
- Make sure you are on the right project
- Click the Documents tab
- Locate the document that you want to edit and click on its Edit link under the Actions menu. The Edit Document page will open.
NOTE The Edit action is available only if the user has Edit permission. - Make the necessary changes and click Save. A message with the result of this action will pop-up on top of the page.
NOTE With the Documents add-on you can only edit the properties of your document and not the content of the file attached to the document. If you want to modify the content of the file attached to a document, you have to first download it locally on your computer, make the necessary changes locally and then attach the new file to the document.
Deleting a document of folder
Follow these steps to delete a document or folder:
- In JIRA, go to Projects.
- Make sure you are on the right project.
- Click the Documents tab.
- Locate the document that you want to delete and click on its Delete link under the Actions menu.
NOTE The Delete action is available only if the user has Delete permission. - You will be asked if you really want to delete the document. If you are sure that you want to delete the document, click OK. A message with the result of this action will pop-up on top of the page.
NOTE The document is permanently deleted along with its version history; you cannot restore it after deletion.
Deleting multiple documents and folders at once
Follow these steps if you want to delete multiple documents and folders at once:
- In JIRA, go to Projects.
- Click the Documents tab.
- Make sure you are on the right project.
- Open the folder that contains the items that you want to delete
- Turn On the Bulk Change Mode from top-right corner
- Select the documents and folders that you want to delete and then click Bulk Delete
- In the confirmation window, click Delete if you really want to delete the selected items.
NOTE: The delete operation cannot be undone.
Moving a document or folder
Follow these steps to move a document or folder to another folder:
- In JIRA, go to Projects.
- Click the Documents tab.
- Make sure you are on the right project.
- Locate the document that you want to move and click on its Move link under the Actions menu.
NOTE The Move action is available only if the user has Move permission. - In the Move window, select the destination folder in the folders tree hierarchy.

- Click Move. A message with the result of this action will pop-up on top of the page.
NOTE: You can move documents only to folders of the same JIRA project.
Moving multiple documents and folders at once
Follow these steps if you want to move multiple documents and folders at once:
- In JIRA, go to Projects.
- Click the Documents tab.
- Make sure you are on the right project.
- Open the folder that contains the items that you want to move
- Turn On the Bulk Change Mode from top-right corner
- Select the documents and folders that you want to move and then click Bulk Move
- In the Move window, select the destination folder in the folders tree hierarchy.
- Click Move. A message with the results of this action will pop-up.
NOTE: You can move folders only to folders of the same JIRA project.
Locking/Unlocking Editing
While working on a new version of a document you might want to prevent the other users to edit that document until you finish working and publishing the new version. You can do this by using the Lock Editing menu-option, which is available in the actions menu of the document. When locking the document for editing you can leave a message that will be displayed to the other users each time they attempt to edit the document. After finishing the work on that document and publishing a new version you can unlock the document's editing by clicking the Unlock Editing menu-option or directly from the Edit Document screen. A document can be locked by any user that has Edit permissions. The unlocking of a document can either be done by the user that locked the document or by the Project Lead.
Lock editing for a document
Follow these steps to lock editing for a document:
- In JIRA, go to Projects
- Make sure you are on the right project
- Click the Documents tab
- Locate the document that you want to lock editing for and click on its Lock Editing link under the Actions menu.
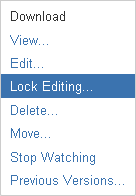
The Lock Editing page will open.
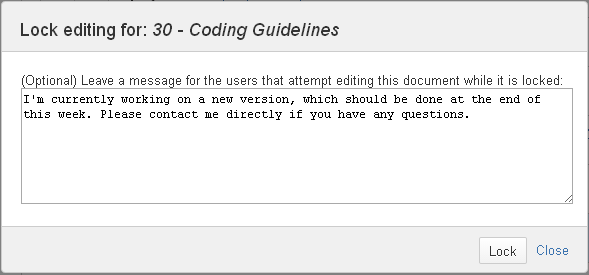
NOTE The Lock Editing menu-option is available only if the user has Edit permissions. - Optionally, you can leave a message that will be displayed to the other users each time they attempt to edit the locked document.
- Click Save. A message with the result of this action will pop-up on top of the page.
The documents that are locked for editing have the "lock indicator" displayed near their icon:

Unlock editing for a document
Editing can be unlocked only by the user that locked the editing for that document or by the Project Lead.
Follow these steps to unlock editing for a document:
- In JIRA, go to Projects
- Make sure you are on the right project
- Click the Documents tab
- Locate the document that you want to unlock editing for and click on its Unlock Editing link under the Actions menu.
- A message with the result of this action will pop-up on top of the page.
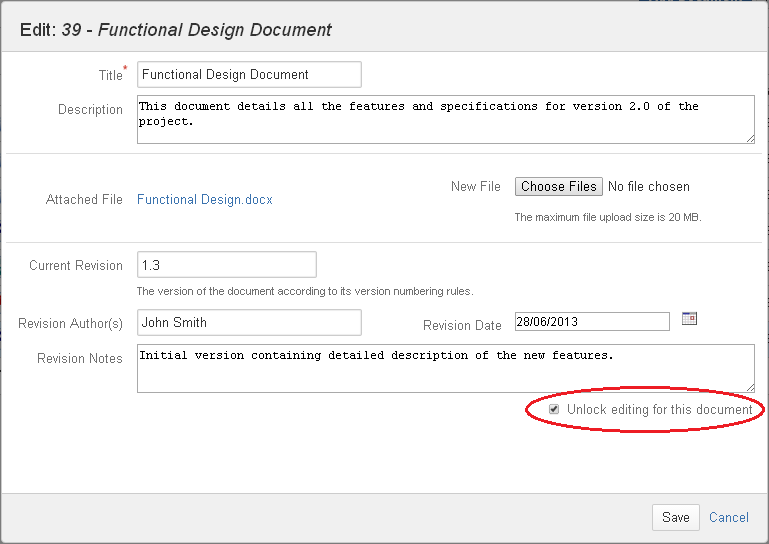
You can also unlock editing for a document directly from the Edit screen, by checking the option Unlock editing for this document.
Watching documents
You can choose to watch a particular document, signing up for email notifications of any updates relating to that document. As a watcher of a document, you will be notified each time one of the following events occur:
- The document was updated
- The document was deleted
- Someone stopped or started watching the document
- A previous version of the document was restored
- The document was moved to another folder
The format (HTML or Text) of the notification email is the one from the watcher's JIRA user profile, configured under Email Type field. The My changes option from the watcher's JIRA user profile is also considered when notifying the watchers.
The watching options are only available for documents; watching a folder is not possible.
NOTE Emails are sent to watchers only if JIRA is properly configured to send email notifications.
The documents watched by you have the "watch indicator" displayed near their icon:

Start watching a document
Follow these steps to start watching a document:
- In JIRA, go to Projects.
- Make sure you are on the right project.
- Click the Documents tab.
- Locate the document that you want to watch and click on its Watch link under the Actions menu. A message with the result of this action will pop-up on top of the page.
NOTE If the Watch menu-option is not present, it means that you are already a watcher of that document.
Stop watching a document
Follow these steps to stop watching a document:
- In JIRA, go to Projects.
- Make sure you are on the right project.
- Click the Documents tab.
- Locate the document that you want to watch and click on its Stop watching link under the Actions menu. A message with the result of this action will pop-up on top of the page.
NOTE If the Stop watching menu-option is not present, it means that you are not a watcher of that document.
Linking and referencing documents in JIRA issues
Linking documents to JIRA issues
You can link documents or folders to JIRA issues by using the Link action of a JIRA issue.
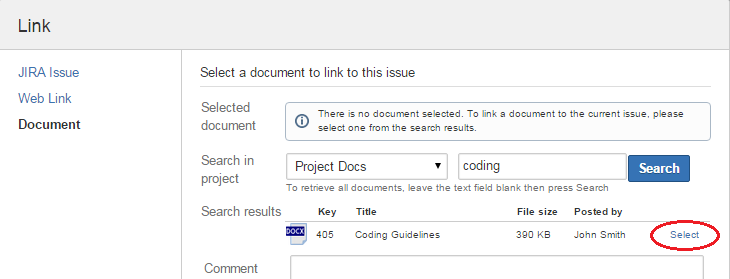
Follow these steps to link a document or folder to a JIRA issue:
- Open the JIRA issue that you want to link the document to.
- Select More > Link to display the Link dialog box.
- Click the Document option from the left of the dialog box.
- Search for the document that you want to link. If you want to link a document from a project other than the current JIRA project, select that project in the dropdown list near the search box.
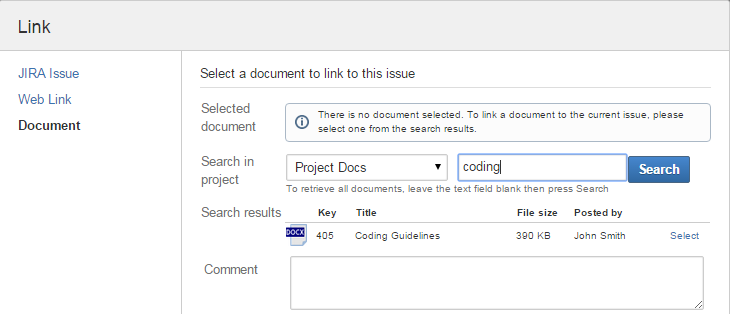
NOTE The dropdown list contains only the projects for which the current user has view permissions. - In the search results table click the Select link from the row of the document that you want to link
- Optionally add a Comment to describe why you are linking the document.
- Click the Link button from the bottom of the dialog.
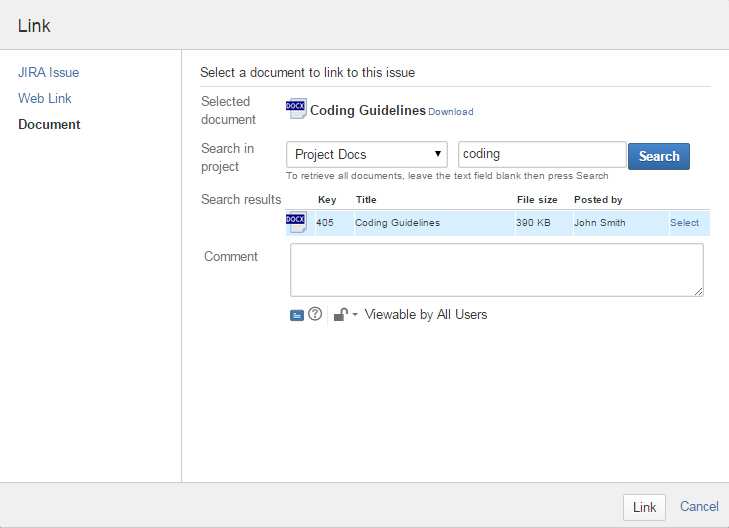
- The document you just linked is now listed under the Links section of the JIRA issue.

Viewing the JIRA issues linked to a document
To view the JIRA issues that are linked to a specific document:
- In JIRA, go to Projects.
- Make sure you are on the right project.
- Click the Documents tab.
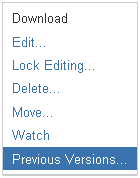
- Locate the document and click on its Linked Issues... link under the Actions menu. The JIRA issues that are linked to the document will be displayed.
Referencing documents in JIRA issues
You can add references to documents or folders in the JIRA fields that use the Wiki Style Renderer. Examples of such fields are the Description field of a JIRA issue or the comments of a JIRA issue. This can be done via the {doc-key} macro.
For example, if the Key of your document is 30 (the Key of the document can be visualized in the Documents tab of the JIRA project), you can add a reference to that document by entering the following text in the JIRA field: {doc-key}30{doc-key}
A comment like this...

... will be displayed like this...

The text displayed by the macro depends of the type of the document represented by the specified key.
- If the key represents a document of type File, the macro displays the Title of the document as a link that allows downloading the newest file attached to the document.
- If the key represents a document of type URL, the macro displays the Title of the document as a link that opens the URL associated with the document.
- If the key represents a folder, the macro displays the Name of the folder as a link that displays the folder's content.
- If the key is invalid or an error occurs, the macro displays an error message in red text.
NOTE The macro works only for the JIRA fields that are configured to use the Wiki Style Renderer.
Version history
When a document is updated (for example, its associated file or properties are changed), its internal version is incremented and the data of the previous version is saved in a version history table.
You can visualize the previous versions of a document at any time or you can download the file that corresponds to an older version of the document. Also, if you have Edit permissions, you can restore one of the previous version of a document.
By restoring a version, a new version is created with the data from the version that you chose to restore.
NOTE Version history only applies to documents; folders do not have internal versioning.
Viewing the previous versions of a document
Follow these steps to view the previous versions of a document:
- In JIRA, go to Projects.
- Make sure you are on the right project.
- Click the Documents tab.
- Locate the document and click on its Previous Versions link under the Actions menu.
The Previous versions for... window will be displayed showing the list with the previous versions of the document in the left side and data of the selected version in the right side (see the picture below).
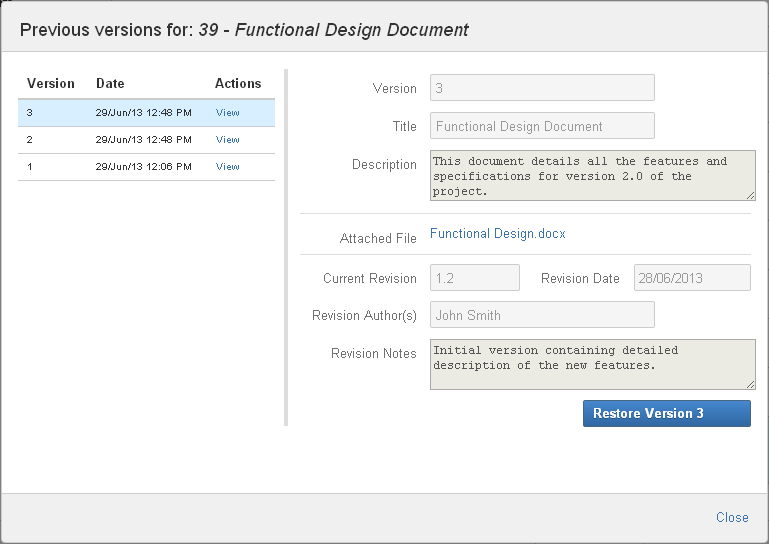
NOTE If the document has no previous versions a message will be displayed on this matter.
- In the list with the versions from the left side, click View to select a version and visualize its data in the right side of the window.
- In case of a File type document you can download the file associated with the selected previous version by clicking the link with the name of the file.
Restoring a previous version of a document
Follow these steps to restore a previous version of a document:
- In JIRA, go to Projects.
- Make sure you are on the right project.
- Click the Documents tab.
- Locate the document and click on its Previous Versions link under the Actions menu.
The Previous versions for... window will be displayed showing the list with the previous versions of the document in the left side and data of the selected version in the right side.
NOTE If the document has no previous versions a message will be displayed on this matter. - In the list with the versions from the left side, click View to select a version and visualize its data in the left side of the window.
- After selecting the version that you want to restore, click the Restore Version button. A message with the result of this action will pop-up on top of the page.
NOTE The Restore Version button is not visible if the user does not have Edit permissions or if the document is locked for editing by another user.
Setting permissions over individual folders and documents
You can limit the access to your documents to a specific list users or groups. Also you can deny specific users or groups to perform certain actions like Edit or Delete on your documents.
NOTE A user must have "Set Permissions" privileges granted by the JIRA admin in order to use this functionality. Also the permissions set by the users on specific documents and folders are within the limit of global permissions set by the JIRA admin in Permissions page from the add-ons settings under admin area. For example, if someone sets the View permission on Allow for a specific user account, that user will still not have the View permission if the account does not belong to a role for which the JIRA Admin granted View access at the global level.
Follow these steps to set permissions over a folder or document:
- In JIRA, go to Projects.
- Click the Documents tab.
- Make sure you are on the right project.
- Locate the folder or document that you want to set permissions for and click on its Set Permissions link under the Actions menu.
NOTE The Set Permissions action is available only if the user has Set Permissions privileges.
- Check the Include permissions from parent folder if you want this document to inherit the permissions from its parent folder.
NOTE The permissions inherited from the parent folder are displayed in italic format.
- In the Set Permissions window, check if the user or group that you want to set permissions for appears in the table. If not, add it to the table by selecting it and clicking Add.
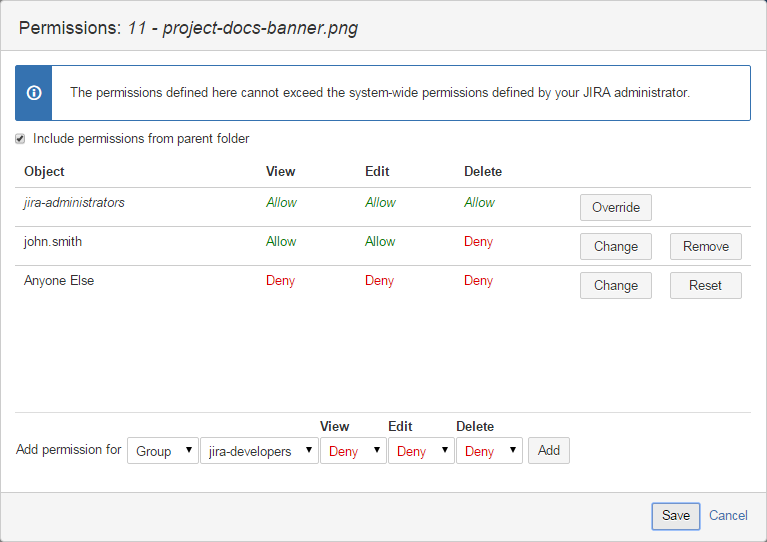
- Once the object (user or group) is listed in the table, click its corresponding Change button. For the objects inherited from parent folder, click their Override button.
- Set the permissions for View, Edit and Delete as you want, then click Apply
- To remove a user or group from the table, click its corresponding Remove button
- Also, make sure to set permissions for Anyone Else as you want.
NOTE The Project Lead and possibly other users granted by the JIRA Admin can access and modify the permissions set here.
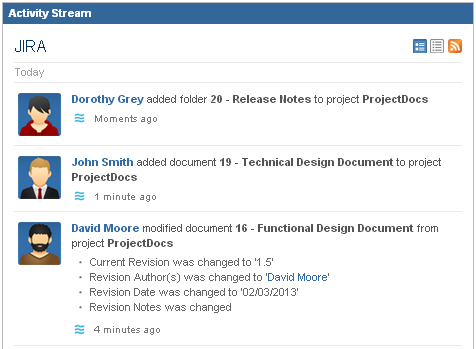
Activity Stream posting
A summary of the actions performed on documents is posted and can be visualized in the Activity Stream gadget. A description showing the modified fields of the document is displayed in case of document update operations.
Activity Stream is updated each time one of the following events occur:
- A document or folder was created
- A document or folder was updated
- A document or folder was deleted
- Someone stopped or started watching a document
- A previous version of a document was restored
- A document or folder was moved to another folder
The title of the posted activity references the document by <Key> - <Title>. Only the first 40 characters of the Title are displayed.
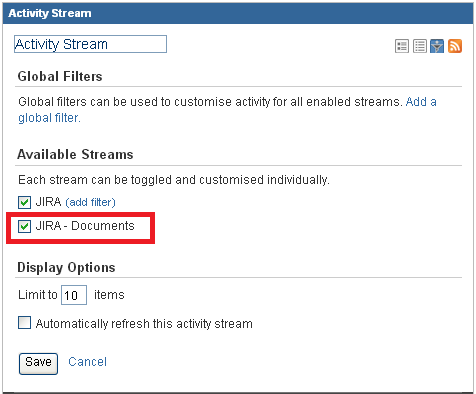
On some versions of JIRA you can configure the Activity Stream gadget to show only the activities related to Documents by selecting "JIRA - Documents" as a filter.
Using the Documents gadgets
New and Recently Updated Documents gadget
With this gadget you can display in your JIRA dashboards the documents that were recently created or updated. How recently? It depends on the number of days that you specify in the gadget's configuration settings. The documents that were created in the period displayed by the gadget are marked as  . Only the documents of type File or URL are displayed; folders are never displayed.
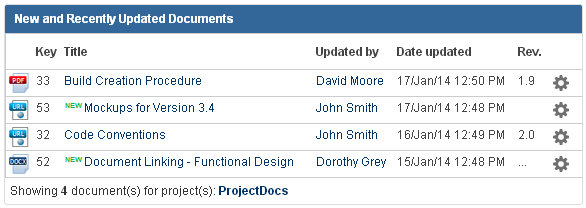
NOTE The current JIRA user must have permissions for browsing the project and View permissions in Documents in order to visualize the documents displayed by the gadget.
Follow these steps to add the gadget to a JIRA dashboard:
- Log in to JIRA or navigate to your dashboard, if you are already logged in.
- Click the Add Gadget link in the top right. The Gadget Directory screen will be displayed.
- Find the New and Recently Updated Documents gadget in the list of gadgets and click Add it Now.
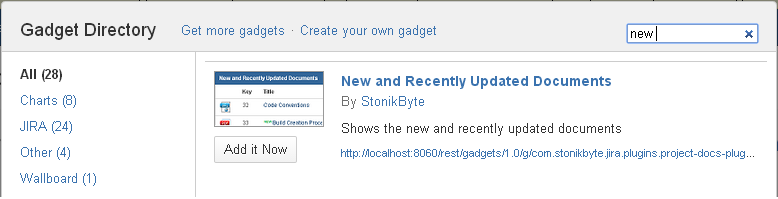
- Click the Close button in the bottom right.
- The New and Recently Updated Documents gadget will be displayed on your dashboard. Enter the following setup details for your gadget:
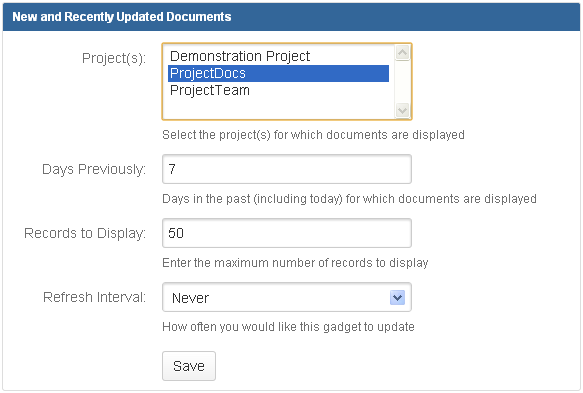
| Item | Description |
|---|---|
| Project(s) | The JIRA project(s) for which documents are to be displayed. You can select one or more projects. Only the projects on which the current user has Browse permission and View permission are listed. |
| Days Previously | Days in the past (including today) for which documents are displayed. |
| Records to Display | The maximum number of documents to be displayed. |
| Refresh Interval | Indicates how often the data in the gadget will refresh. |
- Click the Save button. The gadget will be displayed on your dashboard.
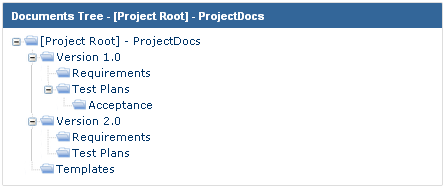
The Documents Tree gadget
This gadget displays the folders structure of a project or of a specified folder in a tree view. You could use this gadget in your personal dashboards or in the team dashboards in order to facilitate the easier access to the project documentation. Clicking a folder in the tree view of the gadget will redirect you to the Documents tab of the project dashboard showing the content of that folder. Using this gadget you can display the folders tree structure in Confluence pages.
NOTE The current JIRA user must have permissions for browsing the project and View permissions in Documents in order to visualize the folders displayed by the gadget.
Follow these steps to add the gadget to a JIRA dashboard:
- Log in to JIRA or navigate to your dashboard, if you are already logged in.
- Click the Add Gadget link in the top right. The Gadget Directory screen will be displayed.
- Find the Documents Tree gadget in the list of gadgets and click Add it Now.
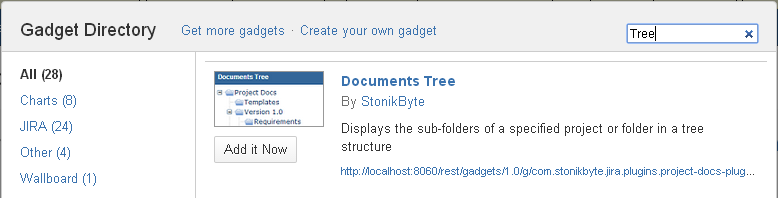
- Click the Close button in the bottom right.
- The Documents Tree gadget will be displayed on your dashboard. Enter the following setup details for your gadget:
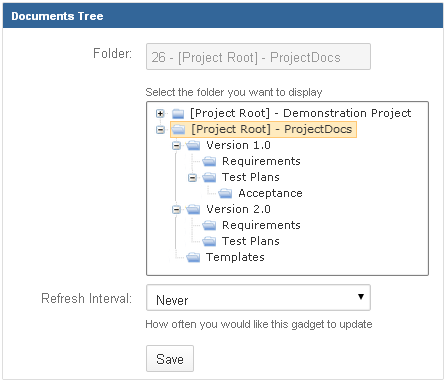
| Item | Description |
|---|---|
| Folder | The folder for which tree folder structure is to be displayed. You can select one or more folders. Only the folder from projects on which the current user has Browse permission and View permission are listed. |
| Refresh Interval | Indicates how often the data in the gadget will refresh. |
- Click the Save button. The gadget will be displayed on your dashboard.
Documents REST API
Searching and retrieving documents by title
You can search and retrieve documents by their title by sending a GET HTTP request to the JIRA instance running this version of Documents add-on. A set of attributes of the matching documents are returned in JSON format.
Request URL
The request URL takes the following form:
http:/ /MY_JIRA_BASE_URL/plugins/servlet/stonikbyte/projectdocs/search-doc-titles?query=QUERY&projectKey=PROJECT_KEY
Replace "http:/ /MY_JIRA_BASE_URL" with the base URL of your JIRA server.
Parameters
You have to specify the following parameters:
| Parameter | Description |
|---|---|
| query | Represents the search criteria. All documents containing this value will be retrieved. Search is not key sensitive. Leave it blank to retrieve all documents. The parameter has to be URL encoded. |
| projectKey | The key of the project you want to search into. |
An example of the request URL with parameters is as follows:
http:/ /myjiraserver:2990/jira/plugins/servlet/stonikbyte/projectdocs/search-doc-titles?query=plan&projectKey=DEMO
In this example all the documents of project DEMO containing “plan” in their title are returned.
A successful response
An HTTP 200 status response indicates a successful request. The following data about the matching documents is returned:
| Data | Description | Example |
|---|---|---|
| key | The Key (unique identifier) of the document | 11 |
| title | The Title of the document | Project Plan |
| type | The type of the document. Possible values are: 1 - Folder; 2 - File; 3 - URL | 1 |
| icon | The filename representing the document's icon. You can retrieve the icon by appending the file name to the following URL http:/ /MY_JIRA_BASE_URL/download/resources/com.stonikbyte.jira.plugins.project-docs-plugin/images/mime-types/ Example: http:/ /myjiraserver:2990/jira/download/resources/com.stonikbyte.jira.plugins.project-docs-plugin/images/mime-types/pdf24.png | pdf24.png |
Error Response
If the REST call fails, the service returns one of the following HTTP statuses:
| HTTP Status Code | Description |
|---|---|
| 401 Unauthorized | Returned for unauthenticated requests or missing View permissions. |
| 412 Precondition failed | Returned if one or more of the mandatory parameters are missing or if the license of the Documents add-on is expired. |
Searching and retrieving documents by using advanced search options
You can search and retrieve documents by specifying the scope of the search and field(s) to be search by sending a GET HTTP request to the JIRA instance running this version of Documents add-on. A set of attributes of the matching documents are returned in JSON format.
Request URL
The request URL takes the following form:
http:/ /MY_JIRA_BASE_URL/plugins/servlet/stonikbyte/projectdocs/search-docs?query=QUERY&projectKey=PROJECT_KEY&fields=FIELDS&folderID=FOLDER&scope=SCOPE
Replace "http:/ /MY_JIRA_BASE_URL" with the base URL of your JIRA server.
Parameters
You have to specify the following parameters:
| Parameter | Description |
|---|---|
| query | Represents the search criteria. All documents containing this value will be retrieved. Search is not key sensitive. Leave it blank to retrieve all documents. The parameter has to be URL encoded. |
| projectKey | The key of the project that you want to search into. |
| fields | The field(s) to be used for search. It can be either "all" which will include most of the data fields associated with a document or one or more of the following values: "key","title", "description", "revision". The items in the list can be separated with comma. |
| folderID | The key of the folder to be searched. See "scope" parameter for more info. This parameter will be used only if the scope parameter has one of the following values: "folderAndSubFolders" or "folder" |
| scope | The scope of the search. By default the scope is the entire project. This parameter can have one of the following values: - "folderAndSubFolders" - the search will be restricted to the folder with the key specified through the "folderID" parameter and all its sub-folders - "folder" - the search result will include only documents from the folder with key specified through the "folderID" parameter If the "folderID" parameter is not provided, then the scope parameter is ignored and the entire project is searched. |
An example of the request URL with parameters is as follows:
http:/ /myjiraserver:2990/jira/plugins/servlet/stonikbyte/projectdocs/search-docs?query=chart&projectKey=DEMO&fields=title,description&folderID=1&scope=folderAndSubFolders
In this example all the documents from the folder with key 1 (that belongs to project DEMO) and its sub-folders that cotains “chart” in their Title or Description are returned.
A successful response
An HTTP 200 status response indicates a successful request. The following data about the matching documents is returned:
| Data | Description | Example |
|---|---|---|
| key | The Key (unique identifier) of the document | 11 |
| title | The Title of the document | Project Plan |
| type | The type of the document. Possible values are: 1 - Folder; 2 - File; 3 - URL | 1 |
| icon | The filename representing the document's icon. You can retrieve the icon by appending the file name to the following URL http:/ /MY_JIRA_BASE_URL/download/resources/com.stonikbyte.jira.plugins.project-docs-plugin/images/mime-types/ Example: http:/ /myjiraserver:2990/jira/download/resources/com.stonikbyte.jira.plugins.project-docs-plugin/images/mime-types/pdf24.png | pdf24.png |
Error Response
If the REST call fails, the service returns one of the following HTTP statuses:
| HTTP Status Code | Description |
|---|---|
| 401 Unauthorized | Returned for unauthenticated requests or missing View permissions. |
| 412 Precondition failed | Returned if one or more of the mandatory parameters are missing or if the license of the Documents add-on is expired. |
Retrieving document metadata
You can obtain the metadata (title, description, type, etc) of a document by sending a specific HTTP GET request to the JIRA instance running this version of Documents add-on. The result is returned in JSON format.
Request URL
The request URL takes the following form:
http:/ /MY_JIRA_BASE_URL/plugins/servlet/stonikbyte/projectdocs/get-document-metadata?documentKey=X
Replace "http:/ /MY_JIRA_BASE_URL" with the base URL of your JIRA server.
Parameters
You have to specify the following parameters:
| Parameter | Description |
|---|---|
| documentKey | Represents the key (unique identifier) of the document. All documents containing this value will be retrieved. Search is not key sensitive. Leave it blank to retrieve all documents. The parameter has to be URL encoded. |
An example of the request URL with parameters is as follows:
http:/ /myjiraserver:2990/jira/plugins/servlet/stonikbyte/projectdocs/get-document-metadata?documentKey=31
In this example the metadata of document with key 31 is returned.
A successful response
An HTTP 200 status response indicates a successful request. The following data about the matching documents is returned:
| Data | Description | Example |
|---|---|---|
| id | The key (unique identifier) of the document | 31 |
| type | The type of the document. Possible values are: 1 - Folder; 2 - File; 3 - URL | 1 |
| parentType | The type of the document's parent. Possible values are: 0 - JIRA Project; 1 - Folder | 1 |
| title | The Title of the document | Project Plan |
| jiraProjectID | The ID of the JIRA project the documents belong to. | 1000 |
| originalFileName | The name of the attached file. | ProjectPlan.pptx |
| originalFileExtension | The extension of the attached file. | pptx |
| target | The internal name of the attached file for a document of type File or the target URL in case of a document of type URL | 8506976070117992219 or www.stonikbyte.com |
| jiraProjectID | The ID of the JIRA project the documents belong to. | 1000 |
| title | The description of the document | text |
| addedbyUserKey | The key of the user who added the document | admin |
| addedByUserDirectoryId | The directory ID of the user who added the document | 1 |
| dateAdded | The date when the document was added (UTC Time) | 12/09/2014 21:27:12 |
| currentRevisionDescription | The Current Revision Description of the document | text |
| currentRevision | The Current Revision of the document | text |
| currentRevisionAuthor | The Current Revision Author of the document | text |
| internalVersion | The current version of the document | 2 |
| fileSize | The size of the attached file in bytes | 34696 |
Error Response
If the REST call fails, the service returns one of the following HTTP statuses:
| HTTP Status Code | Description |
|---|---|
| 401 Unauthorized | Returned for unauthenticated requests or missing View permissions. |
| 412 Precondition failed | Returned if the document key parameter was not specified or if the license of the Documents add-on is invalid. |
Updated