

Better vector shape handling in masks
Issue #57
resolved
It would be really nice to have more complex vector shapes, like using polygons and curves for the Area masks. To do that, I think that ART should use a more generic algorithm to handle even the actual Rectangle/Ellipse shape by decimating that shape in a polyline (like I did with FlatCurveEditor, for example), then add a fillPoly function to fill it properly.
There’s some filling algorithm around, I’ve found one that could probably be used without much effort from Blender :
This proposal is about :
- using a standard
polyFillfunction to fill the shape + decimating the rectangle shape into a polyline - then adding a more versatile Polygonal shape, that could take any shape/curve
For the curve model, using pure Bézier curves of degree 3 can be cumbersom to use, but that’s still an option (you can see how it works in any vector graphics software, like Inkscape).
My curve model for the polygon handling is shown in art03.png. It is made of successive Bézier curves of degree 2, with addition of line where necessary. For example, straight corner (roundness = 0.0) are straight lines for the corner, and there are straight lines as well at the beginning and at the end of the corner where roundness = 0.5. The advantage of this is that it can be used internally to represent the existing Rectangle shape, w/o being retro-compatible though (not the same shape than the clipped version). Converting Rectangles to Polygons would be easy (but there would be no return)
Please let me know if that makes sense.
Comments (25)
-
repo owner
-
reporter
- attached Mockup.png
-
reporter
No problem to look at the rectangle shape later on, if ever.
I’ve attached a mockup which shows a polygon with a hovered spot. If you click on the spot, a menu will appear to let you adjust the Roundness through an on preview slider.
You decided to add sliders for the Spot’s location while I don’t think they were necessary. If we have to add sliders on the right panel, users will have to cross the screen at each adjustment, and will rapidly become annoying IMHO.
[EDIT]
I forgot to mention that users will ctrl-click on the preview to add a new closed polygon. However if the number of points it less than 3, the shape will still appear in the list but is considered invalid (you can’t have a surface with only 1 or 1 points) and will be skipped by the algorithm. This kind of invalid polygon can be represent in a different color, so the user understand that it’s not usable as is.
Deleting point can be done by hovering + right clicking on a point. You can add a point inside an existing segment by ctrl-clicking on that segment.
Ctrl-clicking “outside” of any polygon will add a new polygon shape entry in the list, like for Spot entries.
-
repo owner
well, a picture is worth more than a thousand words
 I like your mock-up (and also your description). I'd say go ahead!
quick question: are you planning to also have the possibility to move the entire polygon? (not sure yet if this will be that useful though)
-
reporter
I didn’t thought about it, but yes it can be done.
-
reporter
@agriggio So how should I proceed? I’ll create a new branch in my fork, but how will I be able to produce a PR in your repo ?
-
repo owner
There is a “Pull requests” entry in BitBucket’s sidebar that should allow you to do that. If not, you just let me know when the branch is done and I can have a look even without going through Bitbucket (I’m probably not going to use the web interface anyway…)
-
reporter
Ok, I’ll post here whenever something usable is ready.
-
reporter
@agriggio So you’re fine with not having sliders for coordinate and Roundness value in the EditorPanel ?
-
reporter
@agriggio Hi, just some status report, I’ve added a screenshot, and it’s not a mockup. I still have to implement point creation (this shape has been added manually to the arp file.

-
repo owner
looks really cool!
-
reporter
Hi @agriggio , I hope you don’t mind : https://discuss.pixls.us/t/unleashing-the-power-of-shapes/18064 , but I’m so happy to have finished this feature.
You can test it with my local repo,
polygon-areabranch : https://bitbucket.org/Hombre57/art/src/polygon-area/Writing the documentation now..
-
repo owner
I don’t mind at all!
I’ll try testing it tomorrow or during the weekend.
Just to make sure: do you consider this ready to be merged, or are you looking for preliminary feedback? anything in particular that I need to pay attention to?
-
repo owner
Oh, and I forgot: thanks a lot for this!
-
reporter
@agriggio
(for dummies documentation here)
Here is a step-by-step tutorial:
[B1] = Left mouse button
[B3] = Right mouse button
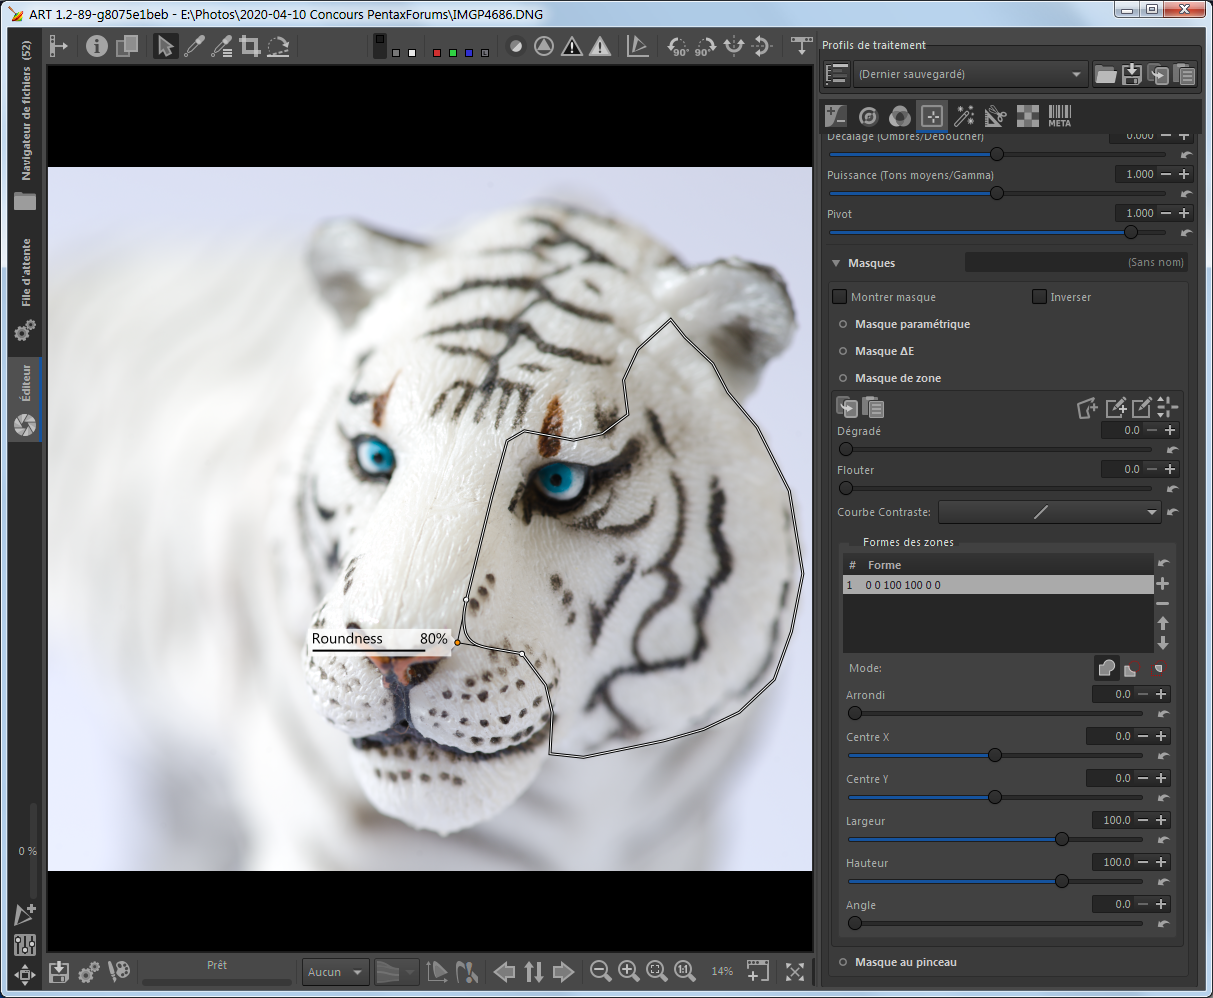
- Create a new polygon shape by clicking on the "Add Polygon" button. This will enable the on preview editing to let you create the shape.
- Ctrl + Click[B1] in the preview to create the first point. At this point, you can already drag it if you want. The shape list will display the number of point in the shape.
- Ctrl + Click[B1] to create the second point. Now you see the first line of the cage, represented as a dashed line, but still no closed polygon, because you need at least three points to have a valid, closed shape. An orange line appears, explanation in the next step.
- Ctrl + Click[B1] to create the third point. Now you see the polygon with a white solid line, surrounded by a black solid line. This is the real shape that will limit the effect of the tool. The orange line has also moved. This line is the "Insertion line", and by default, connects the last point of the cage to its first point (it's the closing segment). The 2 points at each end of the orange line shows the extremities of the Insertion line.
- Move your cursor away from the shape, and Ctrl + Click[B1] to add a point. The new point is taking place inside the Insertion line, i.e. at the end of the points list.
- Move over a segment of the polygon : the Insertion line is now under the cursor, which mean that point creation will take place there, between those new previous and next point.
- Stay over the segment and Ctrl + Drag[B1] : the new point is created where the insertion line was. Of course, once the point is created, you can release the Ctrl key while still dragging the point. For your convenience, the points and the insertion line are hidden during the adjustment.
- Move the cursor over a point. Hints : you may need to move over a segment first to make the extremity points appear. Once your mouse is over a point, this point becomes orange (the orange element is the selected element). The two other points shows now the previous and next points.
- You can drag the point to adjust it
- While still over the point, use Shift + Drag[B1] to the right. This will let you adjust the roundness of that corner. When dragging to the left, it will go back to a sharp corner. Each point can be rounded. As you can see, if you go all the way right, the curve start at the previous point and end at the next point.
- Repeat this step on the previous point, set the roundness to the maximum. Now you can see that, because the previous point is still to it's minimum value, the curve start straight to this previous point. However both the currently edited point and the previously edited point has maximum roundness. In this case, the connection of the curve to the cage segment is done in the middle of the dashed segment. But with different roundness values, it can end up anywhere inside this segment. Changing the roundness value have an impact in the previous and next sub-curve, and it can look awkward at first sight, but there's some tips to make thing easy.
- You can move over a segment and Drag[B1] to move it
- You can move over a segment and Shift + Drag[B1] to move the entire shape
- The polygon shape should still be selected in the Shape list, so click on the
+icon on the right. This button will create a shape of similar type to the one actually selected. Make sure that the On preview editing button is still active (it should be) - Now add 4 points in this new shape to create a big square BUT you'll press Shift + Ctrl + Click[B1] to create the points. This will create points with roundness value to the maximum, and you'll end up with something more like a circle than a square. Each roundness value can still be edited.
- Move over a point and Ctrl + [B3] to delete a point. ART won't delete the 3 last points. If you want to delete a shape entirely, you'll have to do that through the Shape list (
-button).
Now the tip to create predictable shapes
It's very simple : just alternatively create points with sharp corners (roundness = 0, by using the Ctrl modifier key at creation time) and points with totally round corners (roundness = 100, by using the Ctrl + Shift modifier key at creation time). You end up with a series of Bezier curves of degree 3. The sharp points should be located on the border you want to draw, and the round points are used to control the curvature, so it won't usually be on the border.
-
reporter
@agriggio
Just to make sure: do you consider this ready to be merged, or are you looking for preliminary feedback? anything in particular that I need to pay attention to?
For me it’s ready to be merged, and fully functional.
Few things to note :
- I had to create a
rtengine::CoordDspecial class, to handle coordinates with double values. I found this solution less invasive over making theCoordclass as a template. - Your
AreaMaskclass didn’t freed up the allocatedGeometryfor rectangles, so there was a memory leak here, as far as I’ve understood your code - I’ve updated rtgui/areamask.* to add Polygon shape support. It might be interesting for maintenance to separate the classes in their own files, but this is up to you. If so, then there’s some work to do in
LabMasksPanelas it can’t BEAreaMaskanymore. - I didn’t followed your technique for handling
Geometry, by using only ID, because some geometry are added only tovisibleGeometry, some other only tomouseOverGeometry, and others to both. - I’ll let you rename the variables the way you like. I prefer using camelCase, but I tried to use the same scheme than you as much as possible.
- As you’ll see in the documentation, I didn’t used an on preview slider to control the roundness, I think it’s useless in this case, but it can still be done. I’ve started to create a specific object type in rtgui/edit.h (
OPAdjuster), but never had time or use for it. It has to be finished if we have to use it. It could be useful for rectangles though. - Sliders for rectangle shape editing are hidden when editing a polygon. I don’t plan to add slider in the
EditPanelfor polygon editing, that would complicate things a lot in the code, and I presume nobody will use it anyway. On preview interaction is quite complete. - I’ve replicated the way that shapes are saved in the
arpfiles, but you might end up with big files for complex editing. I hesitated to save the values like curves are, with a series of numbers. Feel free to change that if you want. - When duplicating a rectangle, you were copying the last selected rectangle shape for the new one. Now it create a default shape, I didn’t find out how to preserve that functionality, and didn’t investigated that much, I must admit.
On a side note, I’ve used ART quite a lot during testing without looking everywhere yet, but I’m impressed by the work you’ve done, and with some features that I had in mind like selecting a partial profile when processing images, or saving the snapshots with prefix in the key names. Very good job !
- I had to create a
-
repo owner
@Hombre your Bitbucket repository seems private. Can you make it public so that I can pull from it? Thanks!
-
repo owner
Hi @Hombre, I took a (quick) look at the code, and I have started playing with it. It’s already quite good! A couple of comments:
- I agree with most of your choices, but I’d like to use lists of numbers in the
arpfiles rather than individual entries for all the fields in each knot. So I’ll change that - I think having a default rectangle in the area mask is just confusing now, so I’ll start empty there
- for controlling the roundness factor, I think using the mouse scroll wheel (possibly while holding
shift) would be quite nice. You can already change the brush size in the brush mask in this way, so the support is already there – shouldn’t be hard to add - finally, I saw you took the
polyFillalgorithm from a webpage. Would it be possible to include also the copyright/license of the code in the comment right above it?
I guess that’s it for now. I will keep playing with this for a while, but I expect to merge quickly!
- I agree with most of your choices, but I’d like to use lists of numbers in the
-
reporter
@agriggio Thanks for the review.
Which point(s) of the list do you want me to solve ?
For point 4, the blender project only added the following line :
/* originally by Darel Rex Finley, 2007 */There doesn’t seem to be anything else about the license.
-
reporter
One thing about point 3 : the Shift key can be combined with the Ctrl key to slow down the movement and have a finer adjustment, just like in curves. Will it be possible to have 2 speeds with mouse wheel ?
-
repo owner
just let me know what you want to work on, I'll take the rest (sooner or later
Regarding the wheel, it should be easy to implement two different logics according to which keys are pressed.
-
reporter
I’m doing 1, 3 and 4. I’ll commit this saturday.
-
repo owner
great, I’ll take care of 2 then.
For point 4, the blender project only added the following line :
Ok, so at least we can mention this was taken from Blender, and leave the attribution headaches to them
-
reporter
@agriggio I finally committed the changes, it was longer than expected, I had to understand how the
EditSubscriber::scrollmethod were already used inDrawnMaskPanel. So I had to add a bool parameter to let the provider know if the event had to be propagated. It was really necessary.Now scroll wheel can be used w/o modifier key to update the roundness as requested, the Ctrl key can be used to slow down the movement. I’ve also added a 0.5s delay before calling the listener. 0.5s is a good value, it will give the user enough time to set the correct roundness while still being reactive.
I also fixed a but in the tesselation.
[PS] Shift + drag[B1] is still available to edit the roundness, for those who don’t like wheels
 , but I must admit the wheel is very handy
 -
repo owner
- changed status to resolved
closing as merged
- Log in to comment
your proposal sounds good, thanks! for the moment, though, I’d like to add polygons, but also keep the current rectangles, at least for now. the current shapes make it very easy to emulate radial and gradient masks, so before dropping them I'd like to see how the new code works (especially in terms of usability). we can always drop the current mode later if it turns out to be redundant. what do you think?
regarding the GUI, how would this integrate in the current area mask? maybe you can draw a mock-up?