Wiki
core / install / linux_ubuntu
Install COSMOS on Linux Ubuntu
- 1.1 Setup a Git Client
- 1.2 Install Cmake
- 1.3 Install Qt
- 2 Setup the COSMOS Folder
- 3 Clone the Essential COSMOS Repositories
- 4 Compile
- 5 Setting a Path
- 6 More Tutorials
- Cross-compiling for ARM
We will start by installing a git client so you can download the cosmos source code. Then the main "cosmos" folder must be created on your computer, this is where the source code will reside including the compiled programs, libraries, etc.
##**1.1) setup a git client **
All the cosmos repositories are git. If you are using Linux you should have a git client already installed via the terminal. Check this by opening a terminal an type the git command.
$ git --version
you should then see the version of your git client. If not you have to install one.
#!shell
# install git
$ sudo apt-get install git
# check git version
$ git --version
optional (but recommended)
#!shell
# install git gui tool
$ sudo apt-get install git-gui
# check git gui
$ git gui
##**1.2) install Cmake **
Cmake is a cross-platform set of tools that takes our code for COSMOS and packages them in a way that the compiler (Qt) can read.
First check to see if you have Cmake already installed. You can check this by using the command:
$ cmake -- version
If you do not have Cmake installed, you'll have to install it. We recommend cmake 2.8.12 or above. Install with the commands:
#!shell
$ sudo apt-get install cmake
# check cmake version
$ cmake --version
#####for regular users After checking/installing git and cmake, use the installer found here.
##**1.3) install Qt **
Qt is a cross-platform software development kit (SDK) that allows us to compile and build COSMOS.
First check to see if you have Qt already installed. There are typically two places where it could be installed.
The first option is in the "user" folder:
$cd ~/Qt
The second option is in the "opt" folder:
$cd /opt/Qt
If Qt is not in either of these folders then you'll have to install it.
If you get an error message:
"bash: cd: /home/<user>/qt: No such file or directory"
(Note could also be installed in opt?) Then you'll need to install Qt. We recommend using the latest version of Qt because it is compatible with most of the COSMOS tools. Go to this link: * http://www.qt.io/download-open-source/
you'll get a file like this qt-unified-linux-x64-2.0.2-2-online
execute the install script with your version number.
$ chmod +x qt-unified-linux-x64-2.0.2-2-online
$ ./qt-unified-linux-x64-2.0.2-2-online

##**2) Setup the COSMOS folder **
Now let's create the COSMOS folder. This will be where the cosmos programs end up being installed, including compiled libraries, include files, etc. We highly recommend that you create the COSMOS folder in the following location:
- Linux: /home/<user>/cosmos
If for some reason you do not want to use the default folders you will need to set a "COSMOS" environment variable to your non-custom path.
Here is the initial layout needed for the 3 repositories you'll be cloning (You can either create these sub-folders manually now, or you can create them through the git client as you clone the repositories):
cosmos
|_nodes
|  |__cubesat1(clone to here)
|_resources(clone to here)
|_source
   |_core(clone to here)
The following is a typical structure you will find inside the "COSMOS" folder after it has been built (This layout includes some non-essential repositories):
cosmos
|_ bin
|_ lib
|_ include
|_ nodes
|   |_cubesat1
|_ resources
|_ wiki
|_ source
    |_core
    |_tools
    |   |_libraries
    |   |_ MOST
    |   |_CEO
    |   |_...
    |_projects
    |   |_ my_project_1
    |   |   |_ programs
    |   |   |_ libraries
    |   |   |_ build
    |   |_ my_project_2
    |       |_ programs
    |       |_ libraries
    |       |_ build
    |_thirdparty
The folder structure can be changed but the developer must know what to do to setup the proper compilation paths and variables.
##3) Clone the Essential COSMOS Repositories
To get started with COSMOS and run some examples there are only three main repositories needed (the core, nodes and resources)
To access the repositories you must first make a SSH key and link it to your Bitbucket account.
-
GitKraken:
- Open GitKraken and click on Settings -> Preferences (located in the top-right corner).
- Click on Authentication -> BitBucket.org -> Connect to Bitbucket and login to Bitbucket when/if prompted.
- After you are connected, click on "Generate SSH key and copy to clipboard" on the GitkKraken window.
- Click "Copy public key to clipboard and open Bitbucket.org".
- On the window that popped up, click on "Add Key". Give it a label, paste the key into the box, and hit "Add Key".
-
git gui:
- Open up git gui and click on Help-> Show SSH Key.
- In the new window, click "Generate Key".
- Create a passphrase and enter it into the prompts (it should pop up twice).
- Open up Bitbucket and login(if you haven't already).
- Making sure the left-side navigation panel is expanded, and click on Bitbucket settings (click on the icon in the bottom-left corner).
- Click on SSH Keys under "Security" on the navigation panel.
- Click on "Add Key". Give it a label, paste the key into the box, and hit "Add Key".
After registering your SSH Key with Bitbucket, you will have permission to clone the repositories.
For GitKraken, use the following steps
- Click on the folder icon, then go to Clone.
- Enter the following info into the fields and clone the repo (note that if your cosmos folder is not in the recommended location, your folder path will be different):
| Where to Clone to | URL |
|---|---|
| /home/<user>/cosmos/source/core | git@bitbucket.org:cosmos/core.git |
| /home/<user>/cosmos/nodes/cubesat1 | git@bitbucket.org:cosmos/nodes-cubesat1.git |
| /home/<user>/cosmos/resources | git@bitbucket.org:cosmos/resources.git |
For git use the following commands
$ cd ~/cosmos
$ git clone git@bitbucket.org:cosmos/core.git source/core
$ git clone git@bitbucket.org:cosmos/nodes-cubesat1.git nodes/cubesat1
$ git clone git@bitbucket.org:cosmos/resources.git
Remember to update the code regularly ($ git pull) or "Pull" from SourceTree.
##**4) Compile **
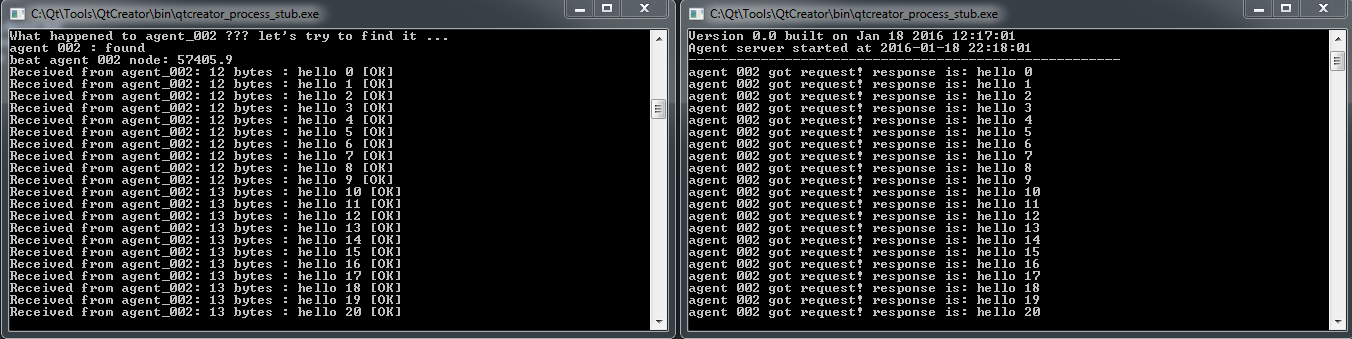
To get started with COSMOS you will run two COSMOS agents that will talk to each other.
1) Using Qt Creator (cmake)
- Start Qt Creator. Note: Make sure you are using the latest version of Qt Creator (use the maintenance tool to upgrade if needed).
- Open the CMakeLists.txt file (File -> Open File or Project -> Open project : cosmos/source/core/CMakeLists.txt)
- Select a build directory (or use the default)
- Click on "Projects" on the left side, and make sure the install option is enabled. (Under "Build Steps" look for "--target install". If it's not there, expand "Details", find the install option in the drop down menu, and click on the box) (Optional step: to compile the code faster, please read note 1 if you're interested.)
- Build the project : ctrl + b If you cannot build the project click here
- Check your "cosmos" folder (ex: C:\cosmos) to see the files that were installed
- Select agent_001. Click on the "Project" button (computer icon on left side of Qt Creator) and select agent_001
- Run agent_001. Click on the "Run" button (big green icon on left side of Qt Creator) or press 'ctrl+r'
- Select agent_002.
- Run agent_002. If running agent_002 stops the run of agent_001 see Note 2.
The two COSMOS agents should be talking to each other at this point.
**2) Using the terminal (cmake) **
Open a terminal and type
#!shell

cd cosmos/source/core/build
cmake ..
make
you can make the code compile faster by using multiple cores. This example shows how to use 8 cores:
#!shell

make -j8
##5) Setting a Path
A path allows easy access to executable programs. To run agent commands from the terminal you will need to set a path to the cosmos/bin folder. To set a path, enter into the terminal:
#!shell

cd
vi .profile
PATH="HOME/cosmos/bin:$PATH"
:x
#!shell

source .profile
#!shell

echo $PATH
##6) More Tutorials After installing COSMOS, continue on for tutorials on:
- Agents
- Namespaces
- Concepts used by COSMOS:
Cross-compiling for ARM
If you want co cross compile cosmos-core and deploy it in another platform (like an embedded arm processor) please click here for more information.
####Note 1#### This is only valid for MinGW and GCC compilers (msvc uses Jom to handle multiple cores).
To compile the code faster using all the cores on your machine go to
Qt Creator -> Projects (icon on left side bar) -> Build Steps -> Make : Details (expand the icon)
on arguments add "-j4" or whatever number of cores that your computer supports.
In some cases you may have to add a space in between "-j 4". In some cases it is also possible to just add '-j' and the compiler will automatically use as many processes it can to compile. This approach works well on Windows but in Linux it seems to freeze the computer because it starts more threads than cores. Use it with caution. If you really need super compilation times then install MSVC 2013 or above. See the results and make your decision.
Compilation tests from cosmos-core.pro using a Win7 with Qt 5.5.1 MinGW 32 bit, AMD FX(tm)-8120 Eight Core Processor 3.11 GHz, 16 GB Ram, 64 bit OS
| Kit | Build Step | Cores used | Compile time |
|---|---|---|---|
| Desktop Qt 5.5.1 MinGW 32bit | mingw32-make.exe (default) | 1 | 3m 30s |
| Desktop Qt 5.5.1 MinGW 32bit | mingw32-make.exe -j4 | 4 | 1m 16s |
| Desktop Qt 5.5.1 MinGW 32bit | mingw32-make.exe -j8 | 8 | 1m 4s |
| Desktop Qt 5.5.1 MinGW 32bit | mingw32-make.exe -j9 | 8 | 1m 4s |
| Desktop Qt 5.5.1 MinGW 32bit | mingw32-make.exe -j | 8 | 58 s |
| Desktop Qt 5.5.1 MinGW 32bit | jom.exe (custom step) | 8 | 1m 16s |
| Desktop Qt 5.5.1 MSVC2013 64bit | jom.exe (default) | 8 | 30s |
####Note 2#### Qt creator on Linux and Windows has an option to close the programs automatically when running another program. You will need to disable this behavior to run the two agents at the same time. Go to Tools > Options > Build and Run > General. Change 'Stop applications before building:' to None.
Updated