Wiki
Clone wikineo4j-databridge / 4.1 Importing CSV files
4.1 Importing from CSV
In the first tutorial in this series, we take you through the steps required to load some CSV data into Neo4j. We introduce the concept of resource and schema mappings and show you how easy it is to setup and run a simple CSV data import.
In this tutorial we'll be using the Databridge shell to quickly bootstrap a new import project.
Create a new import project
Start the shell and create a new import project called satellites, using the init command.
#!bash
$ bin/databridge
neo4j-databridge$ init satellites
import/satellites
resources
schema.
The resources folder contains one or more resource descriptor files describing the resources to be imported.
The schema folder contains one or more schema mapping files that define the graph schema (nodes, relationships, etc) that data from the various input resources will be transformed into during the import. Resource descriptors and Schema descriptors are expressed in JSON.
Create the Resource Descriptor
A resource descriptor provides information about the resource you want to load. It always includes the resource URI, but depending on the resource type, additional information will be present. For example an SQL resource descriptor will provide connection information to the RDBMS. You can find out more about the different resource descriptors here. In this tutorial we will load a file-based CSV resource. Create the following file in the new import/satellites folder:
import/satellites/resources/satellites.json
{
  "resource" : "import/satellites/resources/satellites.csv",
  "delimiter": ","
}
Next, copy the following CSV data to the file indicated below.
import/satellites/resources/satellites.csv
"Object","Orbit","Alt","Program","Manned","Launched","Status"
"Sputnik 1", "Elliptical","LEO","Soviet", "N", "04 Oct 1957", 0
"Mir", "Circular", "LEO", "Soviet", "Y", "19 Feb 1986", 0
"ISS", "Circular", "LEO","International", "Y", "20 Nov 1998", 1
"SkyLab", "Circular", "LEO", "NASA", "Y", "14 May 1973", 0
"Telstar 1", "Elliptical","MEO","International", "N", "10 Jul 1962", 0
"GPS USA66", "Circular", "MEO","International", "N", "26 Nov 1990", 1
"Vela 1A", "Circular", "HEO","NASA", "N", "17 Oct 1963", 0
"Landsat 8", "Circular", "LEO", "NASA", "N", "11 Feb 2013", 1
"Hubble", "Circular", "LEO", "International", "N", "08 Feb 1990", 1
"Herschel", "Lissajous", "L2", "ESA", "N", "14 May 2009", 0
"Planck", "Lissajous", "L2", "ESA", "N", "14 May 2009", 1
The sample data contains the following columns:
| Column | Meaning |
|---|---|
| Object | The satellite name |
| Orbit | Orbital type (Elliptical, Circular or Lissajous) |
| Alt | the Orbital location (LEO=Low-Earth Orbit, MEO=Mid-Earth Orbit, etc) |
| Program | The space program that launched the satellite (NASA, ESA, etc) |
| Manned | A Yes/No flag indicating whether the satellite was manned (Mir Space Station) |
| Launched | The date the satellite was launched |
| Active | A 1/0 flag indicating whether the satellite is still active |
With the data in place, we can now create the schema mapping describing how we want it to be mapped to nodes and edges in the graph. There are two files we need. The schema control file, and the schema mapping file.
The schema control file
The schema control file contains one or more schema mapping references in the order we want to include them during the import.
Copy the following text into import/satellites/schema/schemas.json
{
  "include": [
    "satellites.json"
  ]
}
--
The schema mapping file
The schema mapping file describes how we want to map the data in the satellites.csv file to nodes and edges in the graph. Our graph will have four node types:
- Satellite
- Orbit
- Location
- SpaceProgram
as well as the following edges:
- A Satellite is related to an Orbit via an ORBIT edge
- A Satellite is related to a Location via a LOCATION edge
- A SpaceProgram is related to a Satellite via a LAUNCHED edge, with a launch_date property
Shown below is the the JSON schema mapping. You can read more about how to configure schema mappings, including how to define conditions, data conversions and much more here, but for now, the schema mapping below should be fairly self-explanatory. It contains a header section, describing the schema and its associated resource, followed by a nodes section defining the nodes we want in the graph, and finally an edges section, where we define how we want to connect those nodes.
{
  "name": "satellites.json",
  "resource": "satellites.json",
  "nodes": [
    {
      "type": "Satellite",
      "identity": [ "Object" ],
      "properties": [
        { "name": "satellite", "column": "Object" },
        { "name": "manned", "column": "Manned" },
        { "name": "active", "column": "Status" },
        { "name": "launch_date", "column": "Launched" }
      ]
    },
    {
      "type": "SpaceProgram",
      "identity": [ "Program" ],
      "properties": [ { "name": "program", "column": "Program" }]
    },
    {
      "type": "Orbit",
      "identity": [ "Orbit" ],
      "properties": [ { "name": "orbit", "column": "Orbit" } ]
    },
    {
      "type": "Location",
      "identity": [ "Alt" ],
      "properties": [ { "name": "location", "column": "Alt" } ]
    }
  ],
  "edges": [
    { "name": "LAUNCHED", "source": "SpaceProgram", "target": "Satellite", "properties": [ { "name": "launch_date", "column": "Launched" }] },
    { "name": "LOCATION", "source": "Satellite", "target": "Location" },
    { "name": "ORBIT", "source": "Satellite", "target": "Orbit" }
  ]
}
Copy this text to import/satellites/schema/satellites.json, and you're now ready to run the import.
Run the import
The shell provides a simple mechanism to run an import project: the import command
#!bash
neo4j-databridge$ import satellites
#!bash
neo4j-databridge$ use satellites
neo4j-databridge$ open http://localhost:7474 # (note: MAC OS/X only!)
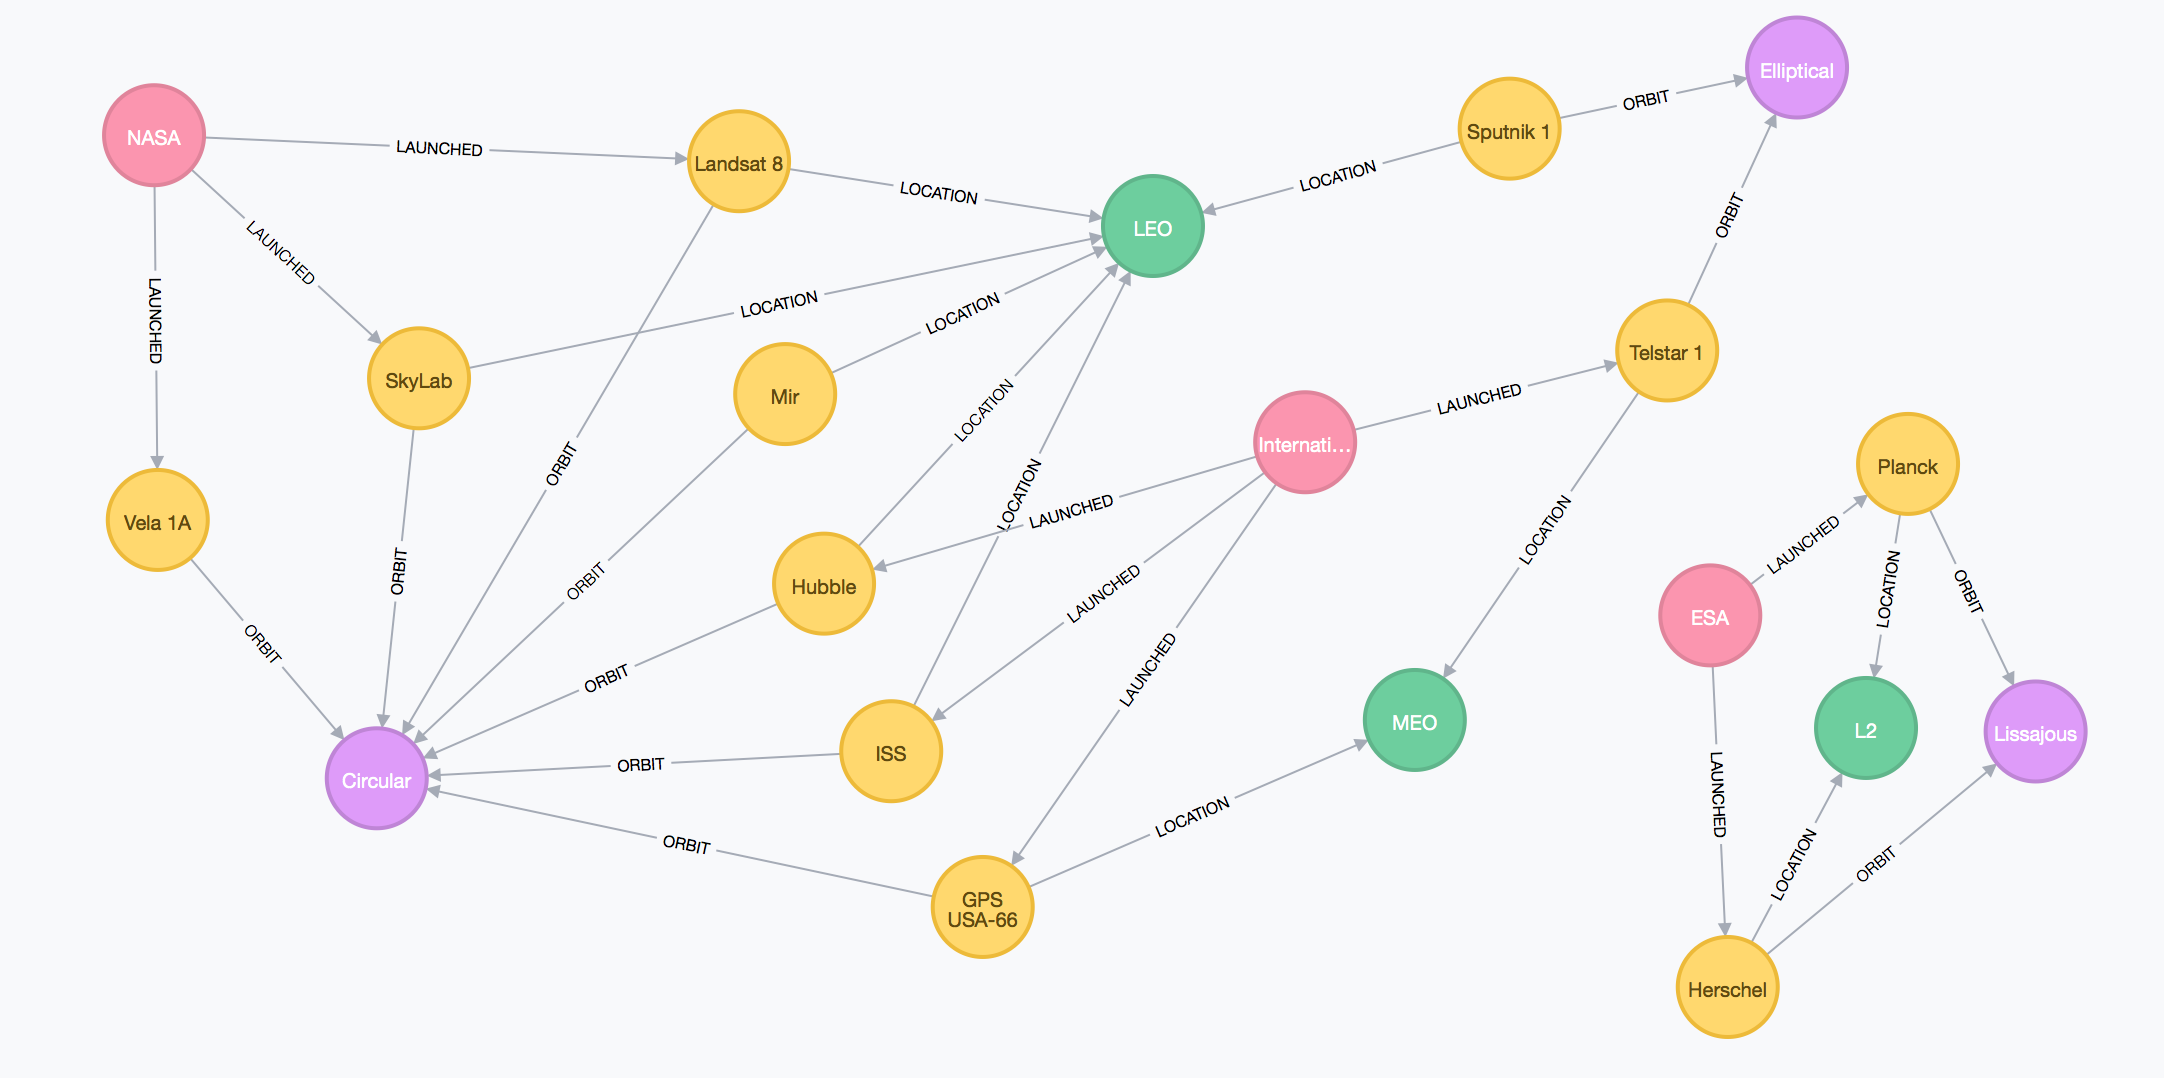
Here is our graph!
Updated