Wiki
Clone wikineo4j-databridge / 4.6 Importing sequences
4.6 Importing sequences
Often data are presented as a sequential set of records that are logically connected. When importing this sort of data we usually want to create the corresponding sequence of connected nodes in the graph.
In this tutorial we'll take a look at creating an itinerary combining several points of interest into a path of connected nodes in Neo4j.
The ITN file format
Our data in this case comes from an ITN file. ITN is a simple text format used by TomTom devices to represent itineraries. Databridge comes with an ITN Adapter, but for the purposes of this tutorial we'll assume it doesn't, and that we need to create it.
The ITN file format assumes that each line in it holds a supporting waypoint:
longitude|latitude|description|type|
The type field specifies how to interpret this waypoint:
| Type | Meaning |
|---|---|
| 0 | Regular waypoint |
| 1 | Waypoint is disabled (will be skipped when navigating the itinerary, appears dimmed in the itinerary overview) |
| 2 | Stopover or destination |
| 3 | Stopover is disabled (will be skipped when navigating the itinerary, appears dimmed in the itinerary overview) |
| 4 | Departure point (should only be set for the first item in the itinerary file) |
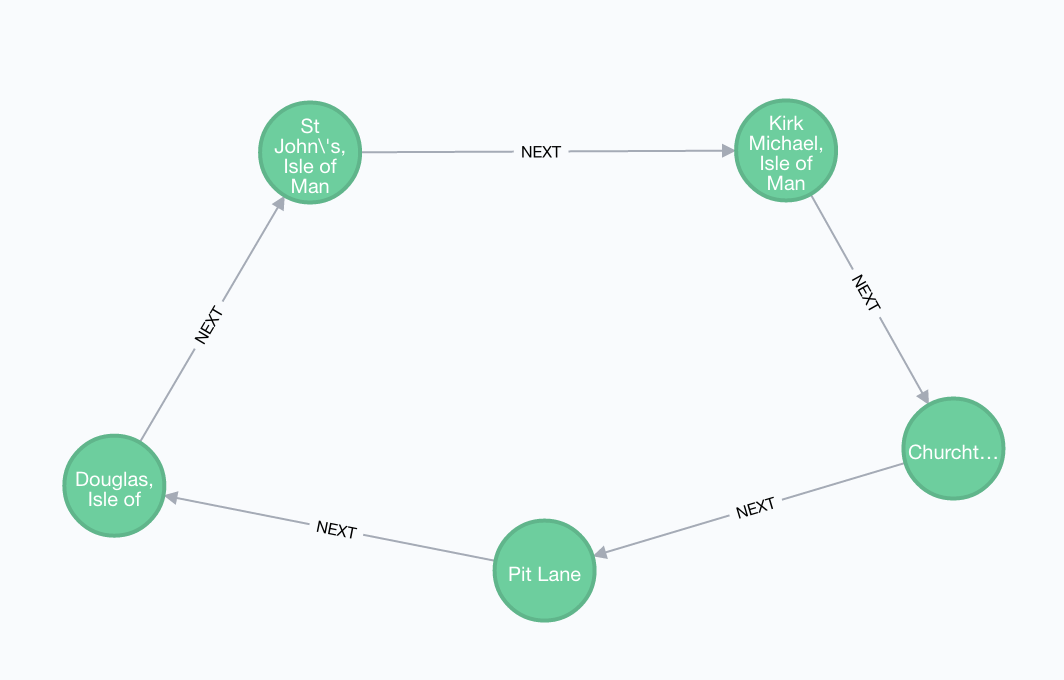
Below is a small itinerary describing points on the Isle of Man TT circuit, in ITN format. As you can see, it starts and finishes in Pit Lane, so it is a circular route.
-447753|5416807|Pit Lane|4|
-450480|5416113|Douglas, Isle of Man|0|
-462919|5420382|St John's, Isle of Man|0|
-457168|5429819|Kirk Michael, Isle of Man|0|
-442543|5431912|Churchtown, Isle of Man|0|
-447753|5416807|Pit Lane|2|
The Route record
When building a sequence of nodes in the graph, we want connect the first to the second, the second to the third and so on.
The idea here therefore is to create a Route that holds just two points of interest (POI). The first record will hold the first two points, and the next record
will hold the second and third points. For each Route we get we can then create the relevant nodes as appropriate and link them together
in the graph. The properties() method on the Route must therefore return all the properties associated with both of its points of interest.
With this in mind, here is a simple implementation.
#!java
public class Route implements AbstractRecord {

    POI a;
    POI b;

    public Map<String, Object> properties() {

        Map<String, Object> properties = new HashMap<>();

        properties.put("a_name", a.name);
        properties.put("a_latitude", a.latitude);
        properties.put("a_longitude", a.longitude);

        properties.put("b_name", b.name);
        properties.put("b_latitude", b.latitude);
        properties.put("b_longitude", b.longitude);

        return properties;
    }

}
The POI record simply maintains the data for each waypoint on the itinerary:
#!java
public class POI {

    String name;
    Long latitude;
    Long longitude;
    Integer type;

    POI(String waypoint) {

        String[] parts = waypoint.split("\\|");

        latitude = Long.parseLong(parts[0]);
        longitude = Long.parseLong(parts[1]);
        name = parts[2];
        type = Integer.parseInt(parts[3]);
    }

}
The ITNAdapter
With the data structures built, we can turn our attention to the Adapter. As in the previous example, the ITNAdapter will extend TextFileAdapter.
This simple example manages the start, end and intermediate waypoints and creates the corresponding Route records according to the scheme described above.
#!java
public class ITNAdapter extends TextFileAdapter {

    private Route route = new Route();

    public ITNAdapter(Resource resource) {
        super(resource);
    }

    @Override
    public AbstractRecord parse(String data) {
        if (data.endsWith("|4|")) {
            return parseStart(data);
        } else if (data.endsWith("|0|")) {
            return parseWayPoint(data);
        } else if (data.endsWith("|2|")) {
            return parseEnd(data);
        } else {
            return new SkipRecord();
        }
    }

    Route parseStart(String data) {
        if (route.b == null || route.b.type == 2) {
            route.a = new POI(data);
            route.b = new POI(readLine());
            return route;
        } else {
            throw new RuntimeException("Start of route not permitted here");
        }
    }

    Route parseWayPoint(String data) {
        if (route.b != null && route.b.type != 2) {
            route.a = route.b;
            route.b = new POI(data);
            return route;
        } else {
            throw new RuntimeException("Waypoint not permitted here");
        }
    }

    Route parseEnd(String data) {
        if (route.b != null && route.b.type != 2) {
            route.a = route.b;
            route.b = new POI(data);
            return route;
        } else {
            throw new RuntimeException("End route not permitted here");
        }
    }
}
Installing the adapter
To install the adapter, compile the adapter classes and create a jar file from them, then copy the jar file to the lib folder of your Databridge installation.
Running the import
To use the adapter you must specify its full class name in the appropriate resource file, as in the following example:
demo/iomtt/resources/iomtt-resource.json
#!json
{
  "name": "iomtt-resource",
  "adapter"  : "com.graphaware.neo4j.databridge.adapters.file.itn.ITNAdapter",
  "resource" : "demo/iomtt/resources/iomtt.itn"
}
In the schema definition we create nodes for each of the two POI records. The update strategy is set to unique so that when a previously-seen node is found again, a duplicate isn't created. Then, we link the two POI nodes together:
demo/iomtt/schema/iomtt-schema.json
#!json
{
  "resource" : "iomtt-resource.json",
  "nodes" : [
    {
      "type": "POI.1",
      "identity" : ["a_name"],
      "labels": [
        {"name": "POI", "indexes": ["name"] }
      ],
      "update_strategy" : "unique",
      "properties" : [
        {"name": "name", "column": "a_name"},
        {"name": "latitude", "column": "a_latitude"},
        {"name": "longitude", "column": "a_longitude"}
      ]
    },
    {
      "type": "POI.2",
      "identity" : ["b_name"],
      "labels": [
        {"name": "POI", "indexes": ["name"] }
      ],
      "update_strategy" : "unique",
      "properties" : [
        {"name": "name", "column": "b_name"},
        {"name": "latitude", "column": "b_latitude"},
        {"name": "longitude", "column": "b_longitude"}
      ]
    }
  ],
  "edges" : [
    {"name" : "NEXT", "source": "POI.1", "target": "POI.2"}
  ],
  "variables": []
}
Finally, add the iomtt-schema to the main schema.json file:
demo/iomtt/schema/schema.json
#!json
{
  "include": [
    "iomtt-schema.json"
  ]
}
Now we can run the import:
#!bash
bin/databridge run demo/iomtt
Updated