Wiki
Clone wikiWebSSO / Home
- About the SAML2.0 WebSSO Module
- Release Notes
- Setup step 1 - Installation: Download and unpack the module
- Setup step 2: Creating a Identity Provider configuration setting
- Setup step 3: Enabling the IDP in the proper store / website
- Setup step 4: Go to the frontend and see if the login page appears!
- Setup step 5: Check if the values are properly mapped
- Your Service Provider URLS
- Advanced Features
About the SAML2.0 WebSSO Module
This module allows your Magento installation to communicate with SAML2.0 providers. We integrated with many SAML2.0 Identity Providers including:
- Microsoft ADFS2.0
- Microsoft SharePoint
- SalesForce
- Google Accounts
- NetIQ
- OpenAM
- SimpleSAMLPhp
- OneLogin
- And many many others
We never had a SAML2 integration with any Identity Provider which we didnt got to work properly.
Release Notes
3.7.4
- Address creation is fixed
- Improved the logging to be more helpful to developers
3.7.3
- Fixed a bug in auto setting the certificates in the metadata
- Made sure ADFS 2 and 3.x can work with the metadata without modifications
3.7.2
- Improved metadata for ADFS 2
3.7.1
- If you use multiple IDPs, you can use
- /websso/metadata?idp=<identifier>
- /sso/login?idp=<identifier>
- Encrypted Assertions are now fully supported
- Signing of SSO and SLO has been completely refactored
- NameID format can be set in the server information
- Mappings have been drastically changed and simplified
- Internal mappings are now easier to make
- External mappings can be transformed
- Made the IDP admin form a bit more readable, by using styling to need less fieldsets on screen
- Allow SSO to co-exist with the regular login with a setting
- Improved store specific settings to be able to update/create customers and addresses
- Removed unneeded legacy settings in the store specific settings
Setup step 1 - Installation: Download and unpack the module
The module comes in a handy Ready2Paste format. So all you have to do is download the module from our website, and unpack it in the root of your website.
On windows :
- drag the zipfile to your project directory
- rightclick the file and select -> unpack here
- Overwrite if you are asked to do so
On linux / other:
- mv or cp the file to your project directory
- cd to your project directory
- unpack the file in its current location
Setup step 2: Creating a Identity Provider configuration setting
In Magento go to the Identity Providers configuration and click "Add new"

Identity Provider Information

- Name - A friendly name for display purposes
- Identifier - A unique identifier, especially useful when you use 2 or more IDP's in your installation
- EntityID - The Entity ID of your current Service Provider which is known in the trust relation on your IDP
- NameID Format - The format in which the IDP expects the NameID to be in
- Metadata URL - The URL of the Identity Provider Metadata
- Is Passive - Can allow authentication methods that do not show the user any input
- Metadata expiration in seconds - We cache the metadata to speed up the site loading process
-
Force Authentication - Disable SSO, when the user goes back to the IDP, an authentication screen is always shown
-
Single Sign-On Binding: The binding used for Single Sign-On. Always setup POST first, because that will always force the certificates to be sent. A IDP does not have to honor security by certificates on a redirect request!
-
Single Log-Out Binding: The binding used for Single Log-Out. Same as SSO Binding, always set it to POST first.
-
Enable Claim logging: Log all the claims to /var/log/wizkunde_websso.log
- Enable Debug logging: Log all incoming attributes to /var/log/wizkunde_websso.log
Identity Provider Certificate

- Certificate Data (CRT): The X.509 Certificate used to communicate with the SAML2 IDP server (preshared)
- Private Key (PEM): The X.509 private key used to communicate with the SAML2 IDP Server
- Certificate Passphrase: Optional passphrase to unlock the certificate
An easy tool to do create self-signed X.509 certificates: https://www.samltool.com/self_signed_certs.php
Attribute Mappings

- Identity Provider Mapping:
- The Name or FriendlyName of the Attribute sent to Magento. In some IDP's these are referred to as Claims, including ADFS.
- The transform that will be applied upon login
-
The extra information needed for the transform
-
Internal attribute: The EAV attribute of the customer or address
Transforms
- Use value unmodified - Incoming value will not be modified
- Substring: Before occurance - Incoming value will be substringed until the first occurance of the value in the extra field
- Substring: Before occurance - Incoming value will be substringed starting at the first occurance of the value in the extra field
- Magento Password Hash - Incoming value will be hashed with the Magento hashing mechanism
- Default value on empty - If the incoming value is empty, the value set in the extra field will be used
- PERL Regular Expression - The regular expression will be applied on the incoming value
Setup step 3: Enabling the IDP in the proper store / website

- Go to System -> Configuration
- In the left bar, find Wizkunde WebSSO and click on it.
- Select the right scope of your website / store to make sure you enable the IDP where you want to enable it.
General Settings

- Enable WebSSO in Frontend: Enable / Disable SSO for the frontend of Magento
- Enable WebSSO in Backend: Enable / Disable SSO for the Backend of Magento
- Allow regular login without identity provider: If this is set, /customer/account/login will not automatically redirect the user to the IDP. Instead manually a button must be created which links to the login URL set in the next option
- SSO Login URL: The URL that fires the login to the IDP. This does not have to be a real route, we catch this URL in an observer
- Enforce login at frontend: If set to yes, the user will not see the Magento site before logging in, it will be immediately redirected to the IDP instead of after clicking on "login". Very useful for B2B sites that only expose data to registered customers
Metadata

- Default Identity Provider: The identity provider that you created in step 2. As stated, this is the default IDP, it can be overriden by adding the identifier to the GET url, when you create links to the login. In this case you can allow a user to login to a completely different IDP.
Customer Information

-
Allow to create a new customer if it doesnt exist in Magento: If set to yes, new users will be created as they login. If set to no, only users with a valid magento account will actually be logged in
-
Update customer on login: If set to yes, will update the customer information to what is set in the incomming claims.
-
Enable redirect if user does not exist: If the user may not login to magento because it does not exist yet, it will be redirected to a CMS page
-
Select CMS Page to redirect to: The actual CMS page that is being redirected to
-
Create address on customer creation: Can optionally create a user address from claim information if all the right claims are mapped
-
Update address on login: The address can be updated with the incoming claims. This will overwrite the current address upon login
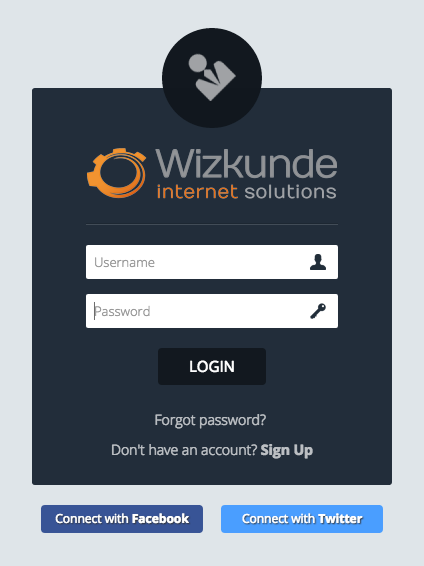
Setup step 4: Go to the frontend and see if the login page appears!

Setup step 5: Check if the values are properly mapped
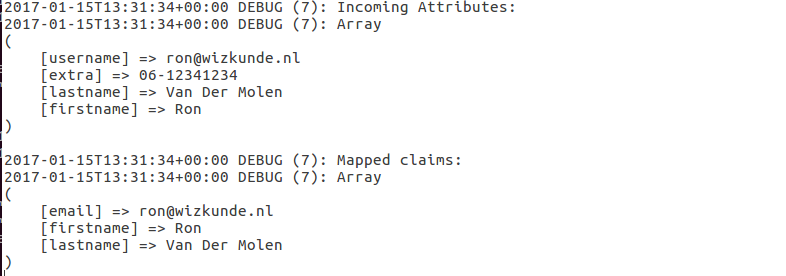
Enable debug logging and do a login attempt. After logging in, check /var/log/wizkunde_websso.log to see what attributes have come in and what was actually properly mapped to the respective fields.
In this example you will see that we did not actually do anything with the "extra" field. It might have been improperly mapped or intentionally unmapped.

Your Service Provider URLS
There are more URLs that your IDP may ask for, you can find all of them inside the metadata XML linked below.
Metadata location Frontend
https://<your store>/websso/metadata
Metadata location Backend
https://<your store>/websso/metadata/backend
Metadata location for alternative IDP
Add this to your metadata URL: ?idp=<identifier set in backend>
Advanced Features
Temporarily disable SSO in the frontend
Navigate to https://<your store>/websso/login/nosso
SSO will be disabled for your browser with a cookie and the regular login is available
Updated