Wiki
Clone wikiPipsta / Adding Bespoke Methods to the Pipsta NFC Daemon
Difficulty Level


- Some aspects involve discussions on Python, but it is possible to complete this tutorial (and extend it to provide other functions) without a complete understanding of the underlying code.
- Initiative may be required in order for the user to navigate the idiosyncrasies of their own Android device.
Time to Complete


- Time taken to make changes to the Android App's functionality are minimal.
Who Should Read This Document
Those wishing to add new functionality to the Pipsta NFC system.
Introduction
In this tutorial, we will complete the work started in 'Adding Bespoke Methods to the Pipsta NFC Android App' by adding the required functionality to process these new NFC packets to the Raspberry Pi NFC Daemon.
Pre-requisites
- Your Pipsta should be set-up as per Pipsta First-Time Setup
- You should have completed 'Adding Bespoke Methods to the Pipsta NFC Android App'
-
You should be familiar with 'NFC Printing' and 'Pipsta NFC Python Code Tutorial'
-
You should have:
- An NFC enabled Android phone
- The Pipsta NFC App installed on this phone
- A modified pipsta_methods.txt file as per 'Adding Bespoke Methods to the Pipsta NFC Android App'
Getting Started
1) Power up your Raspberry Pi and printer
2) Wait for the Raspberry Pi to boot into the graphical desktop environment
3) Click on File Manager on the task-bar.
4) Navigate to:
/home/pi/pipsta/Examples/nfc/pipsta
5) Press [F4] to bring up the terminal
6) Type:
#!

mkdir basic_print
...to create a new directory in which to put our handler script. Do not navigate into this directory.
7) Now type:
#!

sudo nano __init__.py
...noting that there are two underscores either side of the word 'init'. This file is required to tell Python that this is a Python package directory.
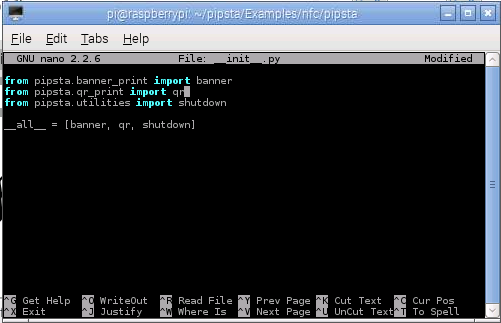
8) This should bring up the Nano editor. The file should appear as follows. If you are presented with an empty file, check the filename spelling and path are correct, as this suggests that Nano has not found a pre-existing file at this location and has created a file for you to edit.

9) Within this file, you will be able to see the existing banner_print and qr_print methods, and a third method which we will discuss later. We will now add a further method.
10) Add the following line:
#!python

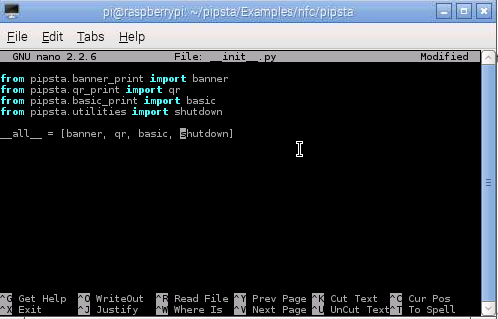
from pipsta.basic import basic
...and modify the bottom line to read:
#!python

__all__ = [banner, qr, basic, shutdown]
11) Your file should now appear as follows:

12) Press [CTRL]+[X], [Y] and [ENTER] in sequence to save the file
13) For simplicity, we will now copy and modify an existing method, e.g. banner_print.
14) Use File Manager to navigate into:
/home/pi/pipsta/Examples/nfc/pipsta/banner_print
15) Select both banner.py and init.py by left-clicking with [CTRL] held-down. Do not select the .pyc files.
16) Right-click and select 'Copy'
17) Now navigate to:
/home/pi/pipsta/Examples/nfc/pipsta/basic_print
...and right-click and paste the files to this location.
18) Right-click on banner.py and rename it basic.py
19) Using Leafpad, now modify basic.py so it is as shown below (alternatively, delete ALL code from the file and copy and paste the code below)
#!python

# basic.py
# $Rev$
# Copyright (c) 2015 Able Systems Limited. All rights reserved.

import argparse
import logging
import platform
import struct
import sys
import time

import usb.core
import usb.util

MAX_PRINTER_DOTS_PER_LINE = 384
LOGGER = logging.getLogger('basic.py')

# USB specific constant definitions
PIPSTA_USB_VENDOR_ID = 0x0483
PIPSTA_USB_PRODUCT_ID = 0xA053

# Printer commands
FEED_PAST_TEARBAR = b'\n' * 5

def setup_logging():
    '''Sets up logging for the application.'''
    LOGGER.setLevel(logging.INFO)

    file_handler = logging.FileHandler('mylog.txt')
    file_handler.setLevel(logging.DEBUG)
    file_handler.setFormatter(logging.Formatter(fmt='%(asctime)s %(message)s',
                                                datefmt='%d/%m/%Y %H:%M:%S'))

    stream_handler = logging.StreamHandler()
    stream_handler.setLevel(logging.INFO)

    LOGGER.addHandler(file_handler)
    LOGGER.addHandler(stream_handler)


def setup_usb():
    '''Connects to the 1st Pipsta found on the USB bus'''
    # Find the Pipsta's specific Vendor ID and Product ID (also known as vid
    # and pid)
    dev = usb.core.find(idVendor=PIPSTA_USB_VENDOR_ID,
                        idProduct=PIPSTA_USB_PRODUCT_ID)
    if dev is None:                 # if no such device is connected...
        raise IOError('Printer not found')  # ...report error
    try:
            dev.reset()

        # Initialisation. Passing no arguments sets the configuration to the
        # currently active configuration.
        dev.set_configuration()
    except usb.core.USBError as err:
        raise IOError('Failed to configure the printer', err)

    # Get a handle to the active interface
    cfg = dev.get_active_configuration()

    interface_number = cfg[(0, 0)].bInterfaceNumber
    usb.util.claim_interface(dev, interface_number)
    alternate_setting = usb.control.get_interface(dev, interface_number)
    intf = usb.util.find_descriptor(
        cfg, bInterfaceNumber=interface_number,
        bAlternateSetting=alternate_setting)

    ep_out = usb.util.find_descriptor(
        intf,
        custom_match=lambda e:
        usb.util.endpoint_direction(e.bEndpointAddress) ==
        usb.util.ENDPOINT_OUT
    )

    if ep_out is None:  # check we have a real endpoint handle
        raise IOError('Could not find an endpoint to print to')

    return ep_out, dev


def parse_arguments():
    '''Parse the argument passed to the script looking for a text string to print.
    If the argument is missing, a default is used.
    '''
    txt = 'My First NFC Application!'
    parser = argparse.ArgumentParser()
    parser.add_argument('text', help='the text to print',
                        nargs='?', default=txt)
    return parser.parse_args()

def main():
    '''This is the main loop where arguments are parsed, fonts are loaded,
    connections are established, images are processed and the result is
    printed out.
    '''

    # This script is written using the PIL which requires Python 2
    if sys.version_info[0] != 2:
        sys.exit('This application requires python 2.')

    if platform.system() != 'Linux':
        sys.exit('This script has only been written for Linux')

    args = parse_arguments()
    setup_logging()
    __send_to_printer(args.text)

def send_to_printer(text):
    '''This is the API call made by the nfc_server to perform a basic print'''
    __send_to_printer(text)

def __send_to_printer(text):
    '''In here printer connections are established, fonts are loaded,
    images are processed and the result is printed out.'''
    usb_out, device = setup_usb()
    usb_out.write(text)
    usb_out.write(FEED_PAST_TEARBAR)

if __name__ == '__main__':
    main()
20) Save the file and exit.
21) Navigate to:
/home/pi/pipsta/Examples/nfc
22) Press [F4] to bring up LXTerminal.
23) Type:
python nfc_server.py start
24) Using your Android phone, start the Pipsta NFC App
25) On the Send to Pi screen, select pipsta.basic
26) Click 'Send' and tap your phone on the Pipsta
27) You should see the message 'Sent message to Pipsta' pop-up no the Android screen, and a few seconds later, the message will be printed.
How it Works
The key aspects are:
1) New methods can be added without modification of the nfc_server.py daemon or nfc.py code.
2) The daemon's functionality can be expanded purely by adding new modules to the package directory.
3) The daemon knows to look in the pipsta directory due to its init.py file, and each underlying directory is also 'known' to the daemon on account of their own init.py file.
4) The init.py file in the pipsta directory must be modified to import each underlying module in the way described above, in the form:
from pipsta.<directory> import <filename>
5) The banner.py script was simplified to remove all font and image processing. Crucially, the daemon does not invoke the main() method: it simply calls send_to_printer(), wherein USB is setup and printing is initiated simply sending the data over as a bulk transfer to the printer.
TIP: The other 'unused' functions, including main() and the argument parser are furnished to allow a single script to work both at the command line and via the NFC daemon. You can try this by running the script directly from the command line, i.e.:
#!

python basic.py
...should print the default message "My First NFC Application!"
This 'dual functionality' is actually used for both banner.py and qr.py scripts.
Extending the Tutorial
As mentioned earlier, the Pipsta NFC daemon already has provision for a shutdown function. This can be seen in the top-level init.py and the source for this can be found at: /home/pi/pipsta/Examples/nfc/pipsta/utilities ...in shutdown.py
To extend the NFC system tutorials, you could:
1) Add a new method to the Pipsta NFC App, pipsta.shutdown, taking a parameter of '1'
2) Add functionality to automatically run python nfc_server start on start-up by:
- Running:
sudo nano /etc/rc.local
- Adding:
sudo python /home/pi/pipsta/Examples/nfc/nfc_server.py start
3) Consider how this can deliver a headerless Pipsta (i.e. a system without a user interface) that automatically starts and can be shut down with an NFC tap, and how this could be useful in shutting down several units in --say-- a classroom.
4) Adapt the template provided to your own scripts for NFC-enabled, web-connected Internet of Things and Internet of People applications.
TIP: Let us know what you develop and we'll let the Pipsta community know what you've achieved!
End of Document
Updated