Wiki
Clone wikiPipsta / Pipsta Circuits 3 - Audio Hack
Difficulty Level


• No Linux or Raspberry Pi knowledge is required,
• A fully assembled and set-up Pipsta and an internet connection are required,
• This is a hardware hack so --whilst the circuit is very simple-- please double-check that there are no shorts before connecting it up to your precious Raspberry Pi!
Time to Complete


• The tutorial covers the operation of the script in overview.
• There are very few components and the scripts are very straightforward. There are areas for developing this should you wish to dedicate more time to it!
Overview
Hack that audio jack!
Three paper-clips, a resistor, a couple of GPIO wires and some speakers/headphones will give you the hardware for a wiringpi based script to play some festive tunes.
Pre-requisites
-
This project assumes you have a fully working and configured Pipsta. There are wiki guides on how to assemble and set-up your Pipsta.
-
wiringpi and wiringpi2 should be installed. If you have already completed the Rudolph tutorial, this will already be installed. If not, see the instructions at the bottom of this webpage.
-
You will also need:
-
A 'Half+Breadboard'
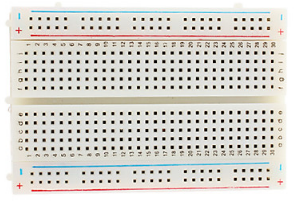
-
Speakers or headphones with a 3.5mm jack
-
330 ohm resistor
-
3 paper-clips. The gauge of the wire must fit in the breadboard. Our paperclips are 0.65mm and look like this:

-
2x GPIO to breadboard links
-
Scissors will be needed.
Step-by-Step Guide
1) If you haven't done so already, create a new directory under '/home/pi/pipsta/Examples' called 'christmas',
2) Download the file '10_AudioHack.zip' from here to the 'christmas' directory,
3) Right-click the file and select 'Extract Here'
4) You should now see:
• File: print_materials.py - the script to print the Pipsta Circuit
• File: audio_hack.py - the script that plays the tunes
• File: audio_cct.png - the Pipsta Circuit image for this project
• File: song1.txt - Your first christmas tune
• File: song2.txt - Your second christmas tune
• Directory: image_print - the module that does the printing
5) Run the print materials script:
#!python

python print_materials.py
6) Your circuit should be printed. Feed this out past the tearbar and cut along the dashed lines with scissors.
7) Affix the Pipsta Circuits label to your half+breadboard.
8) We are now going to turn those paperclips into something much more useful! For each paperclip, bend the inner loops of the paper clip down through 90degrees, like so:

9) You have now created:
**2x jack terminal pins
1x mechanical fixing**
..even if you didn't realise it as you were doing it!
10) Now fit the left and middle paper-clips to the circuit, shown in red here:
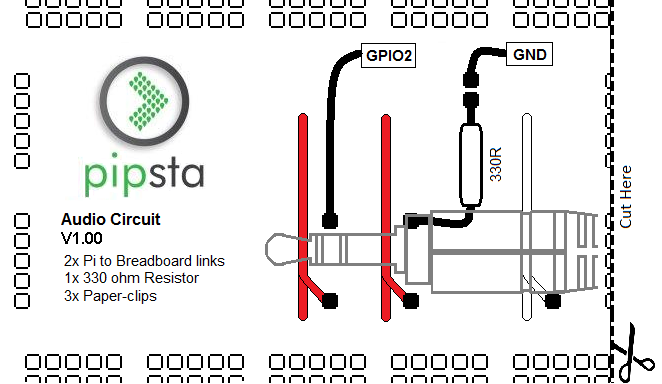
12) Now fit the resistor.
13) Trap the plastic sheath of the jackin the paperclip, making sure the 'leg' of the paperclip protrudes down below the level of the loop:
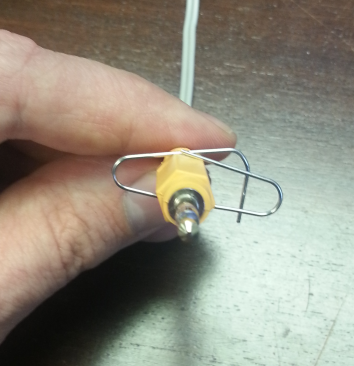
14) Now press the leg of this paperclip into the board as shown here:
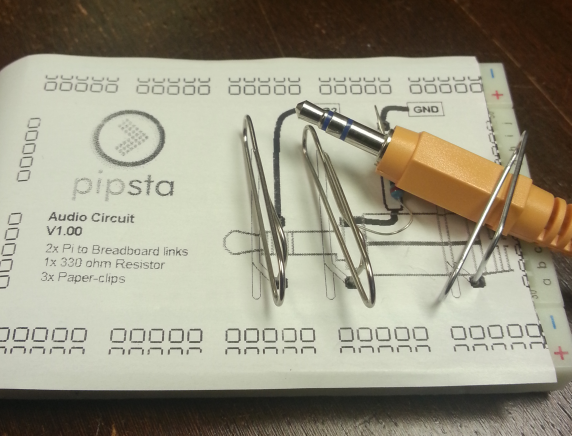
15) Lifting the top of the middle paperclip upwards, rotate the jack plug around until it is trapped:
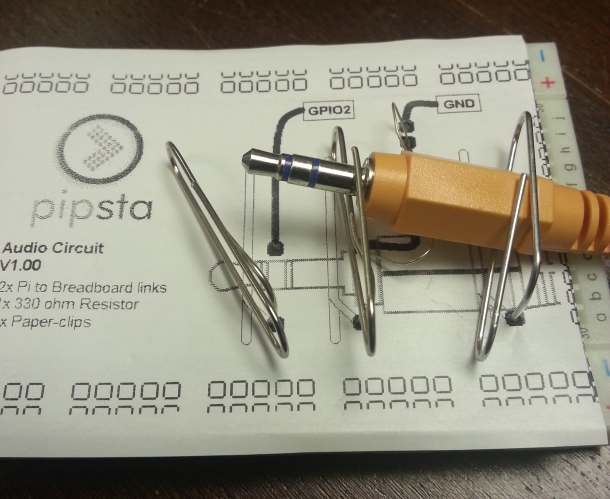
16) Do the same for the left paperclip.
17) When you are finished, you should have something like the following:
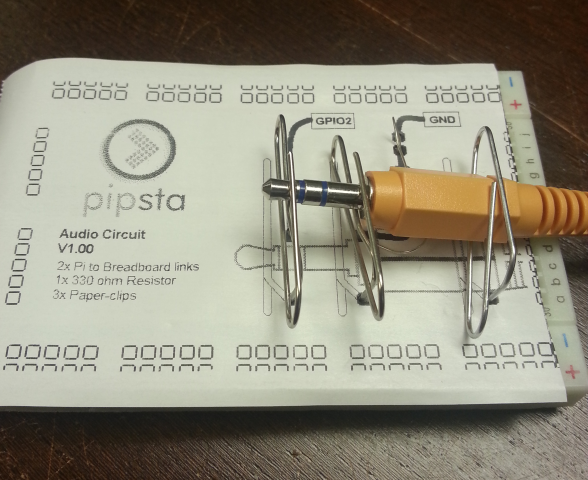
The tricky bit is over!
18) Check for short-circuits! The resistor is all that is saving your Raspberry Pi from a very bad day and intentionally snakes off away from the middle terminal. Make sure that middle paperclip and the GND end of the resistor do not meet!
19) Fit the GPIO2 and GND wires.
20) Back in the terminal, type:
#!python

sudo python audio_hack.py
21) All being well, you should now hear sounds (maybe even a tune) coming out of your left speaker.
22) Once you've guessed the tune, now type:
#!python

sudo python audio_hack.py song2.txt
23) You should now start to feel much more festive(!)
How It Works
1) WiringPi (and WiringPi2) have a tone generation function, which outputs a signal of the desired frequency to a GPIO pin.
2) We read in a file, a line at a time. Each line consists of a single character which is one of:
c,D,E,F,G,A,B,C or a whitespace character
..where 'c' is Middle-C (or close enough)
3) The character is used to pick a frequency:
#!python

FREQ_CL = 262
FREQ_D  = 294
FREQ_E  = 330
FREQ_F  = 349
FREQ_G  = 392
FREQ_A  = 440
FREQ_B  = 494
FREQ_CH = 523
Note that WiringPi's tone generation only accepts integer values, so we've rounded some of the frequencies up or down.
A whitespace character simply gives a pause.
4) Each note is played for a fixed period, yielding a rather primitive music player. If you would like to hack this hack, you might consider adding a second character to each line which defines the note duration, for example.
5) Other possible hacks include:
-
Create more tunes! The song files are fairly easy to understand, so you can have fun creating your own monotonal, staccato masterpieces until people in the vicinity tell you to stop.
-
Getting the right audio channel working. Be careful with that extra paperclip!
-
Make the script polytonal by producing other frequencies on other GPIO lines.
-
Add a volume control by adjusting the resistance. But make sure you don't exceed 20mA per line and 50mA overall!
Feedback
We hope you have fun with this project, and would love to hear back from you about this and any other Pipsta projects. Please drop us a line at support@pipsta.co.uk
[END]
Updated