Wiki
Clone wikiPipsta / Snowman Paper Dolls
Difficulty Level


• No Linux or Raspberry Pi knowledge is required,
• A fully assembled and set-up Pipsta and an internet connection are required,
• The script presented is essentially a variant of the previously released image_print.py,
• The section How it Works gives an optional insight into the script's functionality for those wishing to deep-dive,
• Young children may benefit from adult assistance in folding and cutting the paper dolls.
Time to Complete


• The tutorial covers the operation of the script in overview.
Overview
This script loads an image of a lone snowman and prints it ten times (so he has some company.) A bit of careful folding and cutting yields a chain of Christmas paper dolls, ready for the kids to colour-in.
Pre-requisites
This project assumes you have a fully working and configured Pipsta. There are wiki guides on how to assemble and set-up your Pipsta.
Scissors and felt-tip pens or crayons will be needed!
Step-by-Step Guide
1) If you haven't done so already, create a new directory under '/home/pi/pipsta/Examples' called 'christmas',
2) Download the file '5_SnowmanPaperDolls.zip' from here to the 'christmas' directory,
3) Right-click the file and select 'Extract Here'
4) You should now see:
• File: snowmen.py - the script for this project
• File: snowman.png - the image used for the project
5) Once you have navigated to '/home/pi/pipsta/Examples/christmas/5_SnowmanPaperDolls', press F4 to bring up the terminal
6) In the terminal, type:
#!python

python snowmen.py
7) This will run the script and produce a print of ten symmetrical paper dolls.
8) We've limited the number of snowmen in the chain to ten because folding and cutting become difficult at higher numbers.
9) You may want to produce duplicate prints as there is a small risk of misfolding and/or cutting too far.
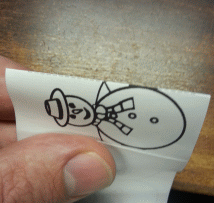
10) Now for the tricky part! Fold the paper along the dashed line to the right of the first snowman:
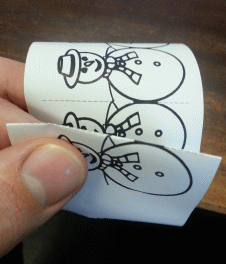
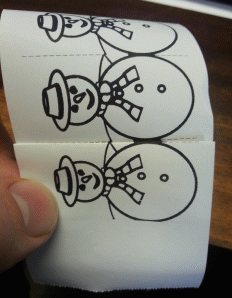
11) We are going to fold the snowmen in a fan-fold fashion, so --if you are really careful-- you can achieve two alignments at the same time by aligning the existing fold to the next-but-one dotted line:
12) Keep folding in this way:
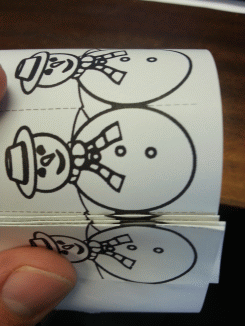
13) ...until you have folded all snowmen:
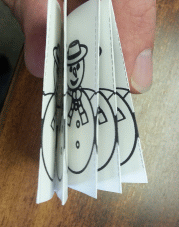
14) Taking care not to cut the link areas at the side of the snowmen, trim around the head, hat and base, leaving the sides of the body and the arm areas untrimmed:
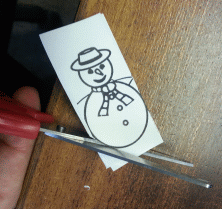
15) Now, holding your breath, unfold the snowmen. This is the point at which fold misalignments and aggressive trimming come to light. Do not prejudge your own efforts too negatively though: we have found that chidren can be quite forgiving during the finale!

(whilst the above shows inaccuracies, this was deemed acceptable by a six year-old.)
16) Adults can then enjoy a quiet few minutes as the kids colour-in their snowmen paper dolls.
How It Works
1) This script works in much the same way as the standard image print project.
2) The script has a single entry point:
- main() - where the script is run directly from the command line
3) After some housekeeping for Operating System and Python versions, the printer is located and connected-to over USB
4) The LED is set flashing by setting the LED mode to '1'
5) The remaining code is wrapped in a Try block. Note that steps 6-9 use the Python Imaging Library and step 10 uses the Bitarray library.
6) The image 'snowman.png' is opened
7) The image is rotated in memory so the paper dolls will run down the length of the paper roll
8) The image is then scaled to fit the 384-dot wide print area
9) The image is then converted to monochrome using newim.convert('1') (effectively 1-bit 'colour' so as to be suitable for the printer.)
10) The image is then converted to an array of bytes using convert_image() using the bitarray library
11) The byte array data is sent as a series of Single Dot Line graphics (see below for more information) commands, over USB to the printer using print_image()
12) print_image() works in the same way as the standard image_print() script, with the exception that all commands and data are sent down to the printer 10 times using the loop:
#!python

for snowy in range(0,10):
Note: The Pipsta printer has a 10KB receive buffer. As the buffer fills with data, the printer goes 'busy' to signal to the Raspberry Pi that sending more data will result in data being lost and the image being corrupted. The latter part of print_image() enquires the busy state of the printer and waits for the printer to be un-busy before sending more data.
13) After the 10 snowmen have been printed, the script feeds 5 more character lines to present the image for tearing off
14) Finally, the command is issued to stop the LED from flashing, indicating that processing is complete.
Single Dot Line Graphics
The Pipsta printer has a print width of 384 dots, with each dot being 0.125mm wide to give an overall width of 48mm. Note that this leaves a ~5mm unprinted left- and right-margin on (nominal) 58mm paper.
Note: To put the printer into a contiguous graphics mode (i.e. without white-space separation between character lines) the script will issue the SET_FONT_MODE_3 command.
Pipsta scripts that produce graphics prints (rather than pure text) use the printer's "Single Dot Line Graphics" command to render the dot image on the paper. The command to render a complete dot line of 384 dots takes the form:

Where a '1' bit in the data corresponds to a black dot.
Thus, the function convert_image() simply has to convert the bitmap image to a big-endian bit-array, and then convert this to an array of bytes to make the data sequentially accessible to the nested for-loops in print_image()
[END]
Updated