Wiki
Clone wikiEspecWeb / EWC_v3.3-P300-manual
Table of Contents
- 1 Introduction
- 2 Initial Setup and First-Time Use
- 3 User
- 4 Network Monitor
- 5 Overview
- 6 Trend
- 7 History
- 8 Constant
- 9 Program
- 10 Start Stop
- 11 Settings
- 11.1 Controller Settings
- 11.2 Data Logging Settings
- 11.3 Macros
- 11.4 Running Time Meters
- 11.5 User Interface Settings
- 11.6 API Settings and Programming Interface
- 11.7 Chamber Interface
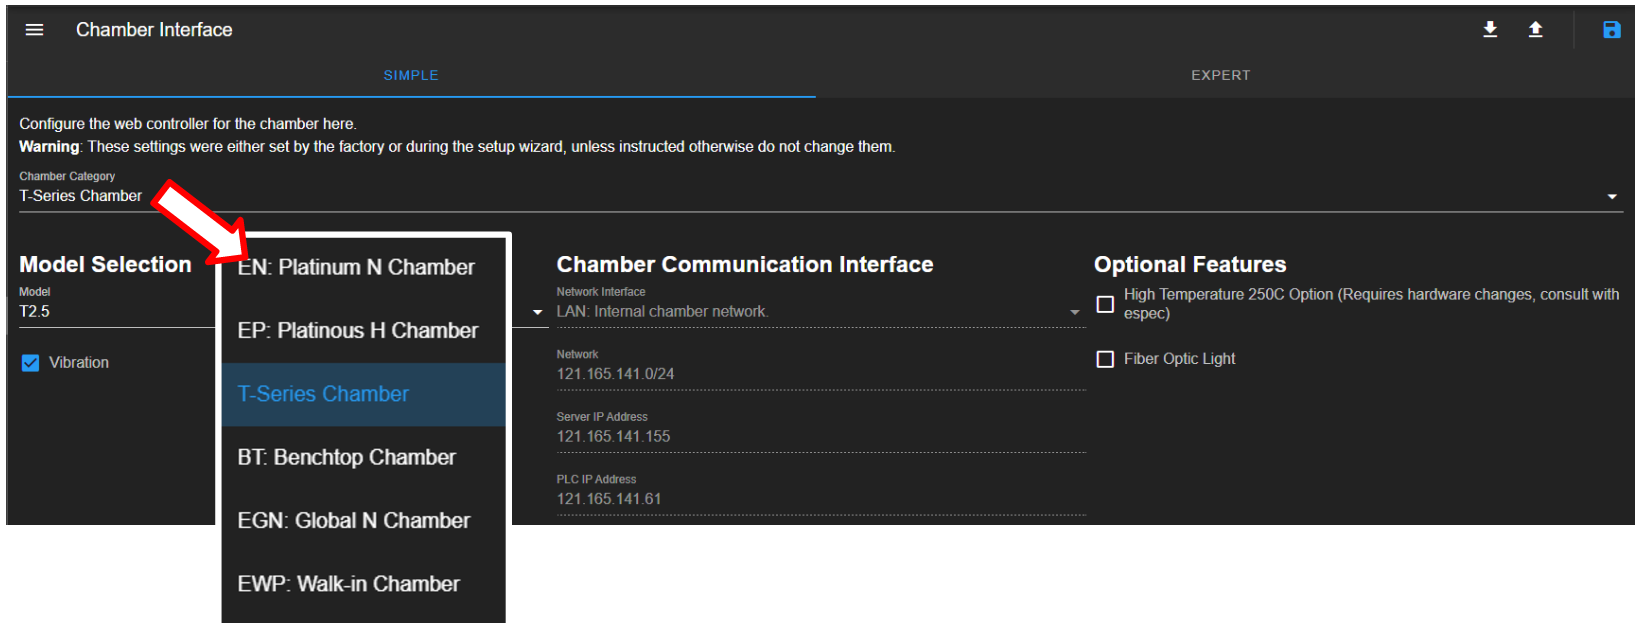
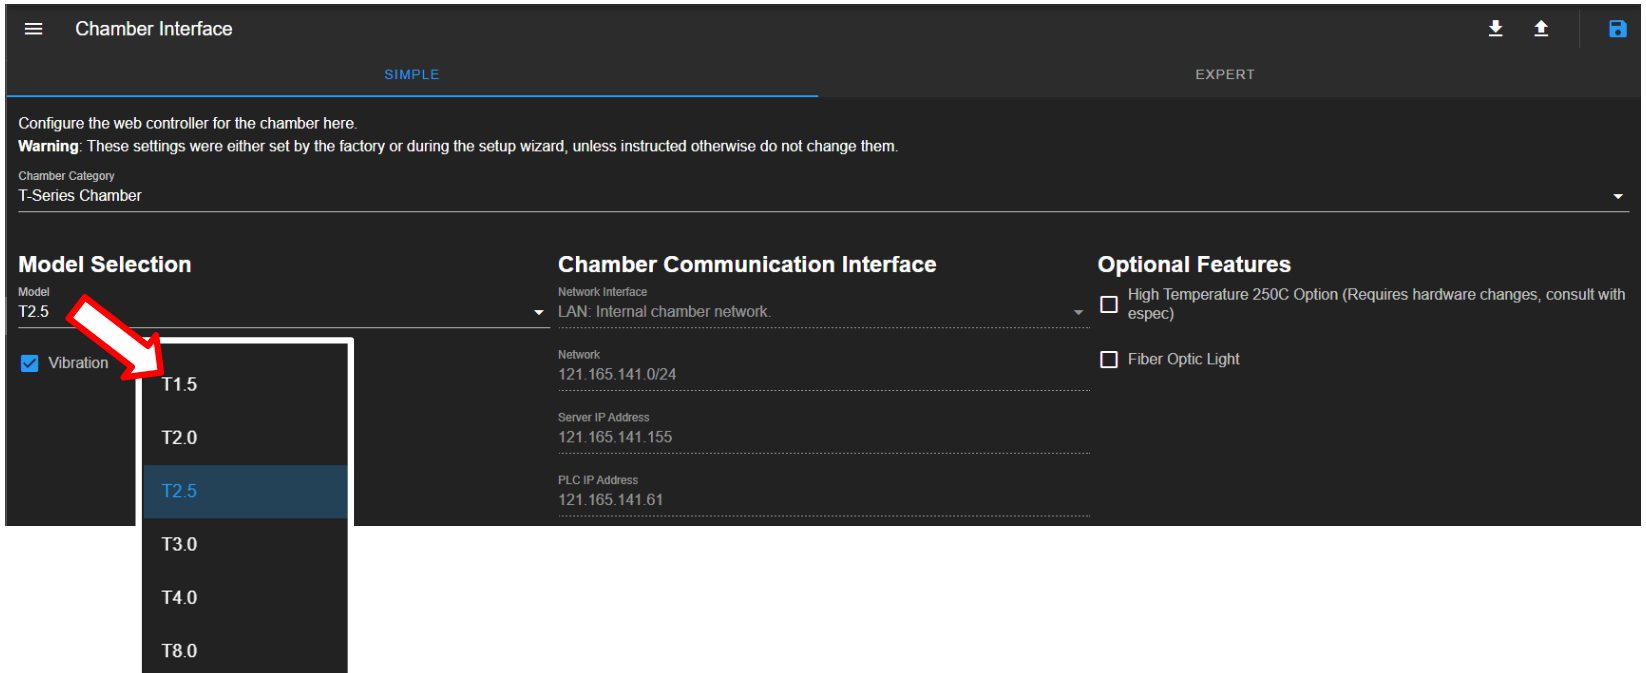
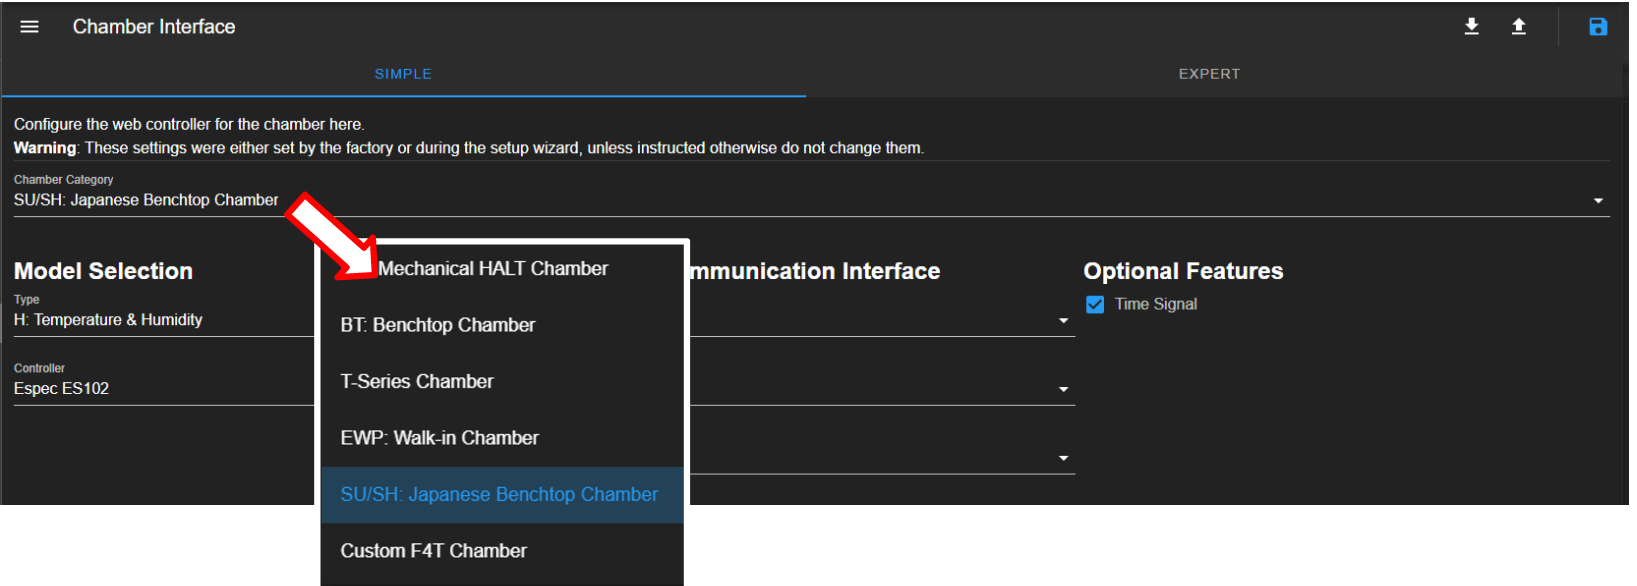
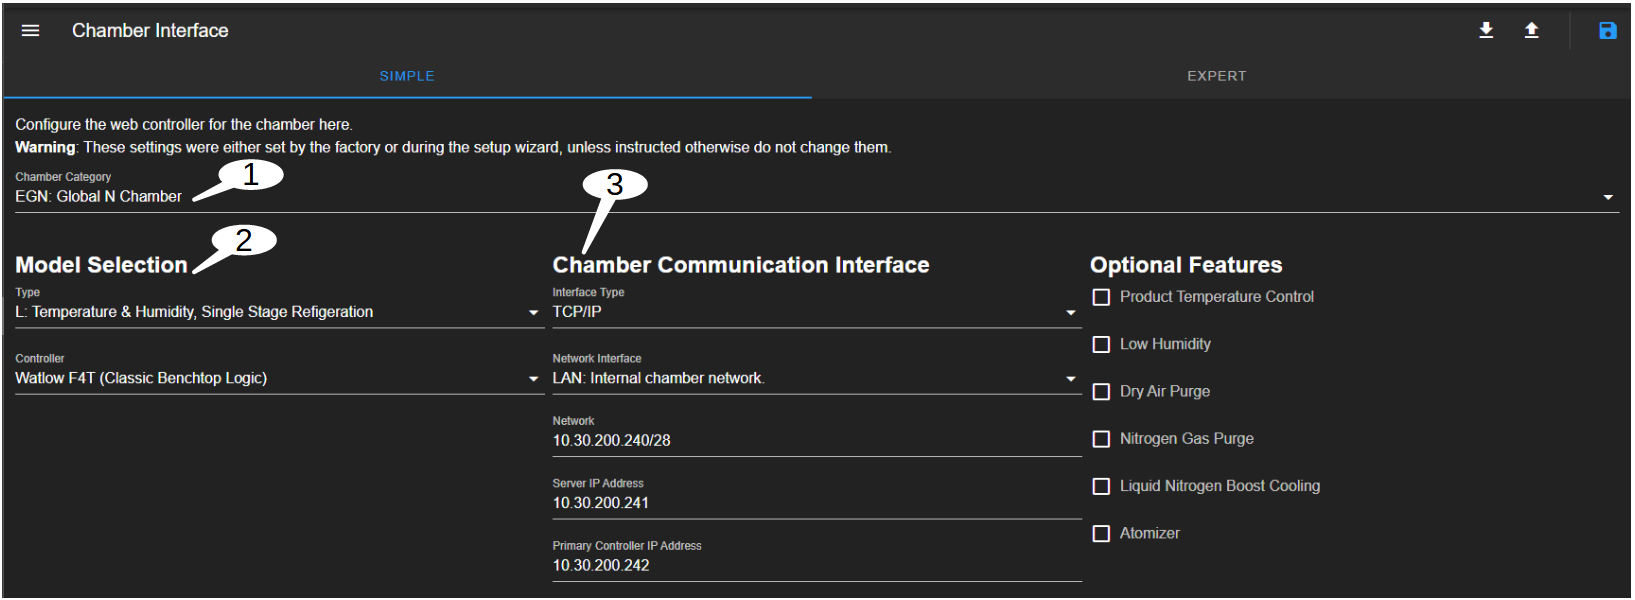
- 11.7.1 T-Series Chamber Interface: Simple Configuration Option
- 11.7.2 SCP220 Chamber Interface: Simple Configuration Option
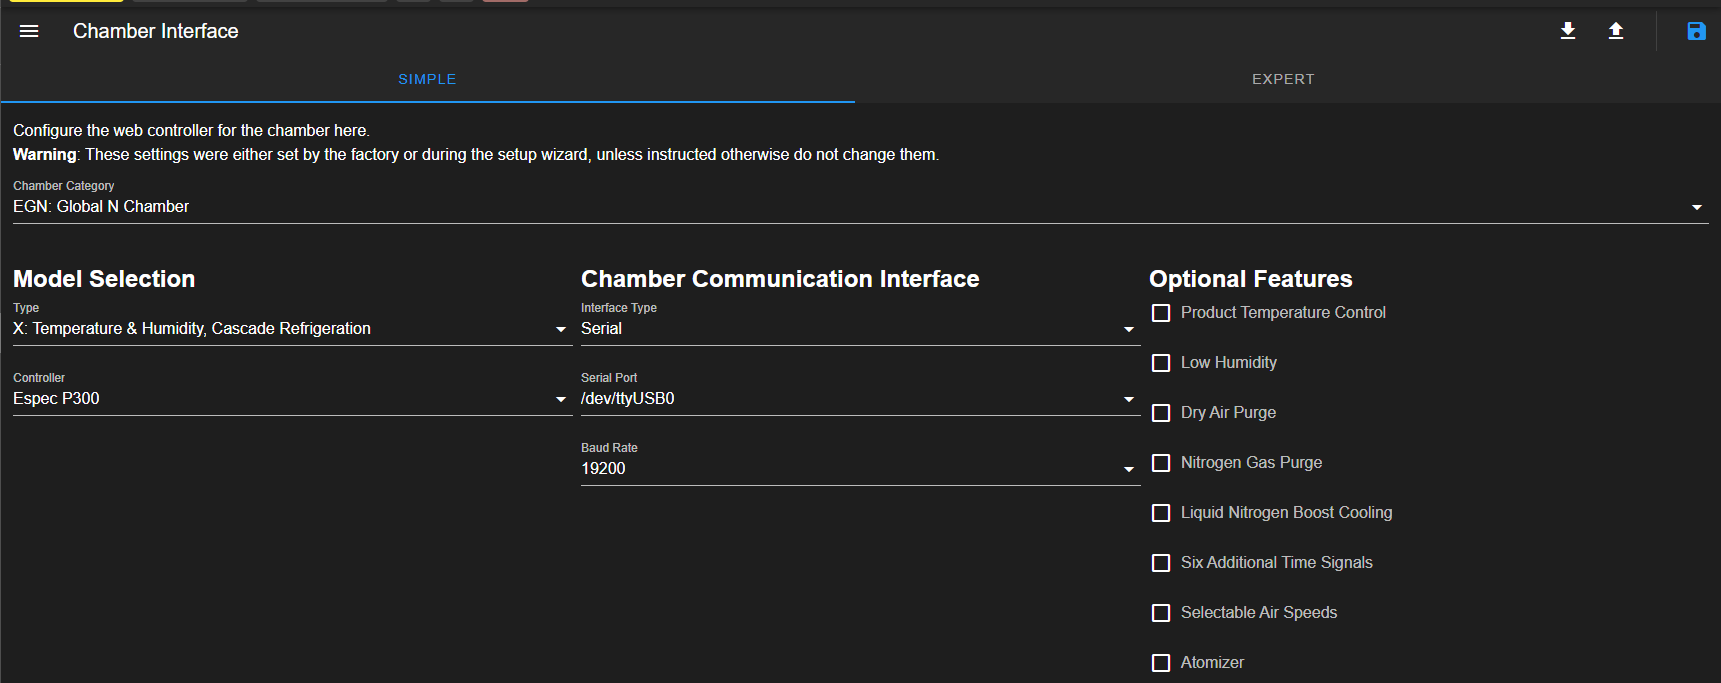
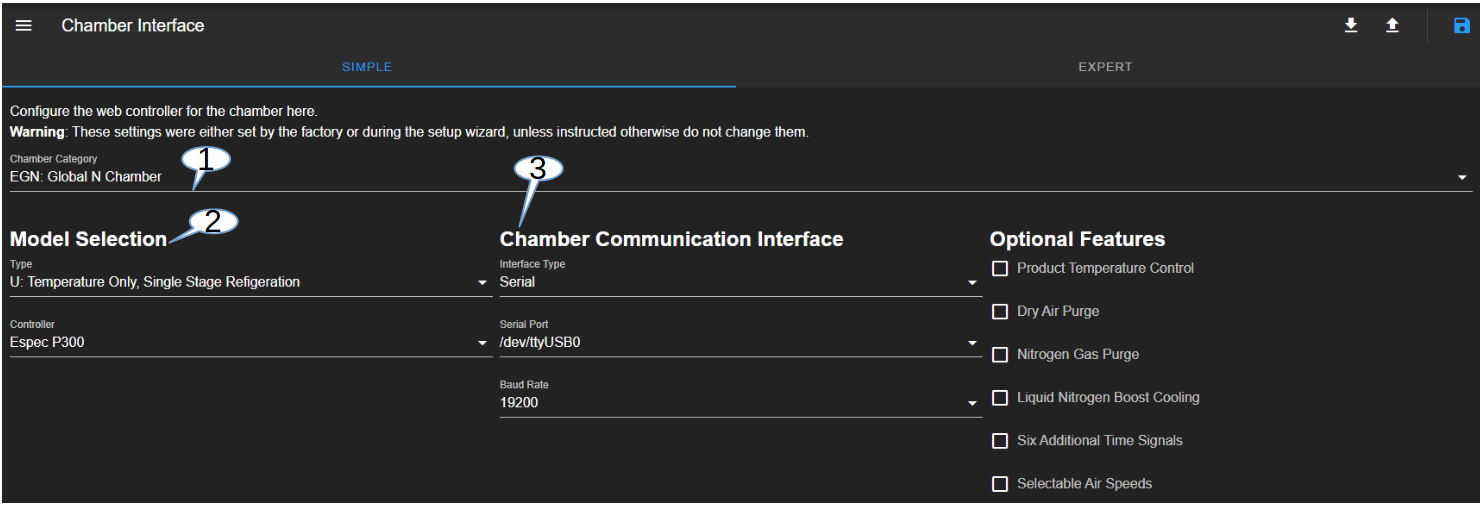
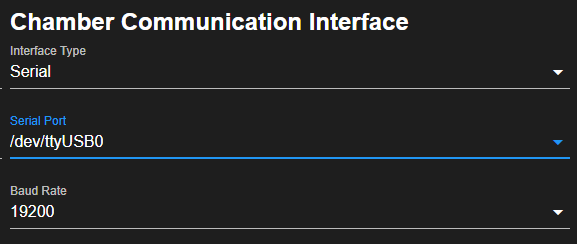
- 11.7.3 ESPEC P300 Chamber Interface: Simple Configuration Option
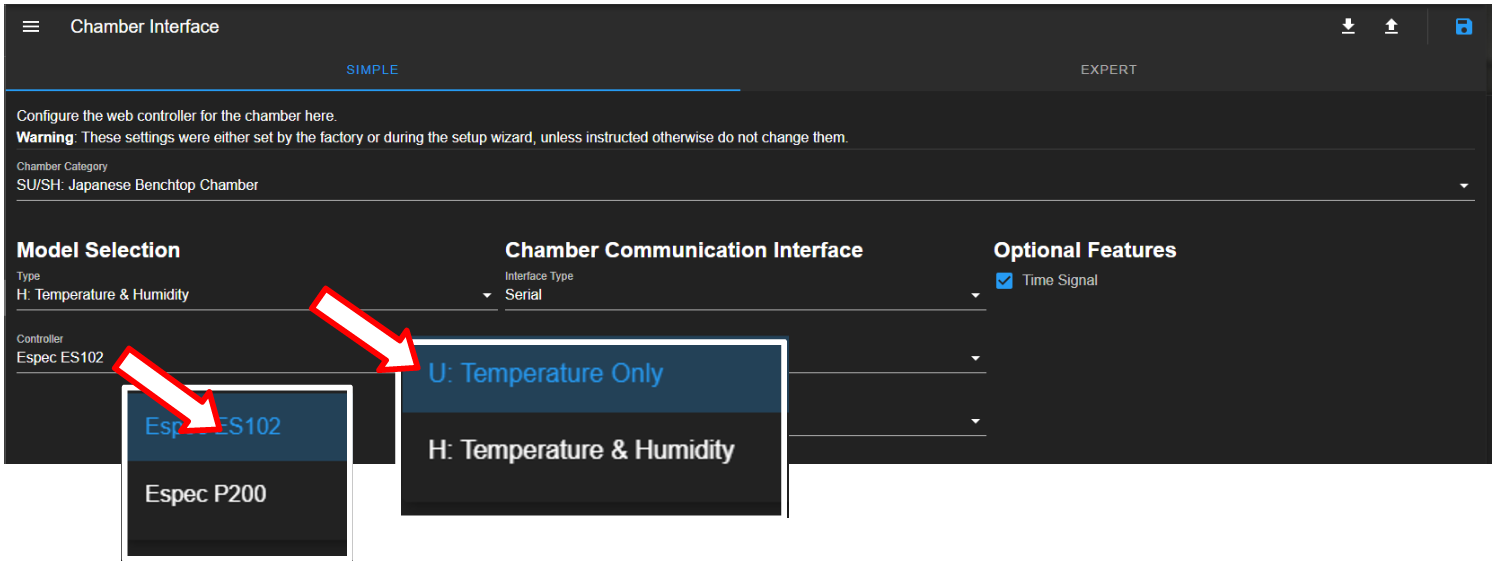
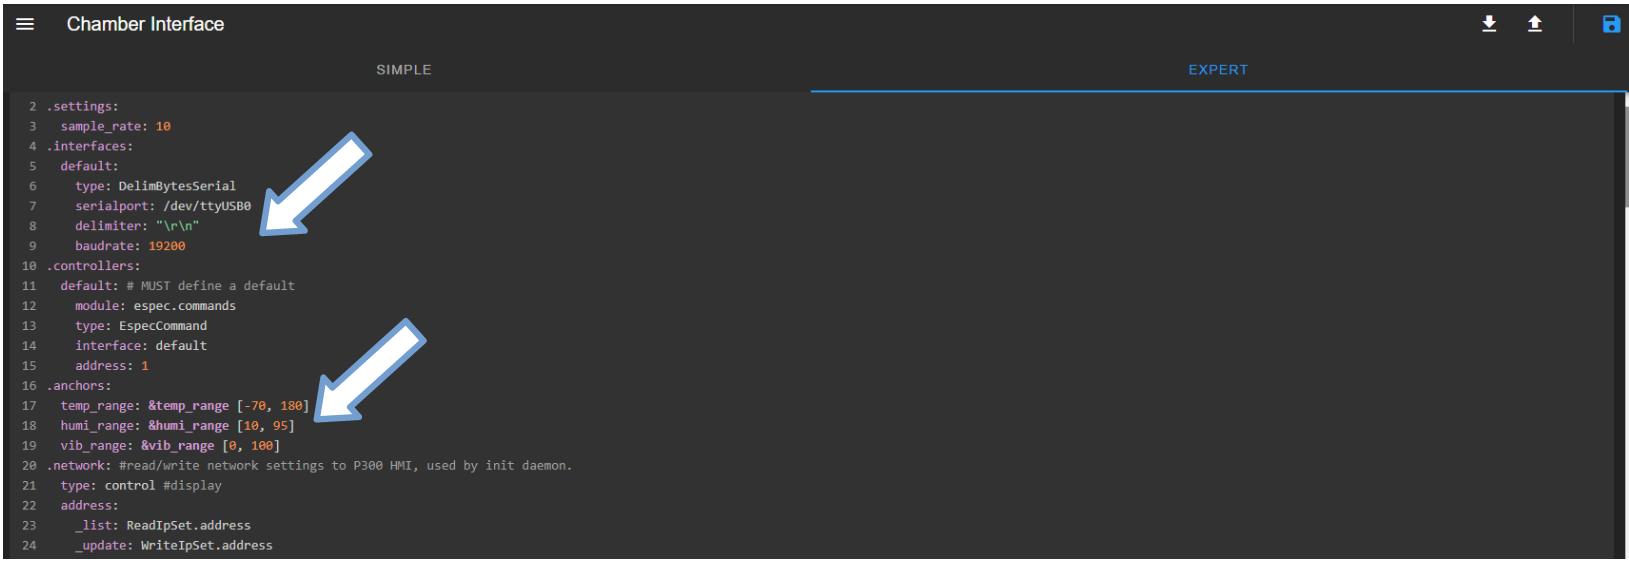
- 11.7.4 ESPEC ES102 Chamber Interface: Simple Configuration Option
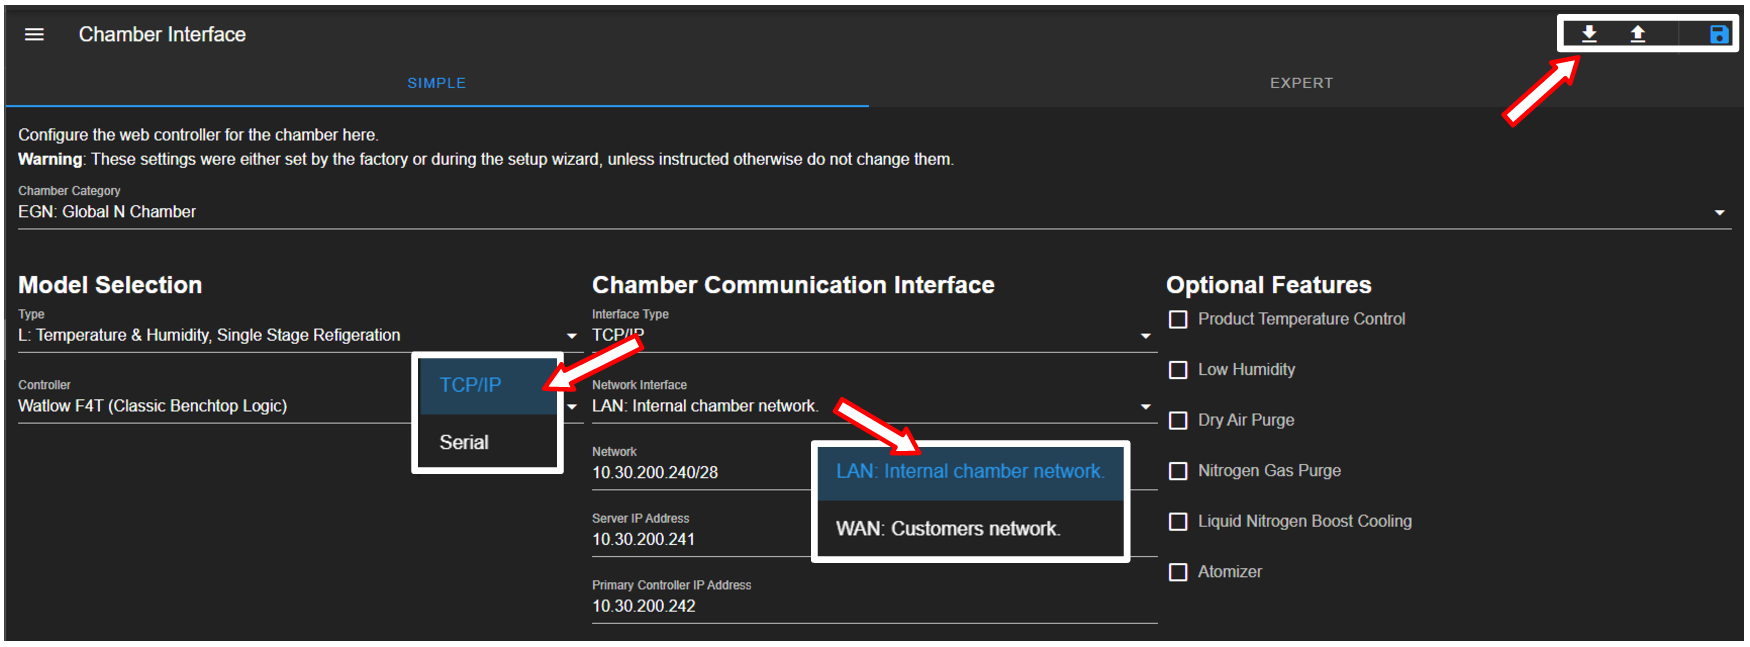
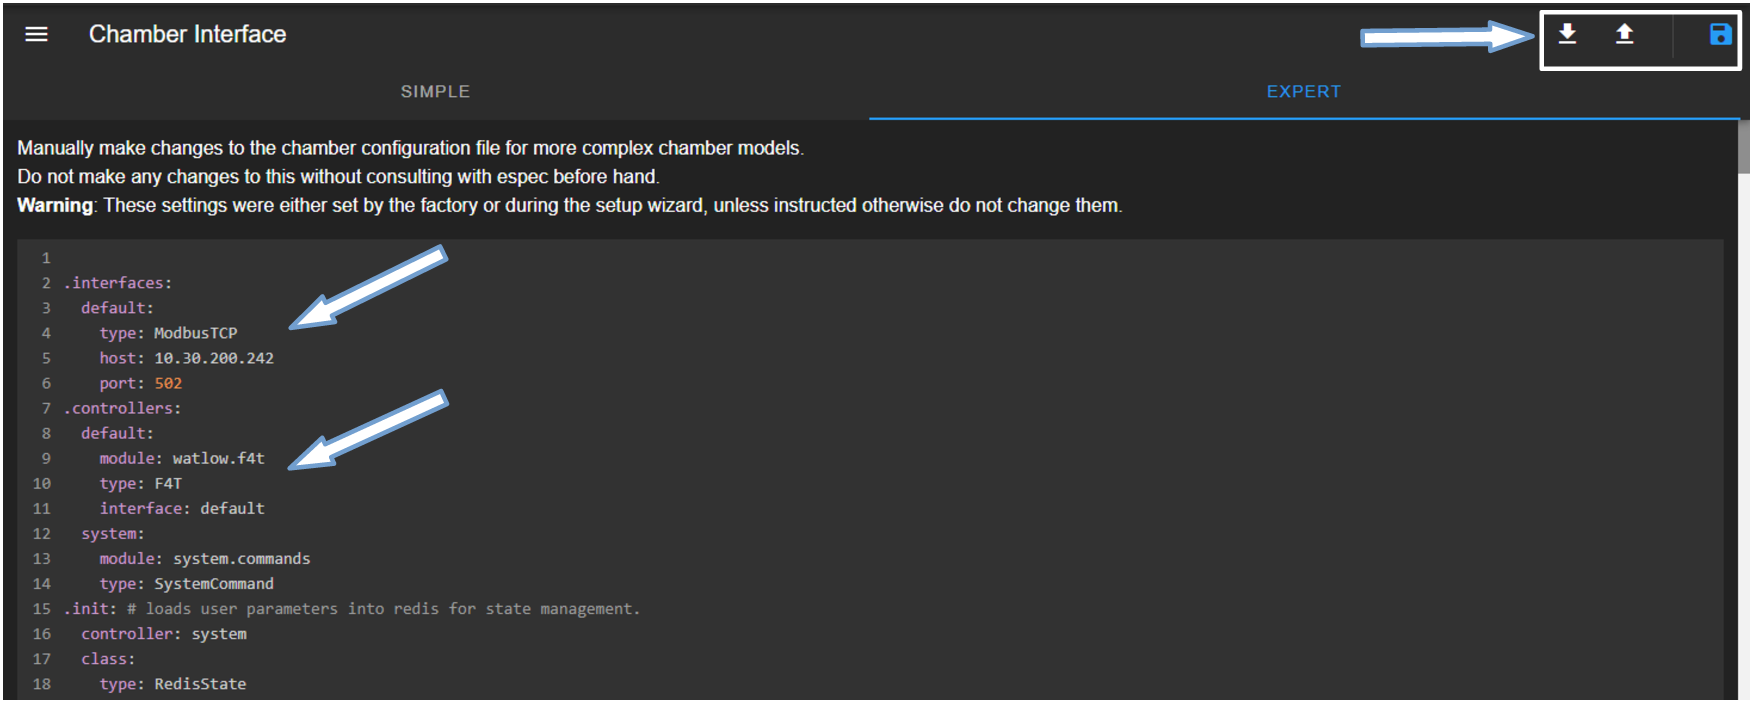
- 11.7.5 Watlow F4T Chamber Interface: Simple Configuration Option
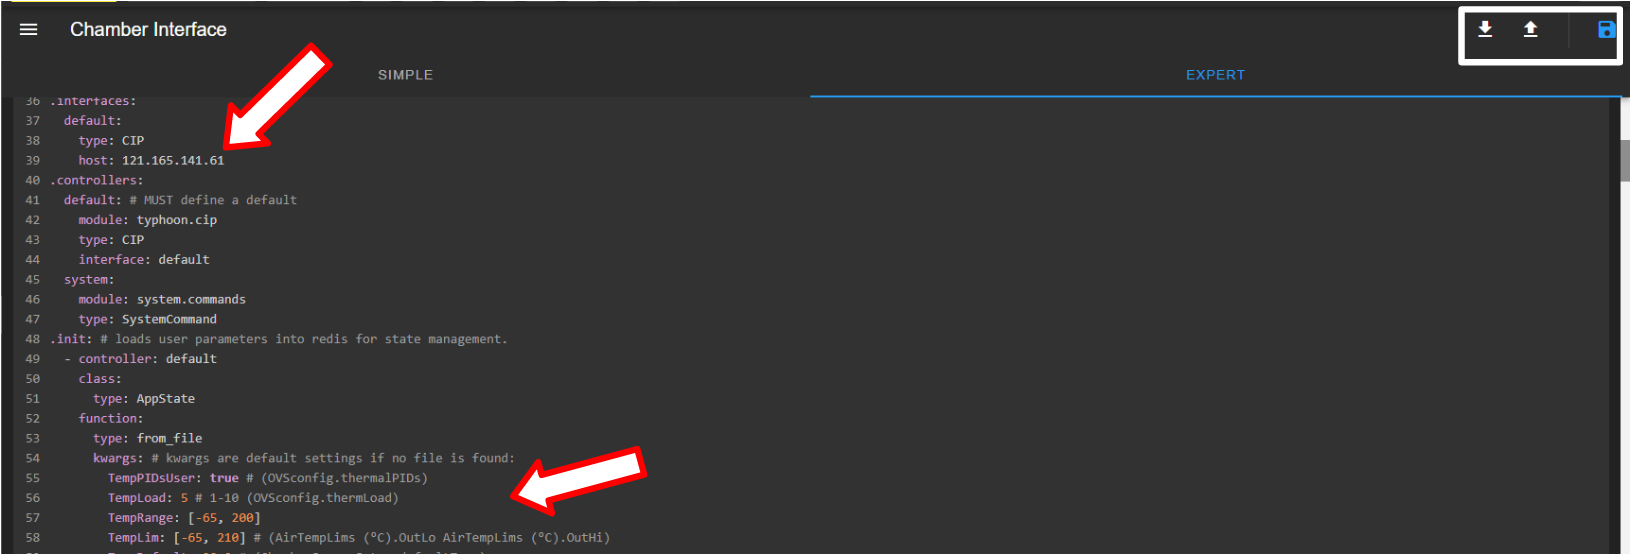
- 11.7.6 Watlow F4 Chamber Interface
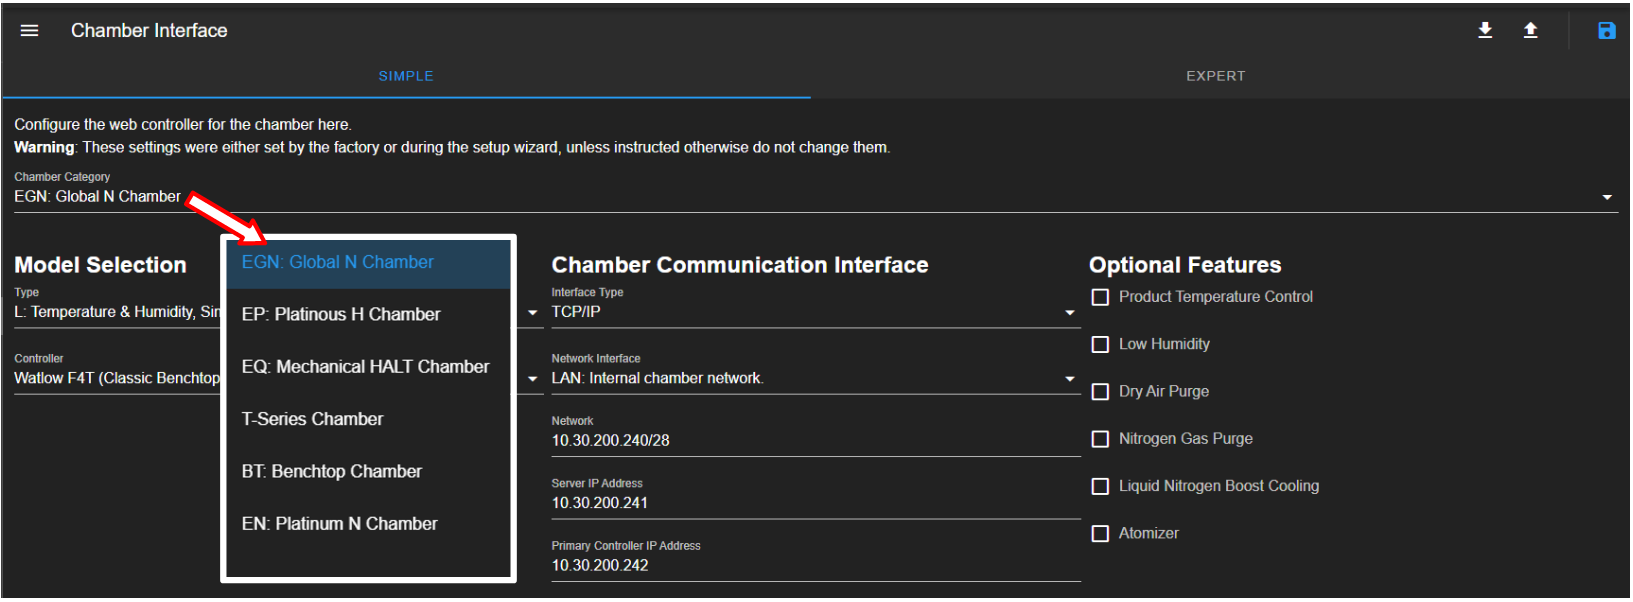
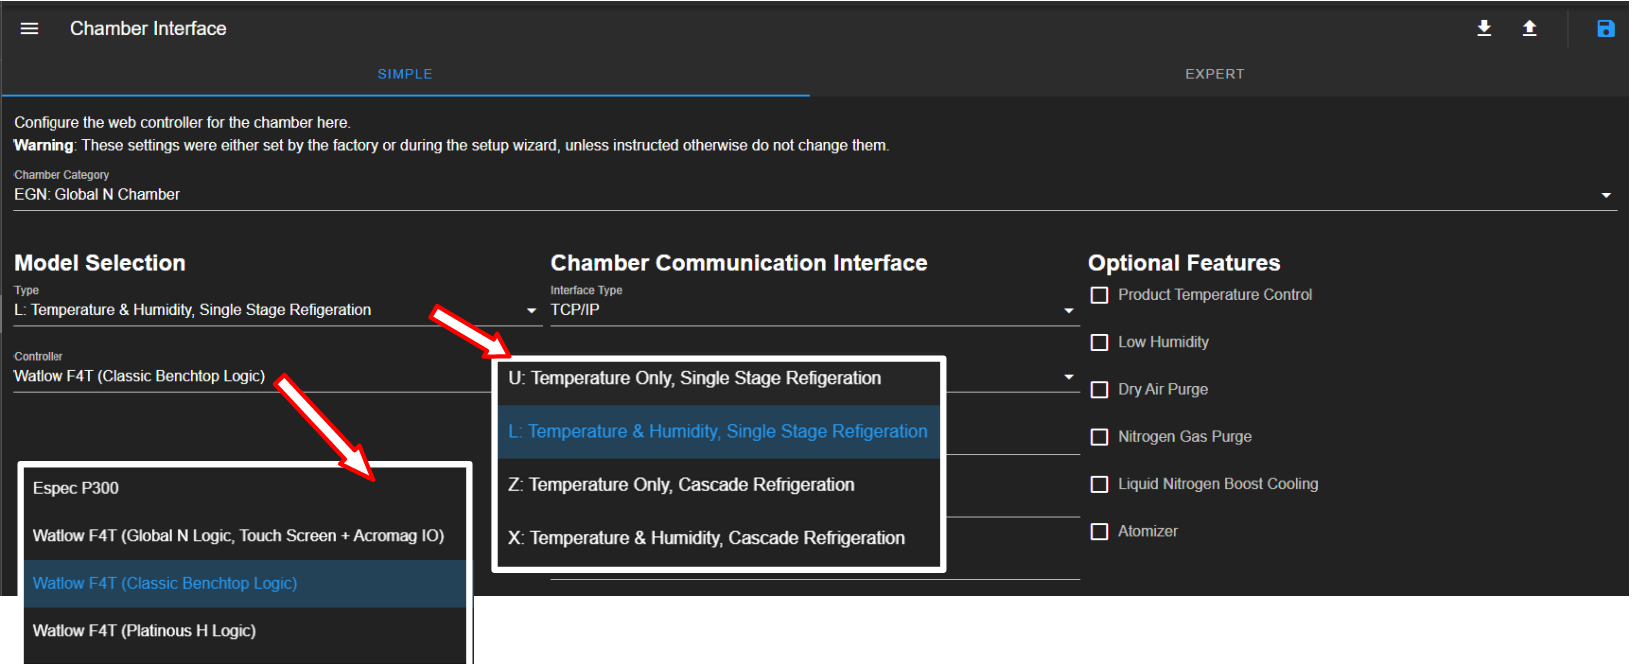
- 11.7.7 Chamber Interface: Expert Configuration Option
- 11.8 Date/Time Settings
- 11.9 Email Settings
- 11.10 Firmware
- 11.11 HMI Settings
- 11.12 Network Settings
- 11.13 Server Settings
- 11.14 User Settings
- 12 About
1 Introduction
This manual provides information for the use of ESPEC Web Controller (EWC), Version 3.3. EWC is capable of communicating and controlling the following process controllers and programmable logic controllers (PLCs): ESPEC P300, SCP220, ES102, Watlow F4 and F4T, Allen Bradley CompactLogix, ControlLogix and Micro8xx series. Communication can be established via an Ethernet TCP/IP protocol through an Ethernet port or via an RS-232/RS-485 through a serial or USB-to-Serial interface.
Our EWC is an embedded computer powered by a Debian GNU/Linux distribution as the operating system. It is based on an x86 64-bit architecture called UP2Board designed by AAEON. Through stack programming, this embedded computer is configured and customized to utilize a standard Web browser to provide (i.e., host) its user interface (UI) to operate and control the chamber; hence, the name Web Controller.
EWC can operate as a standalone system with its touchscreen as the dedicated HMI for control and operation. As a networked system, EWC can join a network to host its UI through a Web browser, accessible through its IP address or its hostname. Thanks to the ability of a Web browser to operate from any computer on the network, chamber operations can be performed via EWC remotely by authorized users on the network. Access to EWC is possible only for any device on the same network.
With EWC, the tedious process of controlling or programming the chamber via the controller HMI is now replaced with the easy-to-use simple UI with multi-tasking capabilities. Many practical features offered by EWC include chamber alerts via an e-mail communication, remote operation through RESTful API, data-logging, access to other EWCs (and chambers) on the same network, and much more. These and other features will be described in detail in this manual.
With Debian GNU/Linux periodically receiving security updates, our embedded system is kept secure and up to date. Additional measures, such as read-only access and no-login accounts, were taken to secure the embedded system. No one can log into the operating system to install a software or modify its configurations for exploitation. Any update package for EWC is signed by ESPEC software engineering team to ensure that only ESPEC update package can be installed on EWC. The user accounts (c.f. Section 1.5) available at the API level of EWC are limited to controlling and operating the chamber and EWC only, and not the Debian GNU/Linux embedded system that hosts EWC. In other words, the entire embedded system of EWC is completely locked down and there are no known methods to break into it. In spite of all the security measures put in place, it is important to recognize that there is no such thing as a secure system; it is all a matter of how difficult and how long it takes someone to breach the system.
To provide robustness in terms of stability and self-correct operation, EWC has a dual root partition structure. This configuration ensures that during a system update (or upgrade) at least one root partition is always in the stable operating state, should the firmware update fail. This feature thereby provides seamless updates and overall system management. In short, EWC is robust, secure, easy to manage and operate.
This manual focuses on a chamber equipped with ESPEC P300 PLC.
1.1 How to Use this Manual
This manual is currently available in two formats: (1) Online and (2) PDF. The online manual is structured for easy navigation via the Table of Contents; it also focuses on a specific chamber. Instead of scrolling down the Web page, users can jump to a specific chapter or section by just clicking on the specific topic listed under the Table of Contents (at the top of the Web page). Click the back button on the Web page to return to the Table of Contents to select a new topic.
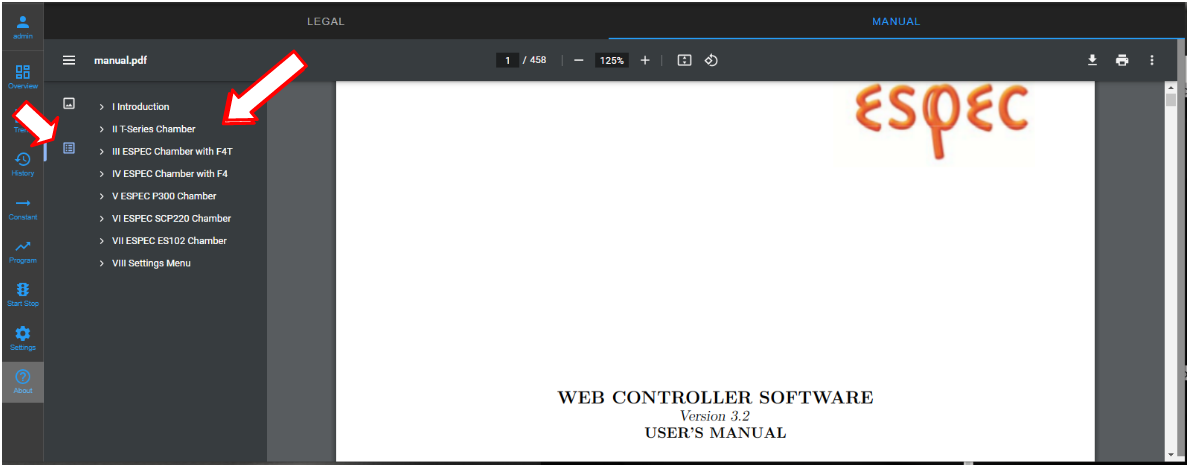
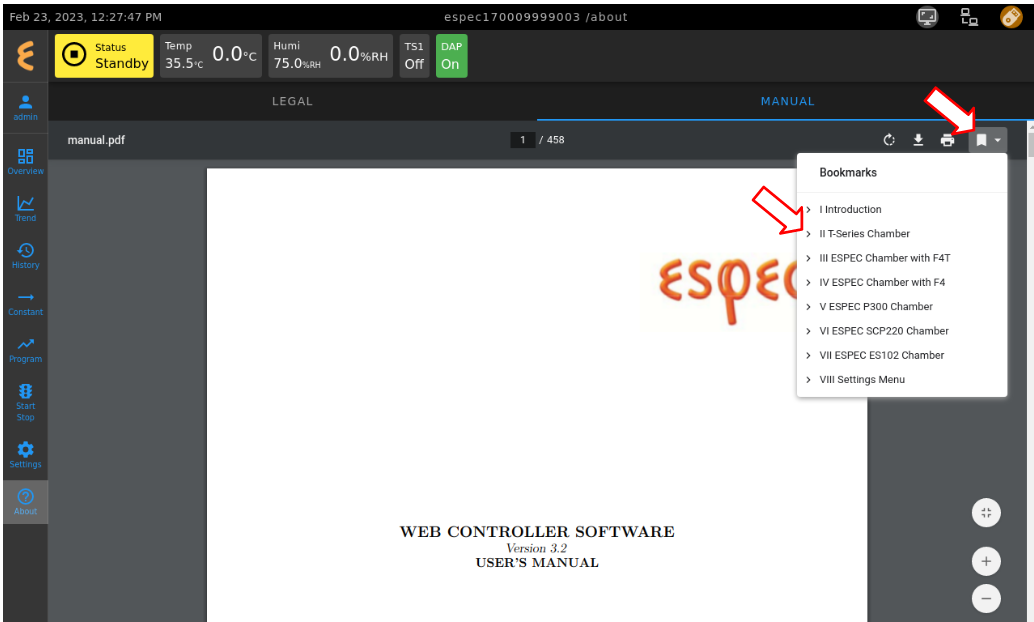
The PDF format is available as an online viewable from within EWC, accessible under the Manual tab in the About menu.
1.2 Operating System, Software or Hardware Requirement
No software installation is required to use EWC. Only a Web browser running on the local computer is needed to access EWC via its IP address or hostname (as outlined in the chapter on Initial Setup and First-Time Use). A computer running MS Windows, Mac OS or GNU/Linux can operate EWC. A handheld device, such as a smartphone, on the same network can also access and operate EWC.
1.3 Web browser Compatibility
Our EWC supports the following Web browsers: Chromium, Google-Chrome, Mozilla Firefox, Microsoft Edge, Apple Safari and Opera. Microsoft Internet Explorer 11 can also be used to access and operate EWC. However, due to its slow performance, the use of Microsoft Internet Explorer 11 is strongly discouraged.
1.4 Home Page of EWC
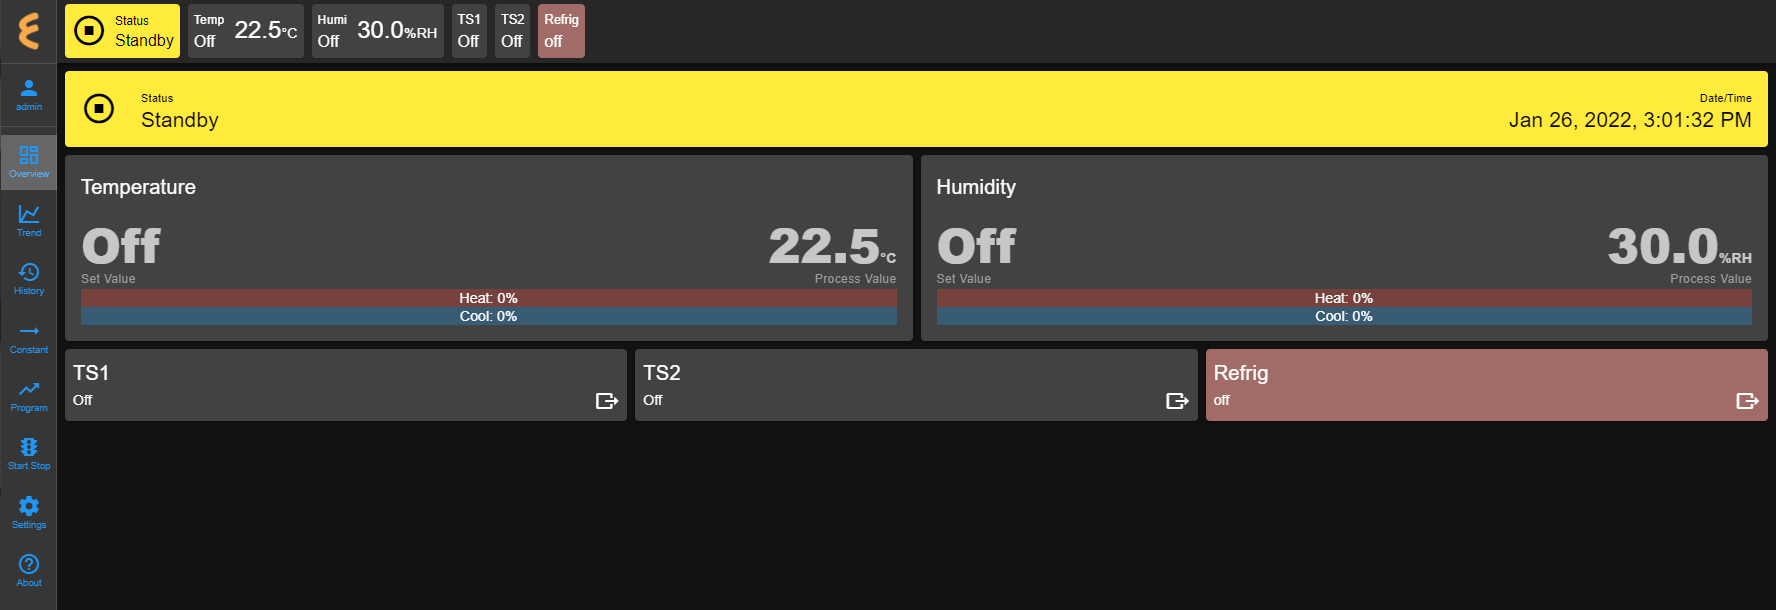
The following figure depicts the home page of EWC, displayed using the Google Chrome Web browser. EWC can be accessed via its IP address or its hostname. As depicted in the figure, EWC was accessed via its IP address (http://10.30.200.253/). Chapter 2 provides detail how to access EWC via its IP address or its hostname from your local computer.
The home page of EWC consists of the main operation menus grouped together in the menu bar which remains fixed on the left. Their descriptive names associated with their icons on the left identify their functionality.
The home page of EWC is essentially the Overview menu. Every time EWC starts, its home page is presented as an Overview page. Three display areas make up the EWC page, as depicted in the following figure. They are outlined and described as follows:
-
Menu bar: The menu bar provides the main operation menu of EWC which remains fixed on the left throughout the operation. The contents of each menu are displayed in the main display area (Item 3 below). Settings and Program menus contain submenus to offer further control of EWC and operation of the chamber. Access permission to these menus is managed by the admin user. The User Settings submenu (under the Settings menu) allows the admin user to control access to the menu bar. Different types of access privilege are described in Section 1.5.
-
Status bar: The status bar displays the status of the chamber operation mode and its condition. The bar remains fixed on the top throughout the operation. The first tab (called status tab) displays the current status of the chamber operating modes, available in Standby, Constant, Program and Alarm. Depending on the type of chamber and controller, the next several tabs display the status of air temperature, product temperature, humidity, vibration, time signals, and refrigeration, including light fixtures in the chamber. The Overview menu discusses in detail the operation of these tabs.
-
Main Display: Contents associated with each specific menu in the menu bar are displayed in the main display area. The menu in the menu bar is highlighted to indicate its active status. As depicted in the above figure, the main display area displays the contents of the Overview menu, showing the current conditions of the chamber such as its temperature, humidity, time signal and refrigeration settings.
1.4.1 EWC and its HMI Touchscreen
During its startup (i.e., during booting), if EWC detects a monitor connected directly to its HDMI or video display port, it will automatically start the graphical user interface on the detected monitor. This trigger applies to both a standard monitor or a touchscreen. The dedicated touchscreen is called HMI, generally attached onto the front or the side of the chamber. This HMI provides complete control and operation of the chamber through EWC.
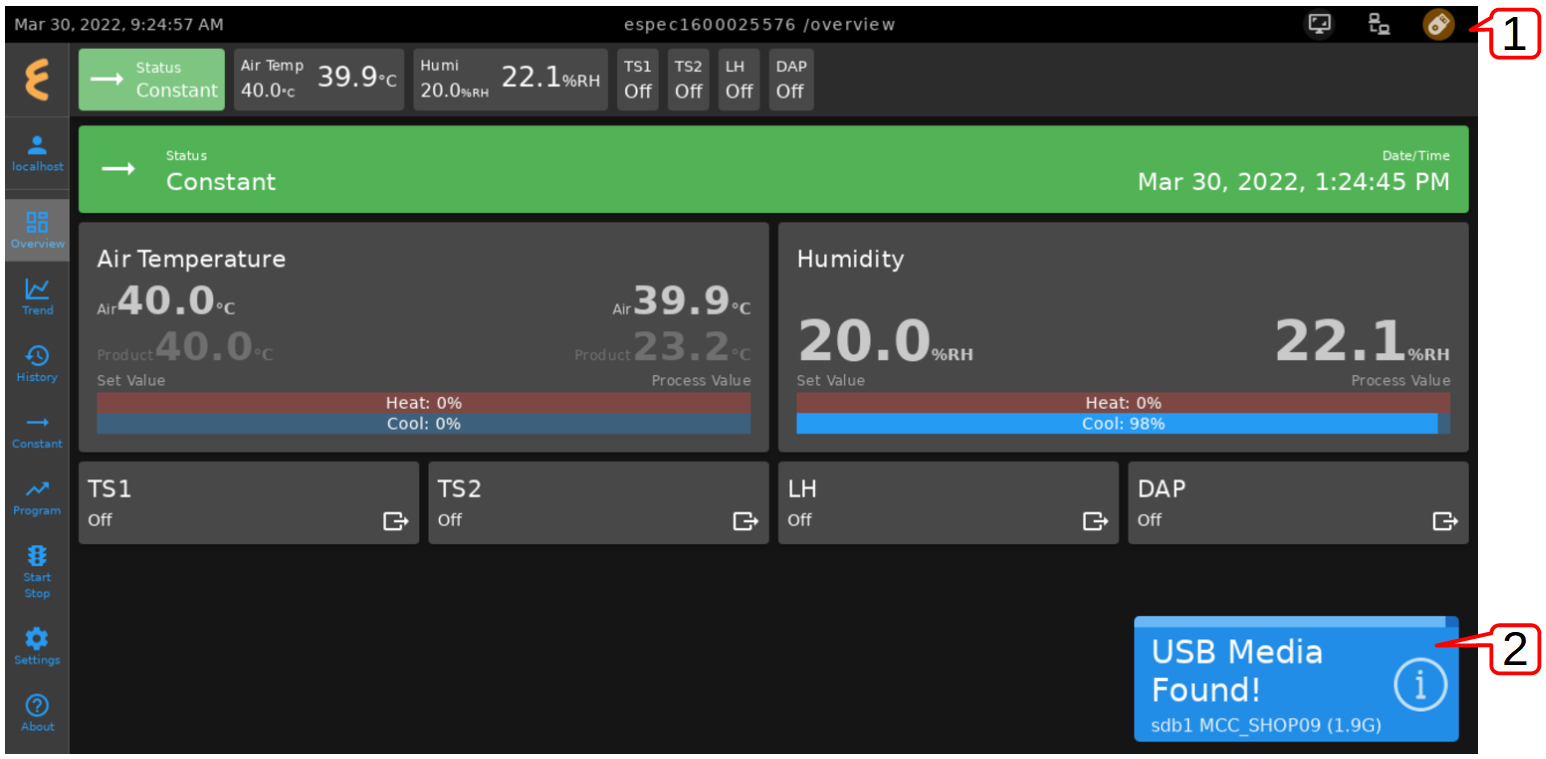
The following figure depicts a typical home page of EWC displaying the touchscreen menu bar designated and labeled as item 1. Components and functionality of the touchscreen menu bar are described as follows:
-
Touchscreen Menu Bar: EWC on its HMI has the touchscreen menu bar (at the top) to provide the touchscreen operation as shown above. It includes the URL that displays its current menu in the middle, three icons on the right (labeled as Screen shot, Network Info and USB Device) described as follows:
-
URL/Menu: To access the URL menu bar, touch the middle area of the touchscreen menu bar indicated by the arrow. This URL displays the current menu of EWC. It provides an extended operation of EWC menu navigation, such as backward or forward menu, refresh the UI page, or access a new menu. It is probably easier to access a different menu via the menu bar (on the left via the touch operation), but the URL field accepts input of a new menu by entering its name and pressing the right arrow.
-
Screen shot: This button can only be used to take screen shots of the EWC user interface if an external USB storage device is plugged into the USB port (on the HMI panel) and detected by EWC. To use this button, first plug in the USB device.
-
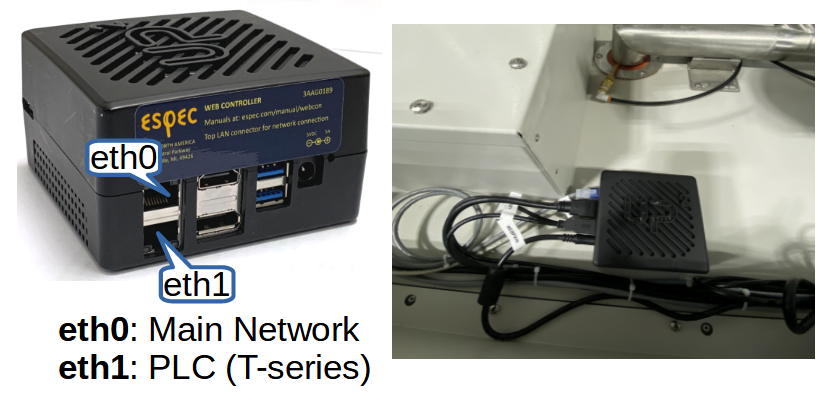
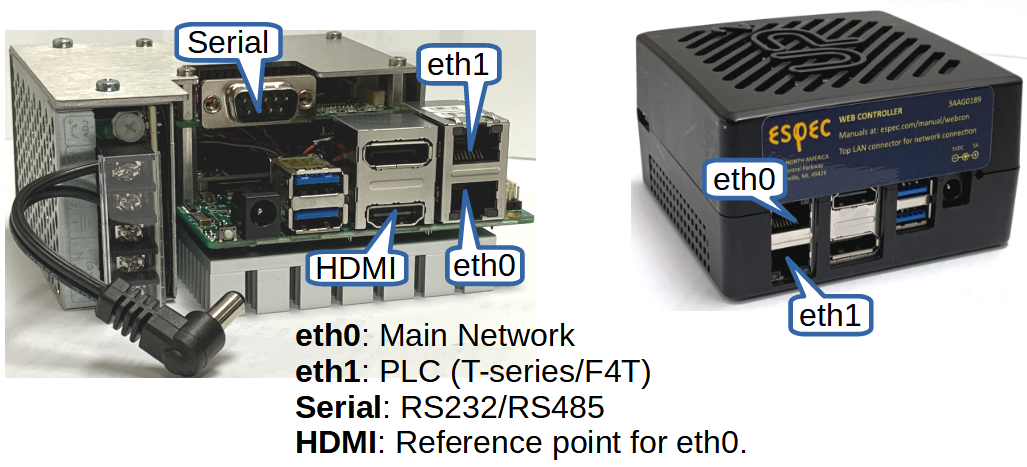
Network Info: EWC hardware has two Ethernet ports. They are labeled as eth0 and eth1. Press this icon to list their IP address(es). As shown in the figure, eth0 displays the IP address of EWC with its MAC address, eth1 displays the IP address. A user on the same network may access EWC user interface via the Web browser using the IP address on eth0. Detail of eth0 and eth1 is discussed in the Settings menu.
-
USB Device: This icon flashes in orange if a USB device is attached to EWC. Do not unplug (that is, simply pull out) the USB thumb drive from the USB port. Doing so would corrupt the filesystem on the USB thumb drive. To disconnect the USB thumb drive from EWC, perform the following procedure:
- Touch the USB Device button.
- Touch the Eject button in the drop-down menu, as depicted above. The system will update the filesystem on the USB thumb drive and dismount it from EWC. A pop-up window appears at the lower right to indicate the status of the ejection.
- Pull out your USB Thumb drive.
-
-
USB Notification: A notification is displayed when EWC detects an external USB device. It displays the device name and storage space.
1.4.2 EWC on a Desktop
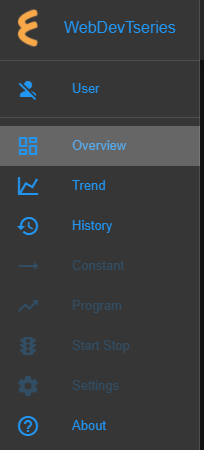
The Overview page automatically handles and renders the display based on the Web browser window or the monitor resolution. The menu bar will collapse to display only its icons if Overview cannot fit in the display window, as shown in the following figure. In order to maintain full display, the browser window has to be expanded (or maximized).
1.4.3 EWC on a Handheld Device
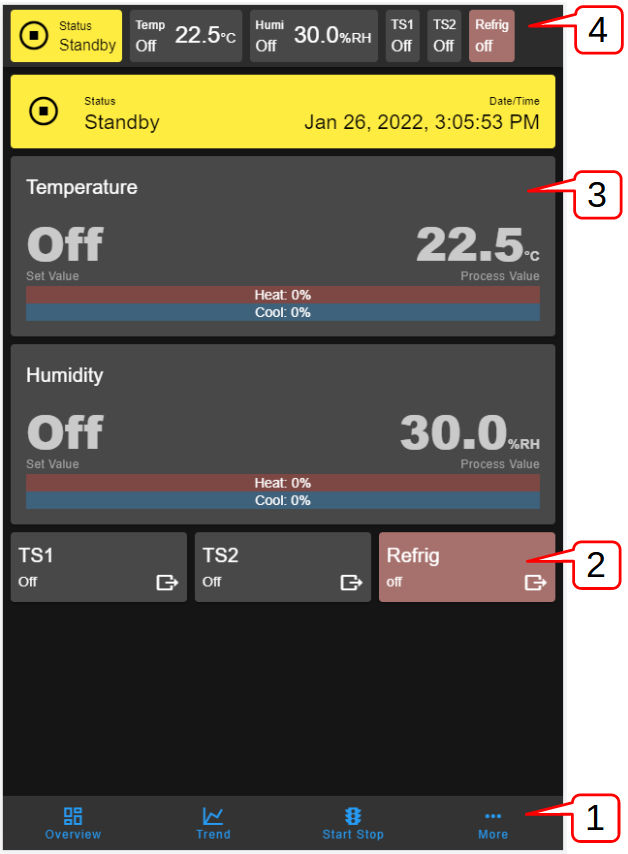
EWC can also be controlled wirelessly via a handheld device, such as a tablet PC or a smartphone, provided the device is part of the main network that EWC is connected to. Typical display of EWC Overview page on a handheld device is depicted in the following figure.
- Tab bar: The menu bar is relocated to the bottom of the page, called tab bar. As depicted in the above figure, three main menus are displayed. The rest of the menus can be accessed by tabbing on the More button. This action causes the menu to display in vertical bar. To close the vertical bar, tab on the down-arrow icon.
- Main Display: The main display area provides a tab-up or tab-down action to access and control the chamber according to each selected (or active) menu.
- Status Tab Extension bar: Still remains in the original position below the status bar, this extension bar of the status tab now opens as a drop-down menu to access and control all the operating modes.
- Status bar: Still remains in the original position but displays only a few tabs, this status bar now becomes the slider bar.
The discussion in this manual will focus on EWC operation using the Web browser on a desktop or laptop computer.
1.5 User Account Types
To help protect the chamber from getting damaged by unauthorized users or users with limited knowledge of the chamber operation, user accounts with different level of privileges can be created. EWC is shipped with two user accounts with different level of privileges as outlined in the following table:
| Account | Overview | Trend | History | Constant | Program | Start Stop | Settings |
|---|---|---|---|---|---|---|---|
| Guest | RO | RO | RO | NA | NA | NA | NA |
| Admin | RW | RW | RW | RW | RW | RW | RW |
where NA, RO or RW under each menu has the following meaning:
-
NA stands for No Access. Users with NA privilege cannot access the EWC menu in any form. Any menu associated with NA is grayed out; it is thus inaccessible to the user, as depicted in the following figure. Any attempt to access the grayed-out menu (by clicking on it), the user will be prompted to login.
-
RO stands for Read-Only access. Users with RO privilege may view the contents of any page (or menu). All clickable contents or links are disabled.
- RW stands for Read-Write access. Users with RW privilege can access, view and modify the contents of any page (or menu). All clickable contents or links may be accessed and/or modified by this user.
The Guest represents a user who does not have an account on EWC. This user can access all the menus in browse or Read-Only mode (designated by RO). The administrator account called admin is one that has complete powers to operate EWC, including managing user accounts.
These NA, RO and RW access types can be used by the administrator to assign access privilege to different user accounts on EWC.
EWC is shipped with the administrator account using the following credentials:
- username: admin
- password: admin
This password should be changed to something more secure. Additional accounts should be created to set specific privileges for designated users. This topic is discussed under the Settings menu.
2 Initial Setup and First-Time Use
When EWC is turned on for the first time, it goes through an initial configuration via a Setup Wizard page. The procedure involves assigning a new password for the administrator account, setting up a password recovery e-mail and network settings.
EWC can operate both as a standalone system (with its touchscreen as the dedicated HMI) or as a networked system to offer remote access and operation of the chamber. Two types of chambers configured by default to operate as a standalone system are T-series and custom F4T chambers. With other chambers (such as, ESPEC P300, SCP220 and ES102, standard Watlow F4T and F4), EWC is configured to operate as a networked system.
EWC can join a Dynamic Host Control Protocol (DHCP) network or a static network. The following sections describe the different scenarios to set up your chamber and EWC to provide operational versatility.
2.1 DHCP Network: P300, SCP220, ES102 and F4T/F4
By default, EWC applies DHCP to obtain an IP address assigned by the DHCP server to join the network. The configuration is done automatically on EWC as soon as it detects a DHCP server on the network.
To connect the chamber (and EWC) to a DHCP main network, complete the following steps:
-
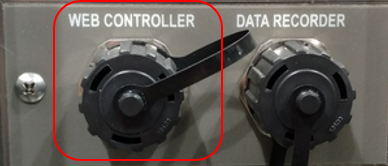
Plug an RJ-45 Ethernet cable into the Ethernet port on the chamber, as depicted in the following figure.
EP/EGN/EWP/EWS/EN Chambers -
Plug the other end of the cable into an Ethernet port (or a router) that connects to the main network.
-
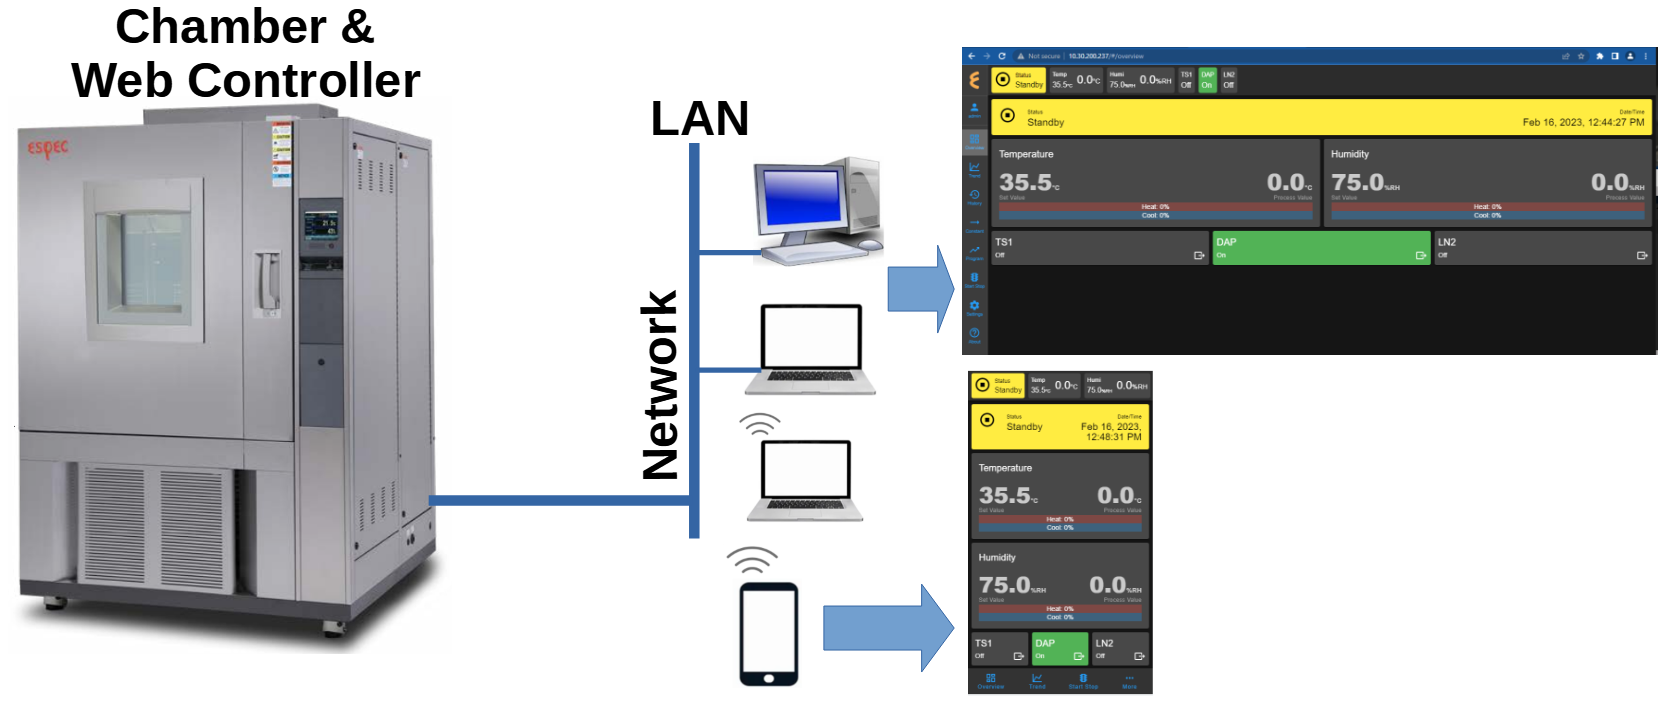
Your computer (PC or laptop) must also join the main network as shown in the following diagram.
To access and use EWC wirelessly from a laptop (or a handheld device), that laptop (or handheld device) must also join the main network through a wireless connection.
2.2 Static Network: P300, SCP220, ES102 and F4T/F4
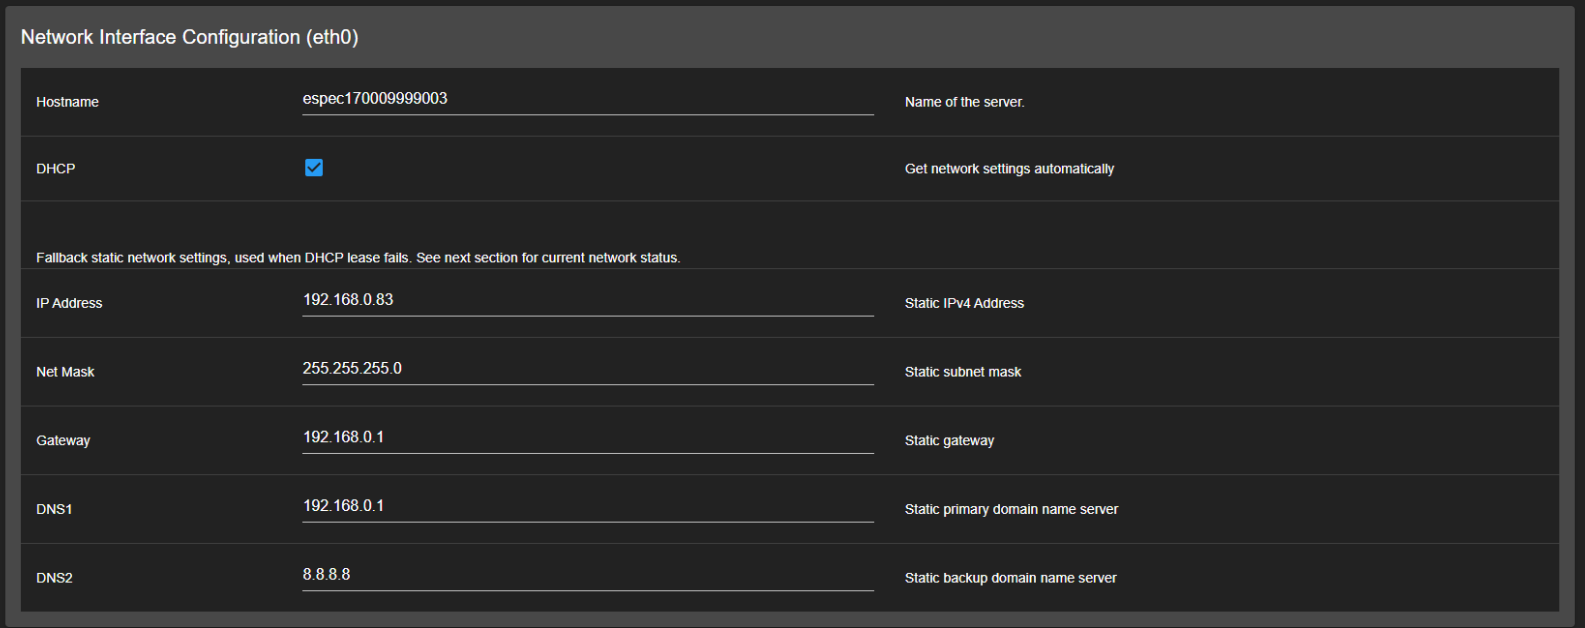
By default, EWC can join a DHCP network automatically. If DHCP service is not available, EWC uses its preconfigured Class C static network settings called fallback static IP:
- IP Address: 192.168.0.83
- Subnet Mask: 255.255.255.0
- Gateway: 192.168.0.1
This protocol occurs when EWC is connected directly to a computer or a network hub without DHCP service.
2.2.1 Static Network Connection
To use a Class C static network on EWC, complete the following steps:
- Plug an RJ-45 Ethernet cable into the Ethernet port on the chamber, as indicated in the previous figure.
- Plug the other end of the cable into the Ethernet port of your PC or a network hub. If a network hub is used, your PC must also connect to it via an Ethernet cable.
-
Your computer should be connected to the chamber directly or via a network hub as pictured below.
2.2.2 Static IP on your PC
Your computer must also use a Class C network protocol with the following recommendation:
- IP Address: 192.168.0.84
- Subnet Mask: 255.255.255.0
- Gateway: 192.168.0.1
- Preferred DNS server: 8.8.8.8
- Alternate DNS server: 8.8.4.4
The following procedure applies to a PC running MS Windows 8/10/11:
- Hold down the Windows key and press R to launch the Run Command dialog box.
- In the Run dialog box, enter ncpa.cpl into the Open box field and press Enter.
-
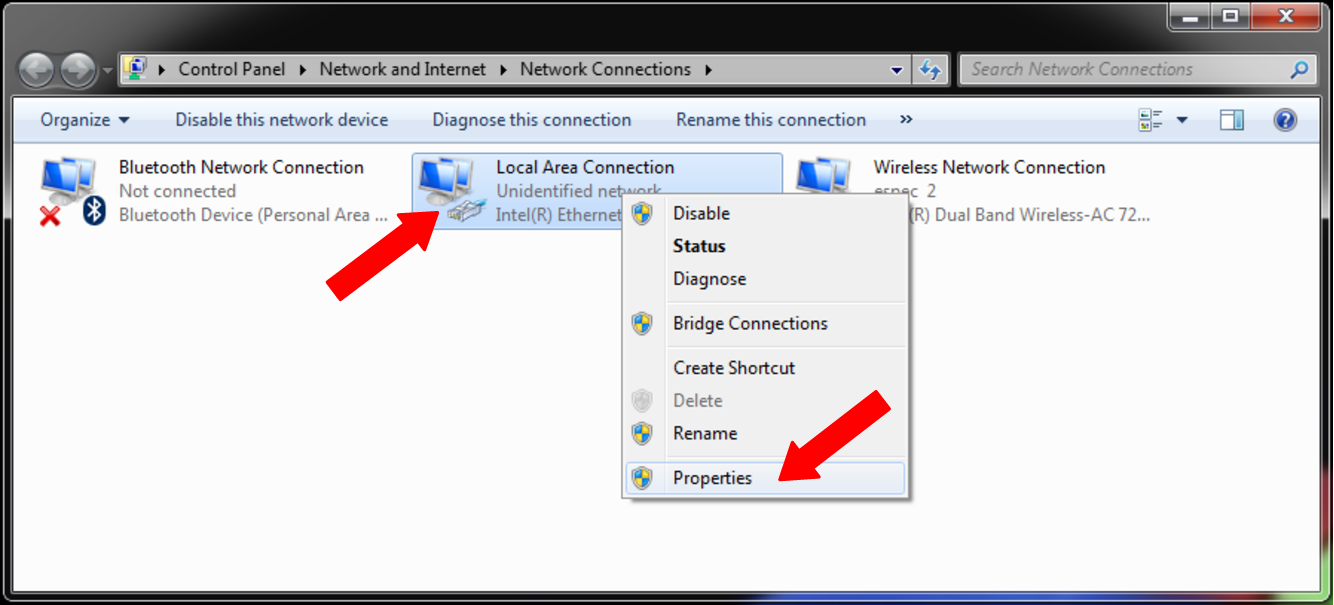
Point and Right-Click the "Local Area Connection" icon, then click Properties from the drop-down menu (as illustrated in the following figure). NOTE: The Local Area Connection icon is the one connected to a hub (or EWC via a straight-through or crossover Ethernet cable). It is important to access the correct icon in case your computer has multiple Ethernet ports or devices.
-
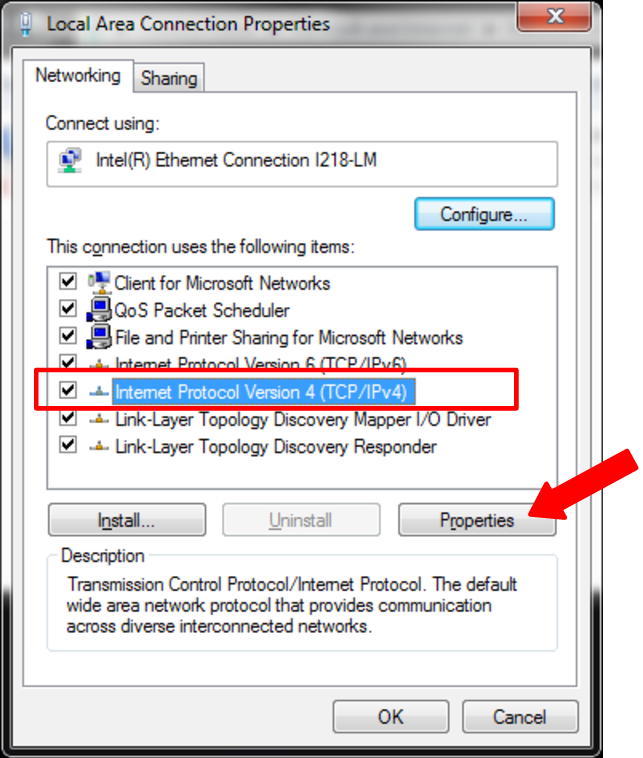
In the "Local Area Connection Properties" window, confirm that there is a check mark placed in front of "Internet Protocol Version 4 (TCP/IPv4)", as illustrated in the following figure. If not, check it. Click to highlight "Internet Protocol Version 4 (TCP/IPv4)" and then click Properties in the lower-right corner.
-
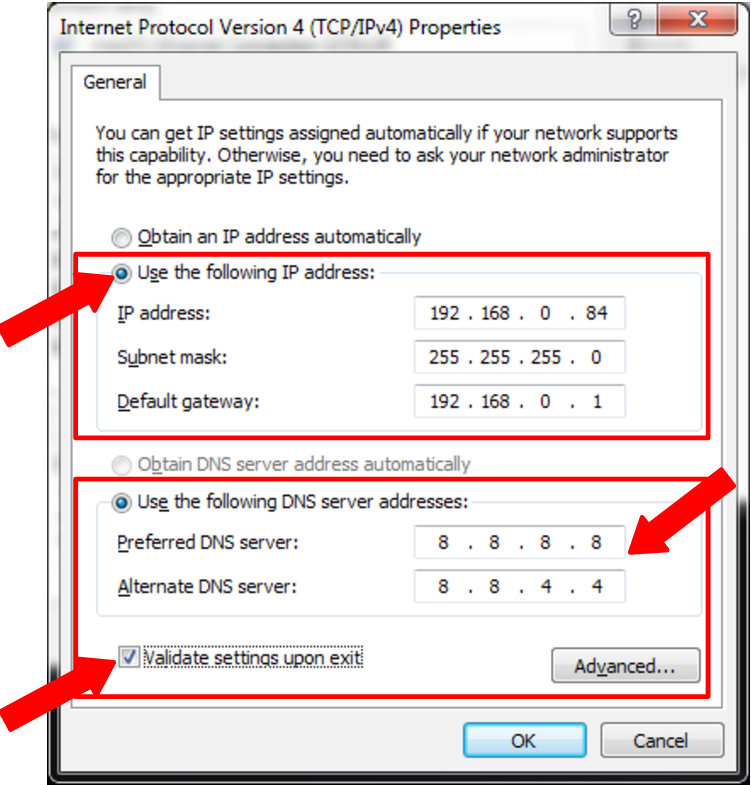
In the "Internet Protocol Version (TCP/IPv4) Properties" window, turn on the radio button for "Use the following IP address:" and enter these settings (see the figure below):
- IP Address: 192.168.0.84
- Subnet Mask: 255.255.255.0
- Gateway: 192.168.0.1
-
In the ``Use the following DNS server addresses:'' section, enter the following address (as shown in the following figure):
- Preferred DNS server: 8.8.8.8
- Alternate DNS server: 8.8.4.4
-
Turn on "Validate settings upon exit" with a check mark and click OK, as illustrated in the following figure.
-
Click OK to close "Local Area Connection Properties" window.
- Close out the Network window.
- To access EWC, proceed to the next Section.
2.3 How to Access EWC on a Network
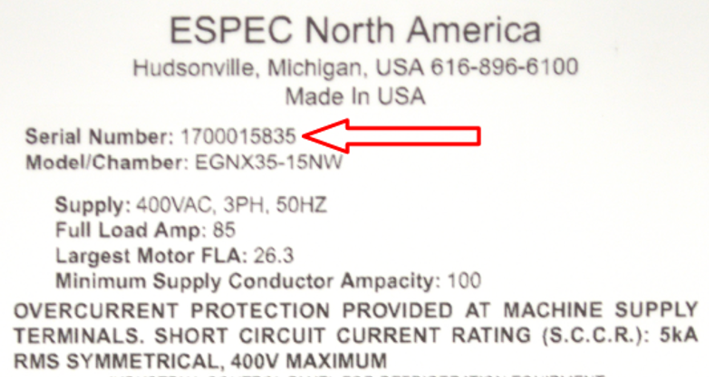
EWC can be accessed via its hostname on either a DHCP network or a static network. The default hostname is especSN#, where SN# is the serial number of the chamber, as depicted in the following figure.
2.3.1 EWC via Its Hostname
EWC can be accessed via its hostname on either a DHCP network or a static network. Complete the following steps to access EWC for the first time.
- With both the chamber and computer joined the network as described above, apply power to both devices.
- On your computer, open a Web browser.
- Enter http://especSN#.local/ in the URL address field. For example, based on the serial number depicted in the previous figure, the URL appears as: http://espec1700015835.local/.
- When EWC is accessed for the first time, its Setup Wizard page will appear. Proceed to Section 2.4 to complete this Setup Wizard page.
- If access failed, verify that both the chamber and computer are on the same network. Cycle power on the chamber to reboot EWC and wait one minute before accessing EWC again.
- If the problem persists, contact Customer Support for assistance.
2.3.2 EWC via Its Fallback IP
EWC can be accessed via its fallback static IP address on a Class C static network with the following steps:
- With both the chamber and computer joined the network as described above, apply power to both devices.
- On your computer, open a Web browser.
- Enter http://192.168.0.83/ in the URL address field.
- When EWC is accessed for the first time, its Setup Wizard page will appear. Proceed to Section 2.4 to complete this Setup Wizard page.
- If access failed, verify that both the chamber and computer are on the same network. Check to confirm that your PC uses a Class C network protocol as outlined previously. The local computer must use an IP address 192.168.0.xxx, where xxx is any number other than 1 or 83. The recommended IP address is: 192.168.0.84. Cycle power on the chamber to reboot EWC and wait one minute before accessing EWC again.
- If the problem persists, contact Customer Support for assistance.
2.3.3 EWC IP on P300 or F4T HMI
With ESPEC P300 or Watlow F4T, the IP address of EWC can be located via the PLC's HMI.
-
P300 HMI: When EWC starts and is in communication with the chamber, it posts its hostname and IP address on the chamber's controller. On the P300, the IP address is displayed on the Set LAN screen. The following figure illustrates detailed steps to access and view EWC's IP address on the P300 HMI.
-
F4T HMI: When EWC starts and is in communication with the chamber, it posts its hostname and IP address on the chamber's controller. With Watlow F4T, this information is displayed on the Message tab via the Controller Status button, as depicted in the right image of the following figure.
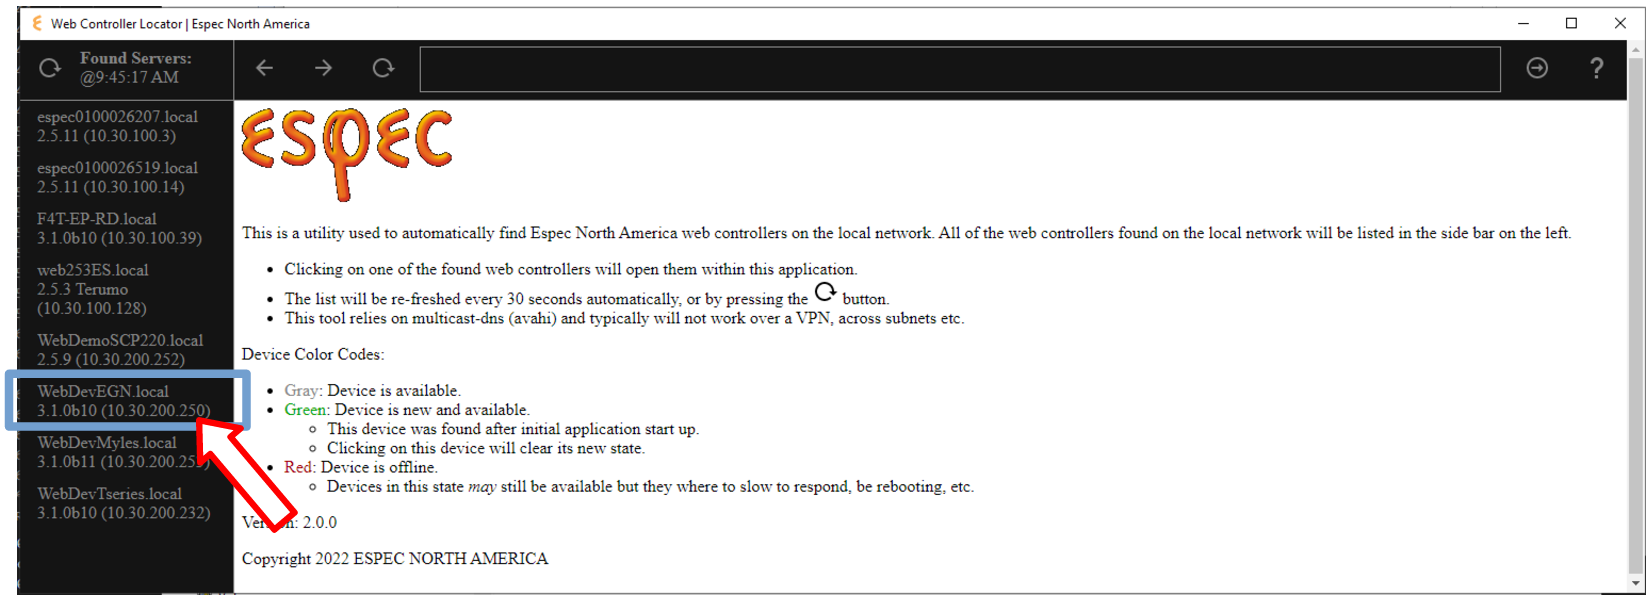
2.3.4 EWC via ESPEC Locator Utility
Another method exists for locating EWC on the local network via the ESPEC Locator utility. This utility software is MS Windows-based and is executable on Windows 7/8/10. From a security standpoint, its practical use is dictated by the customer's IT department. Once executed, the utility scans for EWC (ver. 2.0 and higher) on the local network. It then displays each detected EWC via its hostname, IP address and firmware version, as depicted in the following figure. To access EWC, click on its hostname/IP address link, as indicated by the arrow in the following figure.
2.4 Setup Wizard of EWC on a Network
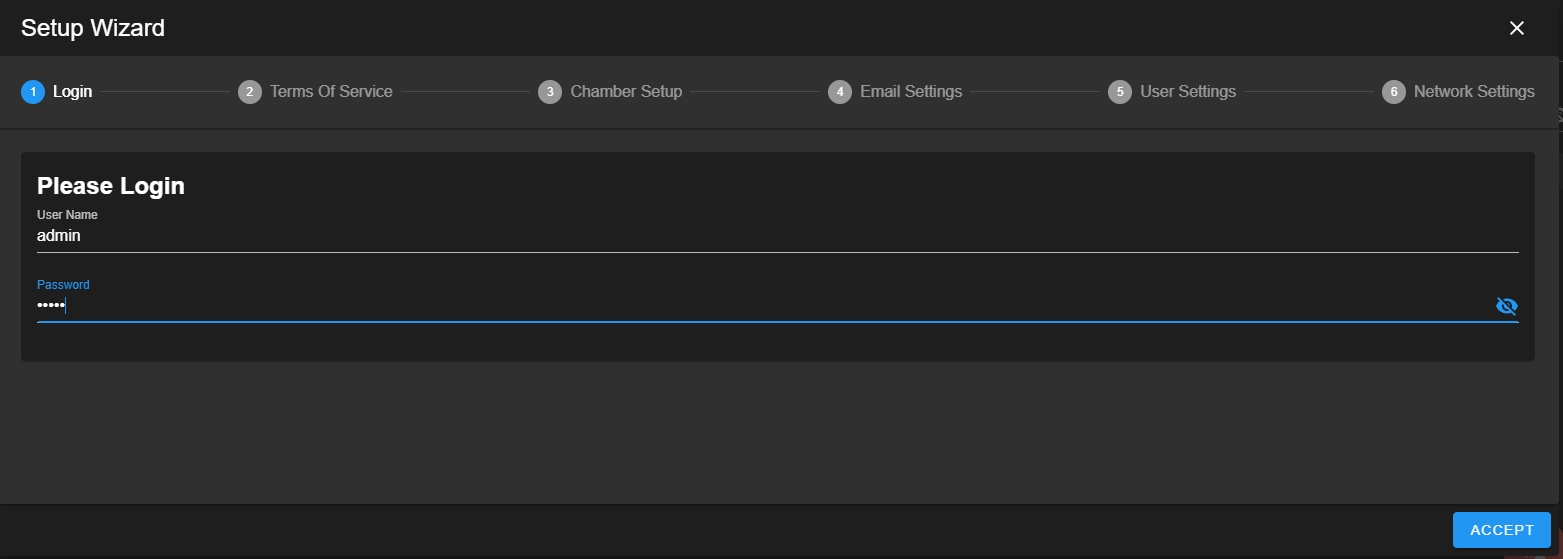
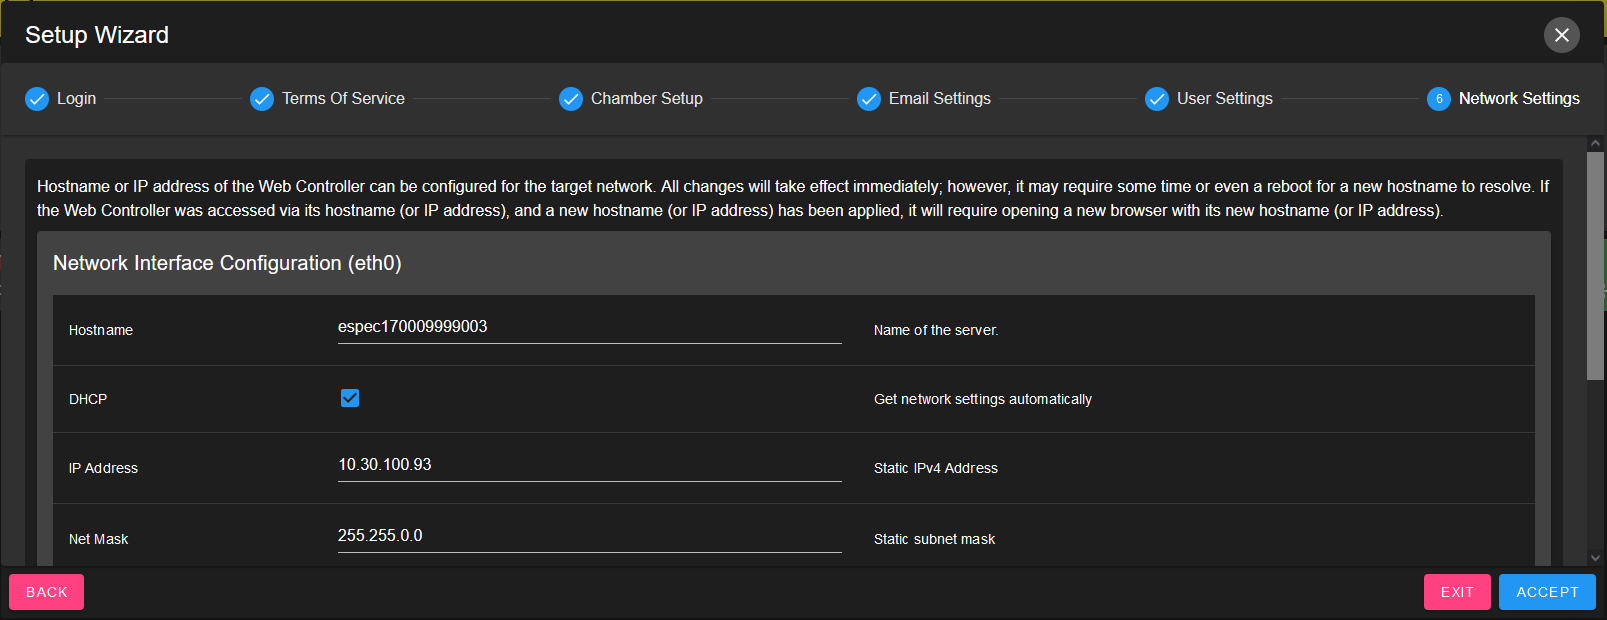
Before EWC can be used for the first time, you must complete the Setup Wizard. This process involves accepting Terms of Service, setting an e-mail for a password recovery, resetting the administrator's password. When EWC is first started, the Setup Wizard page appears as follows:
-
Login: When prompted, log in using the administrator account credentials (specified in Section 1.5), as depicted in the following figure.
-
Terms of Service: Scroll down the page to read and accept ESPEC terms of service in order to use the product.
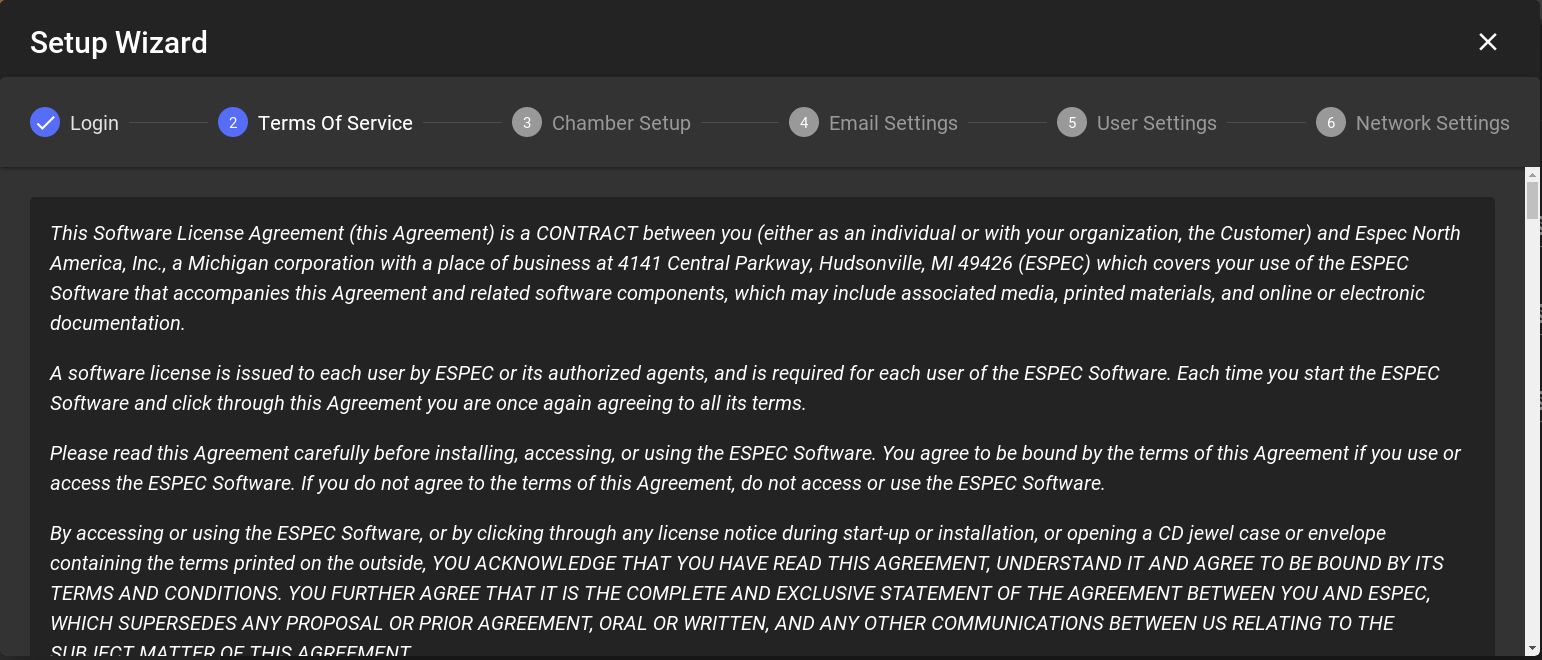
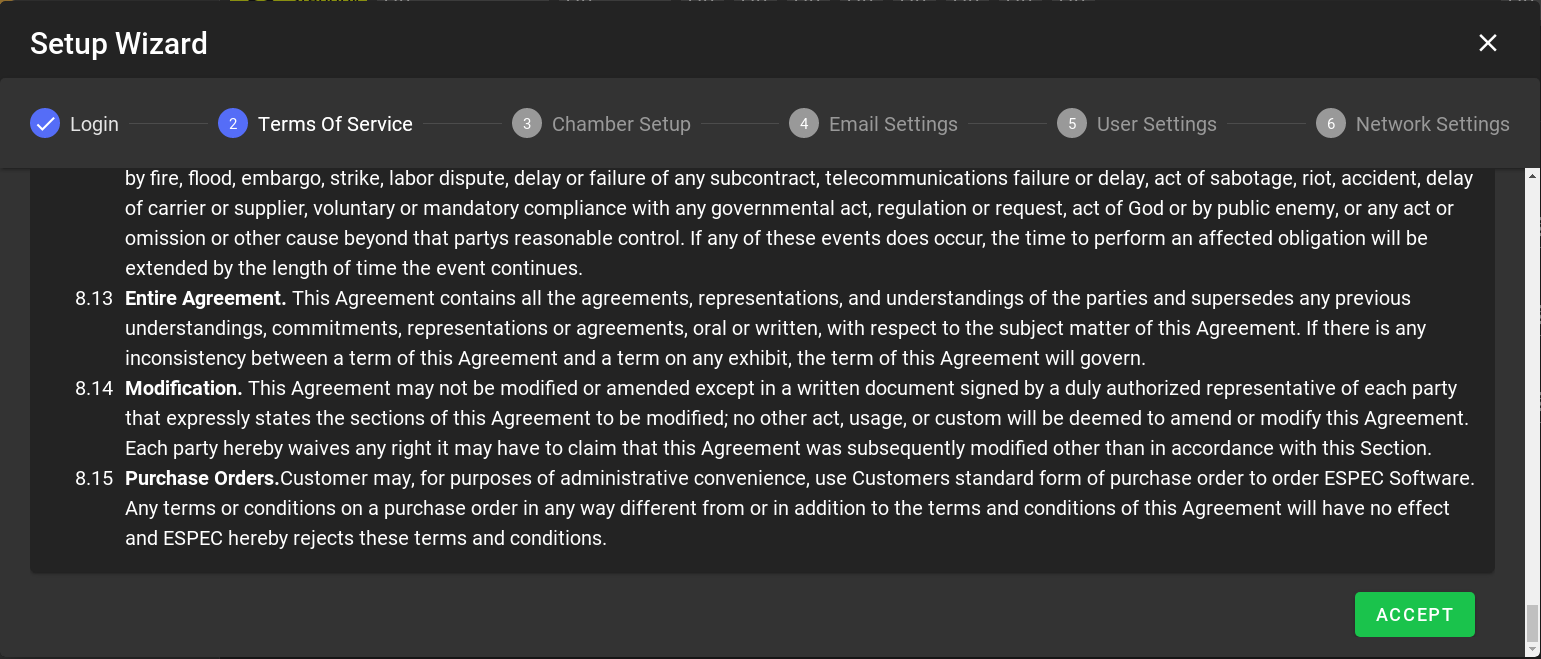
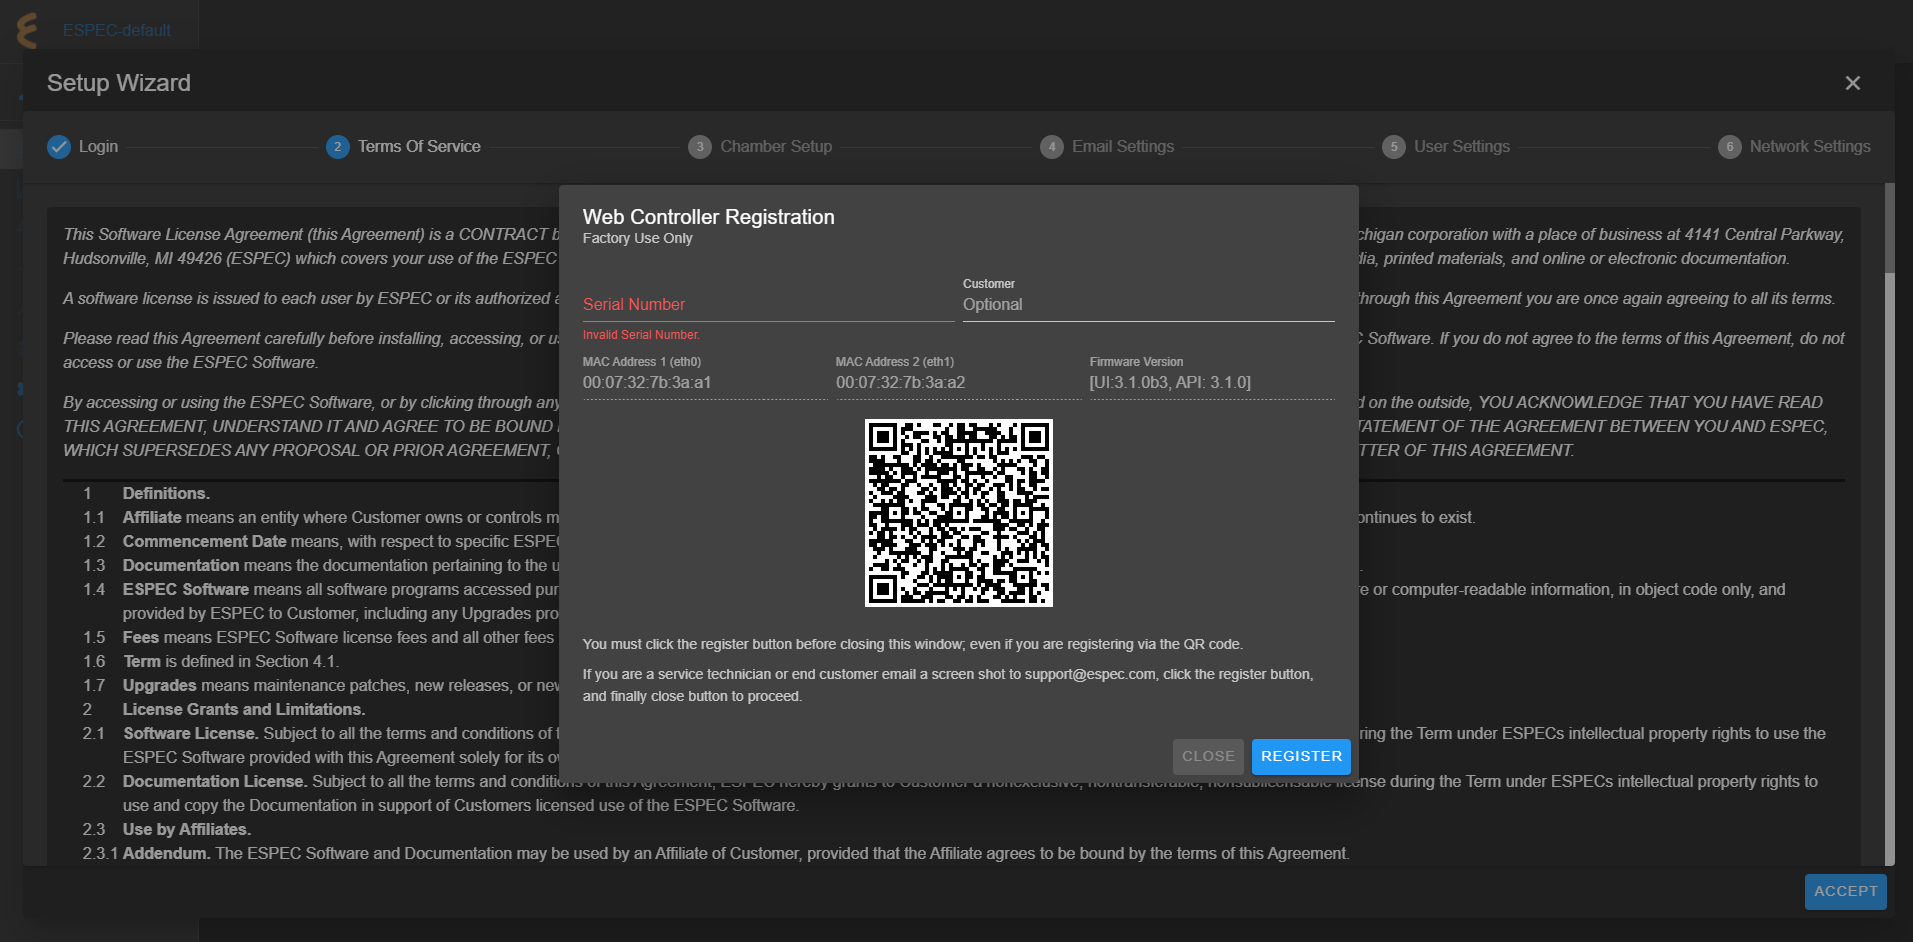
If EWC registration page appears as depicted in the following figure, contact ESPEC customer service for detail about your registration.
-
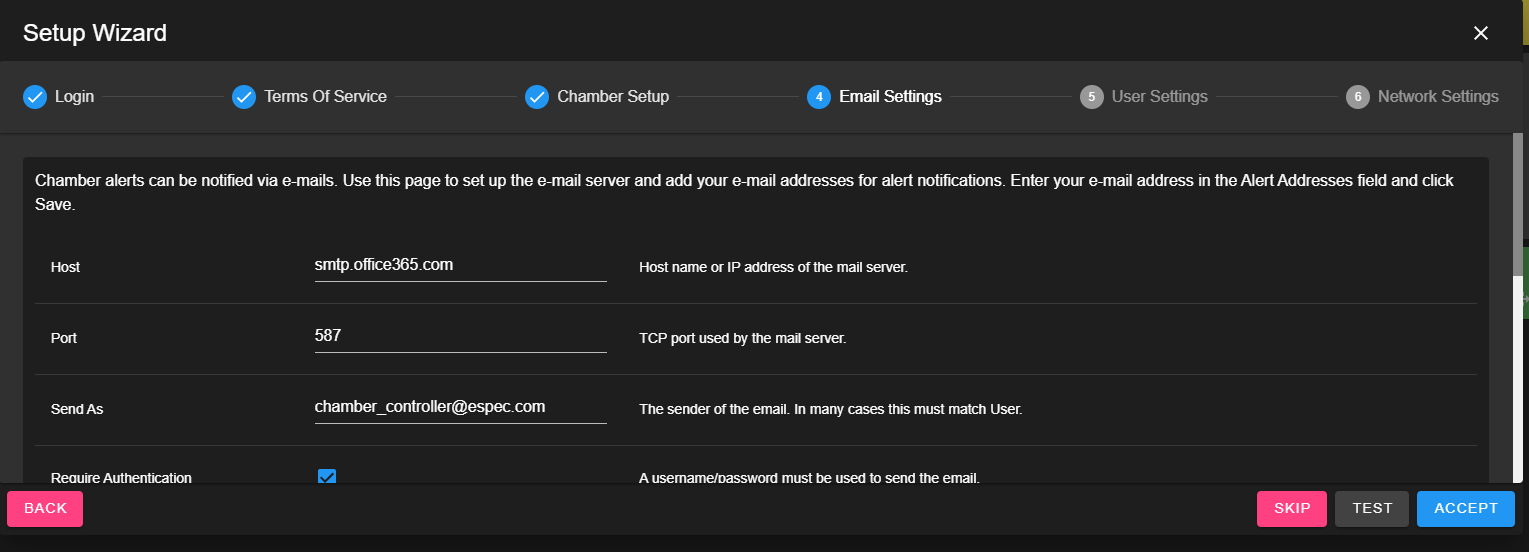
E-mail Settings: This page allows the administrator to set up an e-mail for password recovery and e-mail alert of chamber conditions. If your EWC does not have access to the Internet, this setting be skipped for now by clicking on the ACCEPT button. Such information can be entered later via the Settings menu.
-
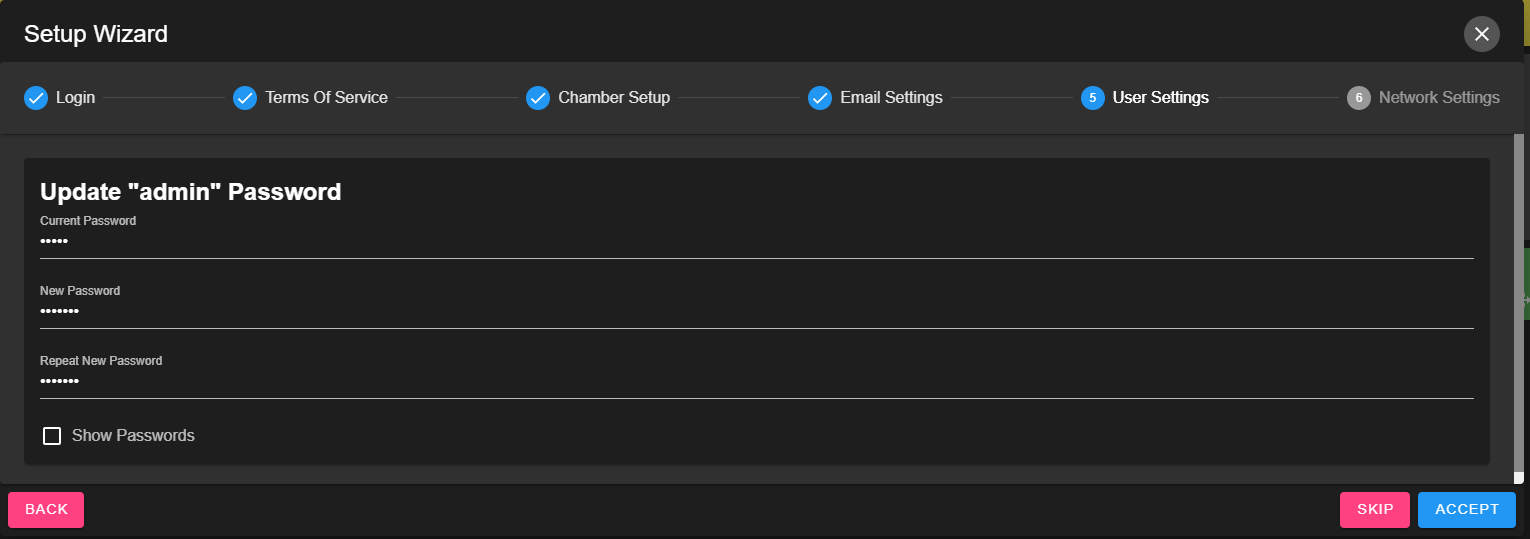
User Settings: It is imperative that the administrator account password be changed to something more secure than the one given in the manual. Enter the current administrator's password, then enter the new secure password twice and click ACCEPT to apply the new password setting.
NOTE: An error message, as depicted in the following figure, will be displayed if a new password is not entered.
-
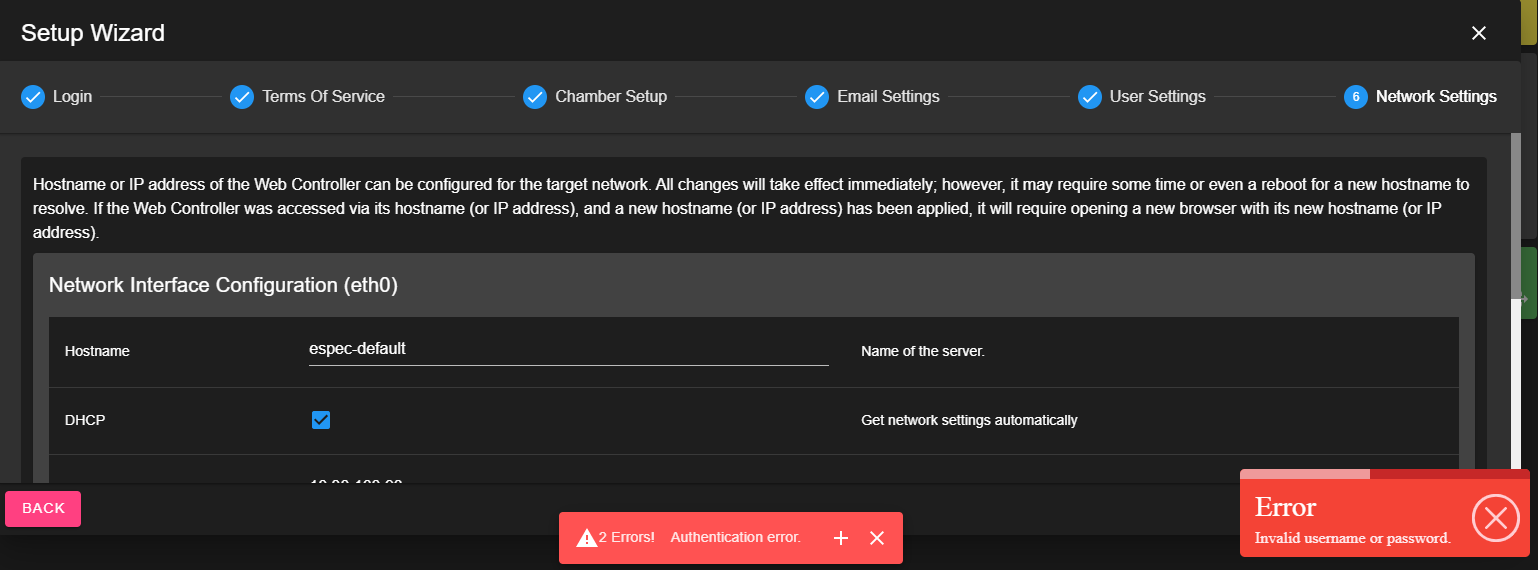
Network Settings: Make note of the hostname and IP address of EWC, as shown in the figure, and click ACCEPT to continue. It is recommended to use the default setting during the initial setup. The EWC hostname or IP address may be changed later via the Settings menu.
IMPORTANT NOTE: If you click SKIP on any of the above Setup Wizard pages, they will reappear every time you log into EWC.
After the Setup Wizard is complete, EWC displays its main home page in Overview mode. EWC is ready for operation. Users may begin to log into EWC to operate the chamber. Proceed to Chapter 3 (User) to begin operating the chamber.
3 User
This chapter explains how users log into EWC to control and operate the chamber. EWC protects the chamber by permitting only authorized users to login and operate the chamber. The following sections discuss how to login, logout and set a new password.
3.1 Login
To log into a specific account, click the User menu in the menu bar and enter account name and password, and click SUBMIT as depicted in the following figure.
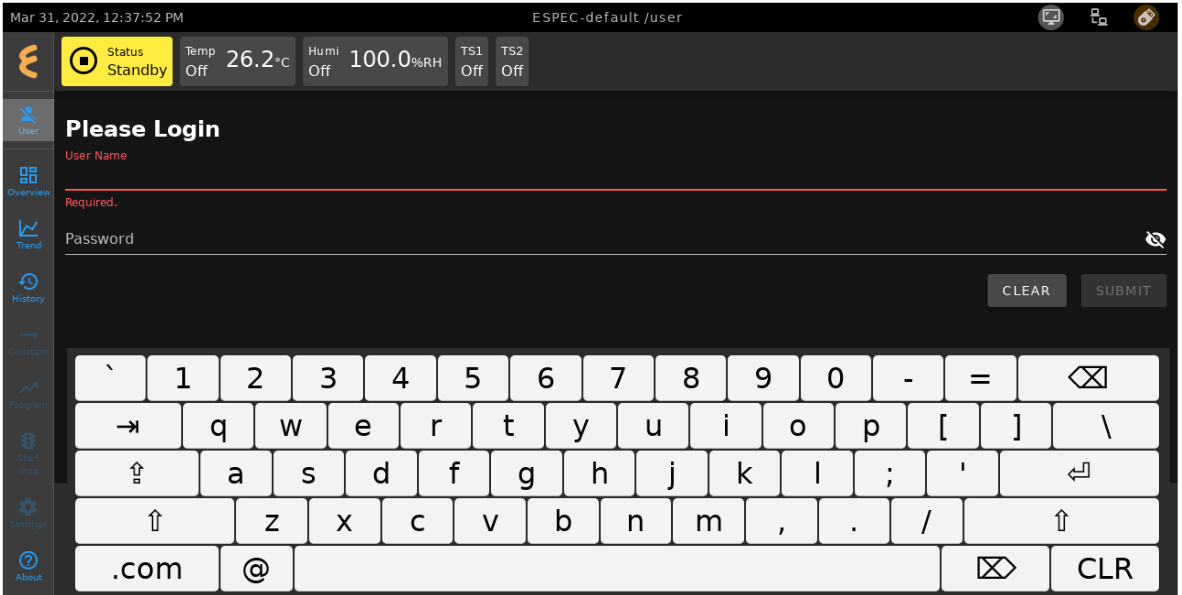
To log into a specific account on EWC HMI (touchscreen), use the touchscreen keyboard as shown below.
If the login fails, an Invalid username or password message pops up at the lower right corner. Click the Close button and re-enter username and password.
To set the Web browser to remember the login credentials, check the Remember Me box. This method is not advisable on a public computer using a public account. Only apply the Remember Me feature on your computer or your user account on a public computer. After authentication is verified, EWC logs you in and the web page is displayed in Overview mode.
To log into a different account, click the User menu (which now displays the current login name), click LOGOUT, enter new username and password and click SUBMIT (or press Enter).
3.2 Logout
To end EWC session and logout your account, click the User menu in the menu bar, which now displays your username, and click LOGOUT, as depicted in the following figure.
EWC reverts all its navigation links to Read-Only mode with only User, Overview, Trend, History and About visible and accessible as depicted in the figure in Section 3.1.
3.3 Set New Password
There are two ways to set or change a user's password:
-
User-Own Setting: A user can reset their password via the User menu, as depicted in the previous figure:
- Once logged in, click User which now displays the account name.
- Enter the current password in the Current Password field.
- Enter the new password in the New Password and Repeat New Password fields.
- Click SUBMIT to apply the setting, or click CLEAR to cancel the setting.
If authentication is checked and confirmed, a new password to the user account will be set and becomes effective immediately.
-
Administrator Setting: A user account password can be reset by the administrator via the User Settings submenu.
This method will be discussed in detail under a separate chapter on the Settings menu.
4 Network Monitor
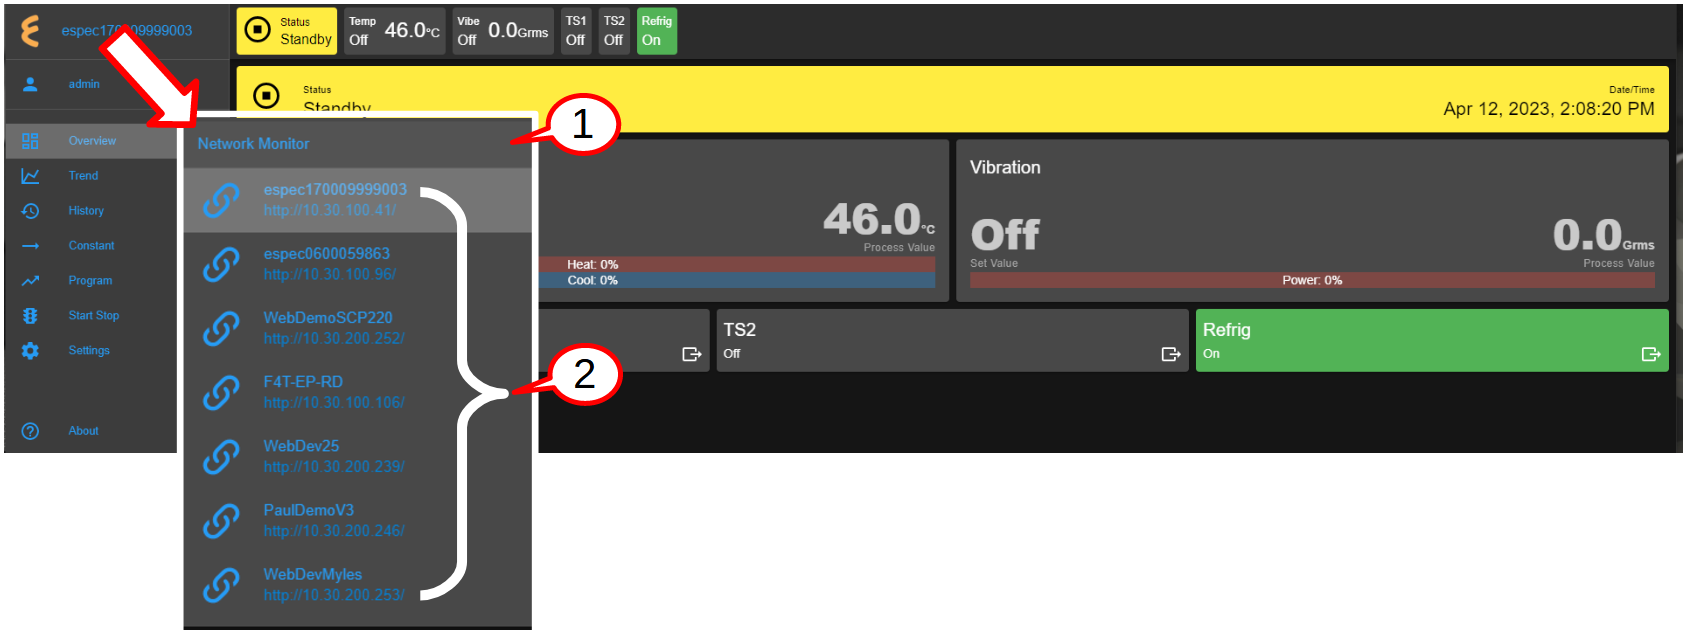
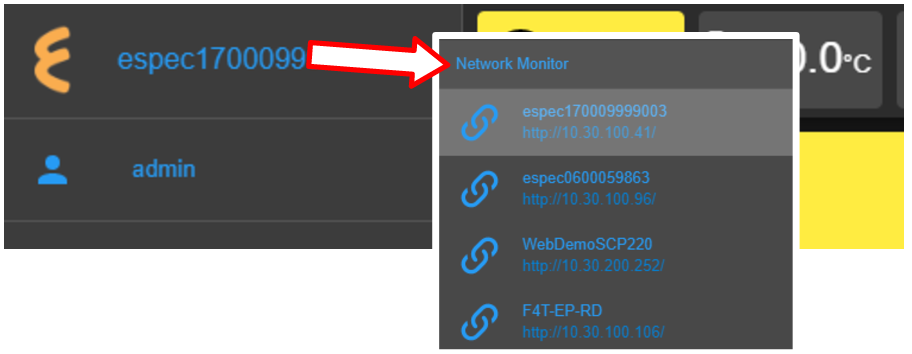
EWC can communicate with each other on the network. The E logo atop the menu bar or the hostname of EWC itself is a clickable link accessible from within any menu (with Overview illustrated in the figure) that, when clicked, opens a drop-down menu to display a link to the Network Monitor page and a list of clickable links to other EWC devices on the network.
-
Network Monitor: The Network Monitor page is a clickable link that opens in a new page to allow the operator to manage all active EWC devices on the local network. Its features and application will be discussed in the following section. The Network Monitor link is bound to user privileges; a user must have specific privileges identified in the user account in order to use it.
-
Active EWC on Network: All EWC devices detected on the local network are listed here. The top one on the list is the current EWC that points to itself when clicked. Any EWC on the list can be accessed directly by clicking on its hostname. The back button of the Web browser or the E logo of the current EWC can be used to return to the original EWC. Any EWC on the network can access each other via the E logo.
The Network Monitor page cannot be accessed or operated on the touchscreen or on a monitor connected to the HDMI or display port of EWC. It can only be accessed and controlled from a Web-based device on the local network. For this reason, the touchscreen of a T-series or custom F4T chamber cannot be used to set up a Network Monitor page.
4.1 Network Monitor Page and EWC
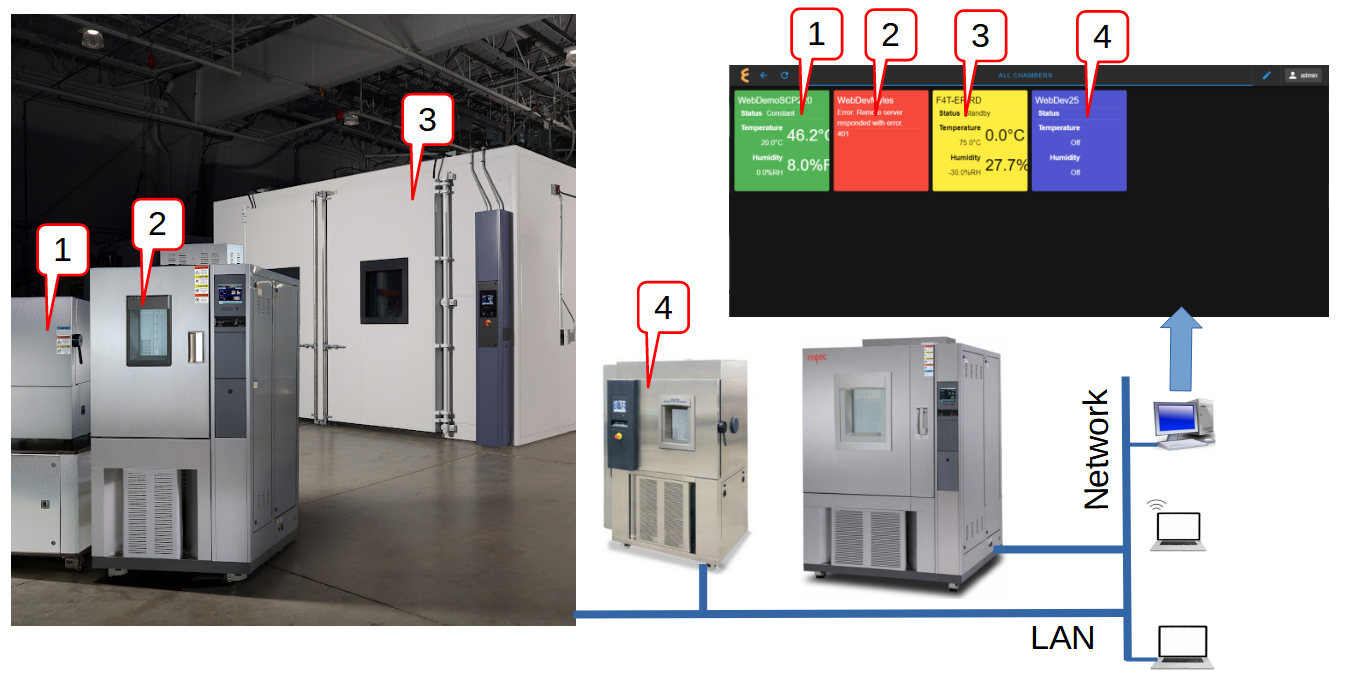
The Network Monitor page offers an appealing feature that allows all EWC devices on the local network be displayed in one central monitor without the need for a central server to monitor them, as depicted in the following figure.
An operator can monitor the operating mode, status and conditions of all EWC devices on their network and take action on any of them when a situation arises, such as an alarm was tripped or a communication error occurred with the chamber, etc.
To access and manage the Network Monitor page,
- Log in as admin or as a user with permission to control the Network Monitor page
- Click the E logo or the hostname of EWC
- Click the Network Monitor link on the drop-down menu
The following figure illustrates the layout of the Network Monitor page with seven (7) important components. Each is listed and described as follows:
- Back Button: This button closes the Network Monitor page and returns to the Overview of EWC.
- Refresh Button: The refresh button updates the display of the Network Monitor page to apply any new configuration.
- Monitor Tab: By default, only one tab with default name ALL CHAMBERS is active and ready to populate the selected EWC devices (as depicted in the above figure). Multiple tabs with unique and descriptive names can be created to display different groups of EWC devices.
-
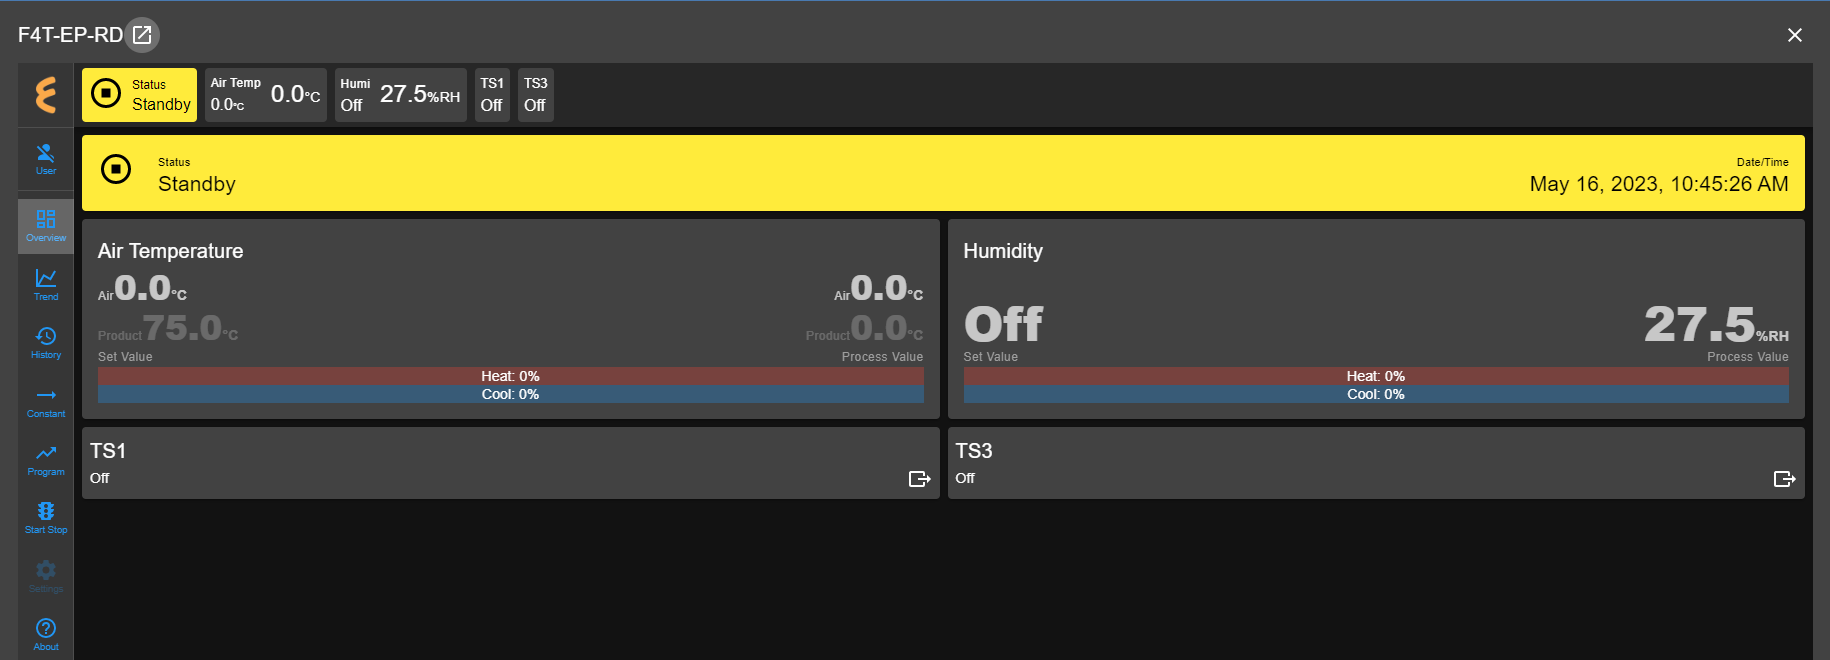
EWC on the Network: By default, each EWC is displayed with its hostname for identification, but a unique name may be created in place of the hostname. As shown in the above figure, each EWC is displayed based on its operating status, such as Standby, Constant or Program, using it's default color. Each EWC can be accessed directly and displayed inside the Monitor tab as shown in the following figure for F4T-EP-RD. To close F4T-EP-RD, click the X button on the top right. To open it entirely in a new Web browser tab, click the expand button next to its hostname.
The color coding scheme allows the operator to quickly identify a chamber with issues, such as the one depicted in the following figure.
-
Monitor Area: The monitor area is based on the size of the monitor screen which defines the real estate of the display to accommodate EWC devices.
-
Edit Layout: The Edit Layout (pen icon) is a clickable link/button that provides the edit menu with options to create additional tabs to populate EWC devices, as shown below.
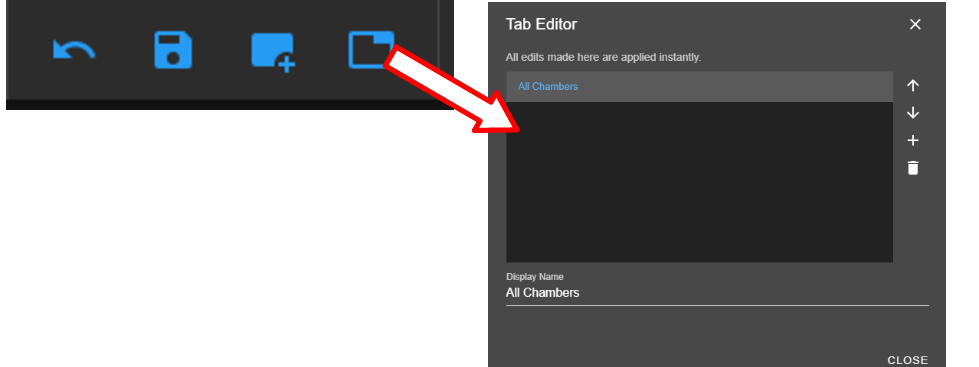
From left to right, the four buttons are: Revert (back button), Save, Add Chamber/Device, Edit/Create Tab. Detailed operations of these buttons will be discussed in the following section.
-
User: Identity of the current user is listed here for reference.
4.2 Managing Network Monitor
When Network Monitor page is open for the first time, it has an empty tab with default tab name ALL CHAMBERS.

The Edit Layout (pen icon) button can be used to edit or create new tabs to populate and display EWC devices. The four buttons in the menu (labeled in the figure) can be used to manage and edit the layout.
These four buttons are described as follows:
-
Edit Tab: The default tab name All Chambers can be edited via this button. Additional tabs can be added via the + button. Any tab on the list can be removed with the trash bin button. The up/down arrows on the right can be used to select a tab to be edited.
-
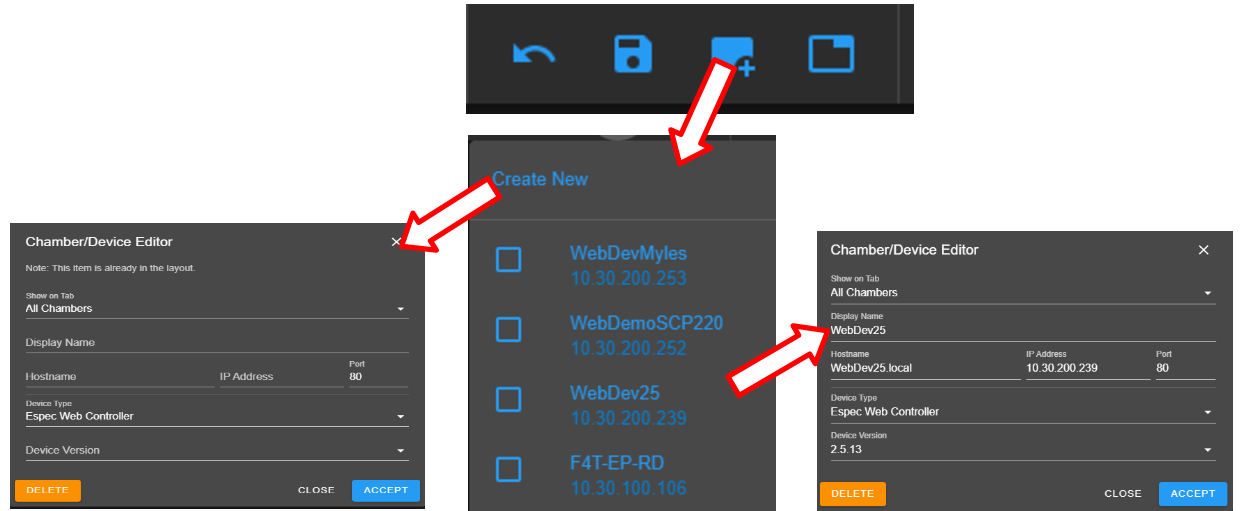
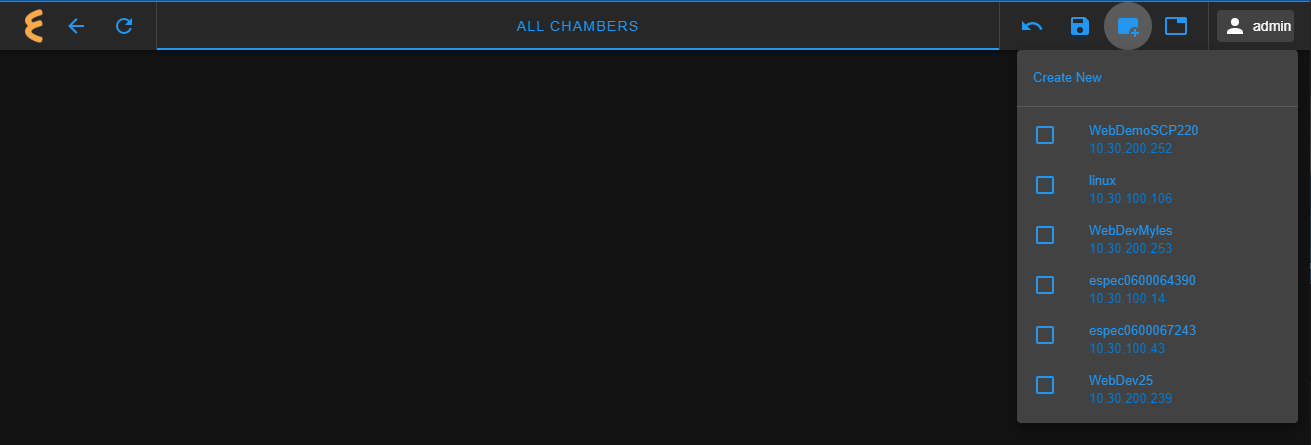
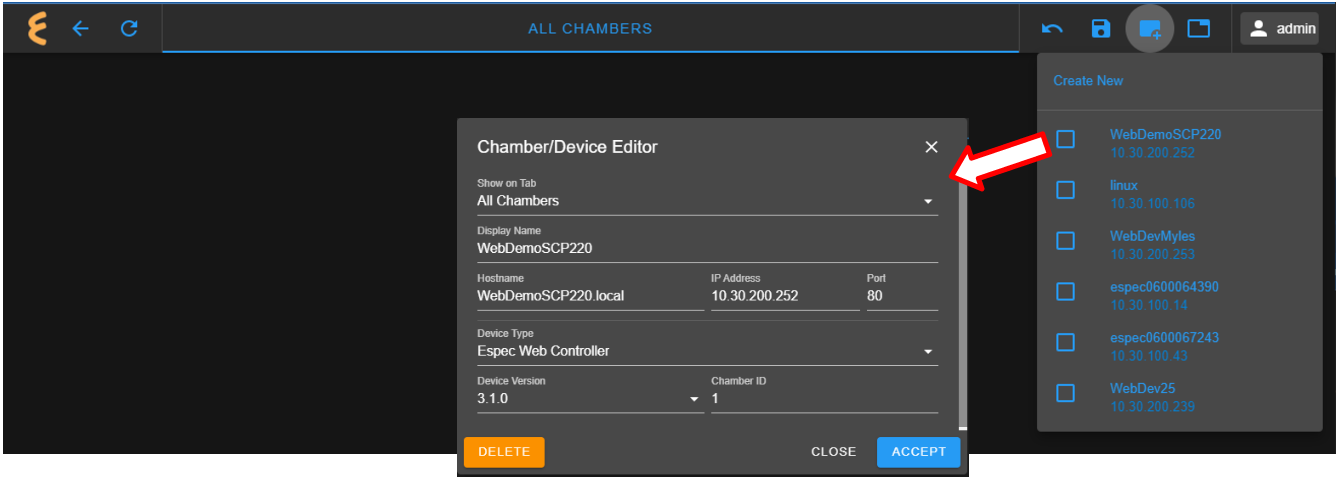
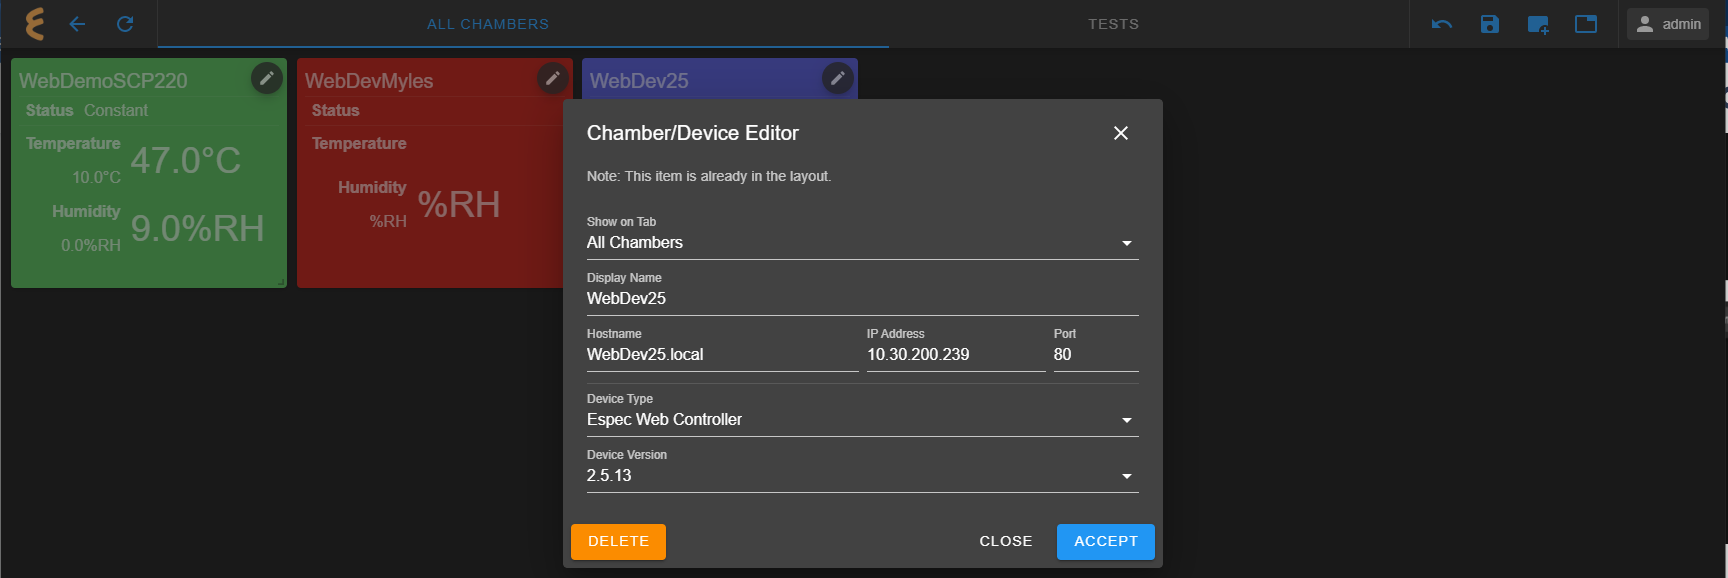
Add Chamber/Device: A new EWC device can be selected to add into the display tab via (1) the Create New button or (2) the EWC list as shown in the following figure. The first option permits manual configuration, while the second option applies the default settings for the selected EWC device which includes hostname, IP address, type of EWC and its version, as depicted in the following figure (for WebDev25).
-
Save: To apply all settings made in the network tab, the Save button must be applied.
- Revert: This is the back button to exit the Edit Layout.
In the following section, we provide an example how to set up the Network Monitor page.
4.3 Example 1
In this section, we provide a step-by-step example how to set up and configure a network monitor page to display three EWC devices in the default Monitor tab. This example can be completed only if you have at least two EWC devices, one as a host and the other as a client on your network. Note: All EWC device hostnames and IP addresses used in this example are for illustration purposes only. You must use the hostnames and IP address of your EWC devices found on your network.
- Select one EWC on the network to host a Network Monitor page.
- Log in as admin or as a user with Network Monitor privilege.
-
Click the E logo or the hostname of EWC.
-
Click the Network Monitor link on the drop-down menu.
-
Click Edit Layout (pen icon) in the Network Monitor page.
-
Click the Add Chamber/Device button. Two options are available for adding the EWC device into the Monitor tab: (1) Create New and (2) Select from the drop-down list. The first option is for a manual configuration; the second option applies the default configuration. Option 2 will be used for this example. From the drop-down menu, click to select the desired EWC to populate the Monitor tab.
Default configuration of the selected EWC has been applied as shown in the pop-up window, which includes hostname, IP address, type of EWC and version.
Click ACCEPT to populate this device in the Monitor tab.
-
Apply step 6 again to add two additional EWC devices from the list. The selected EWC devices will be populated below the first one in a single-column profile. The check mark in each box indicates the device selection.
-
The pen icon appearing in each EWC object indicates that the Monitor tab is still in edit mode. Click and drag to relocate or arrange each EWC in the Monitor tab, as shown below.
-
Click Save to apply the settings. The Network Monitor page configuration is complete with three EWC devices in the Monitor tab (called ALL CHAMBERS).
-
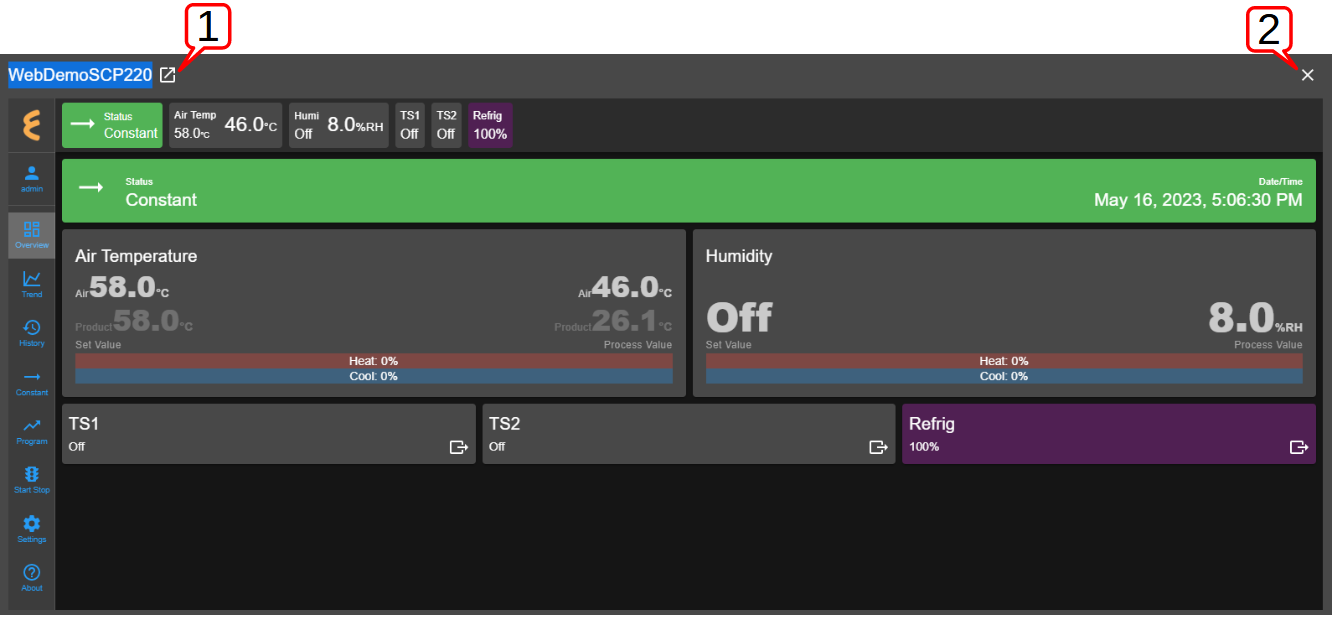
Each EWC in the Monitor tab is a clickable link that, when clicked, opens the selected EWC inside the Network Monitor page, as depicted below.
The expand button (1) next to the hostname can be used to open WebDemoSCP220 in a new Web browser tab so that the Network Monitor page is free to manage other EWC devices. The X button (2) can be used to exit and close WebDemoSCP220 to get back to the Network Monitor page.
-
The back button (indicated by the arrow) can be used to return to the host EWC for its chamber control and operation.
The E logo (in the Overview page) and the back button (in the Network Monitor page) can be used to toggle back and forth between the EWC's Overview page and its Network Monitor page to monitor other EWC devices on the network. The toggle operation can be performed during any operating mode of the host EWC, not just in Standby as shown in the figure.
4.4 Example 2
In this section, four more examples are given to illustrate the practical application of the Network Monitor page. The EWC device in Example 1 will be used as the host EWC in following examples.
4.4.1 Adding a new Monitor tab
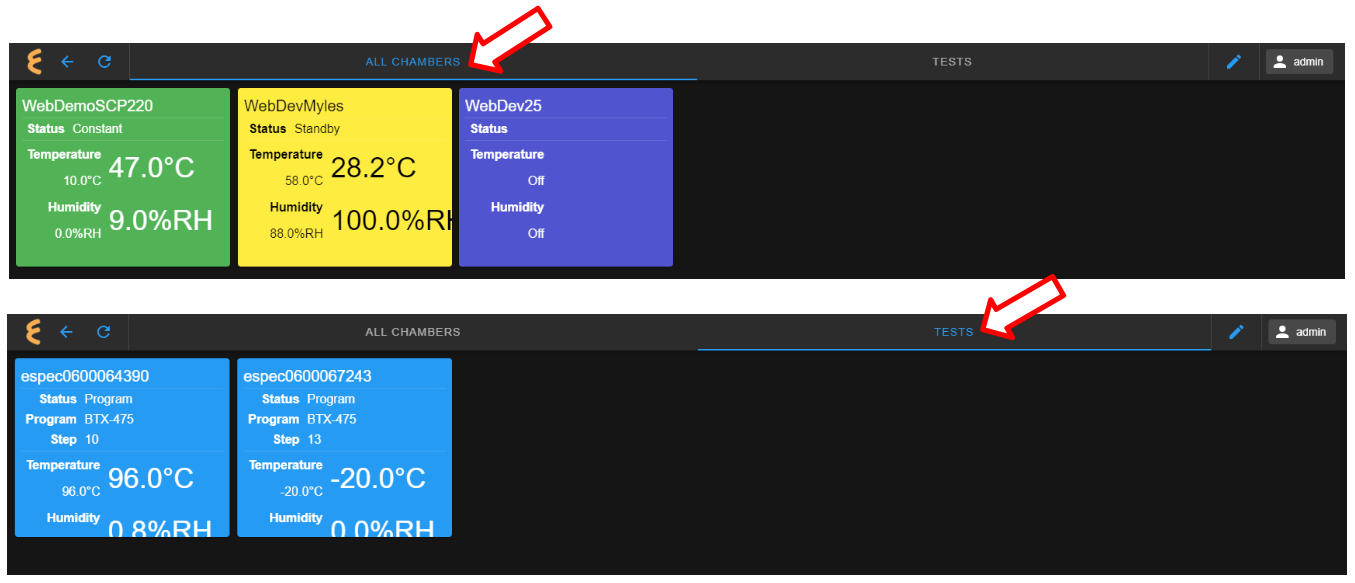
This short example illustrates how to create and add a new Monitor tab (called TESTS). It is then populated with two EWC devices.
- Log into EWC as admin or as a user with Network Monitor privilege.
- Click the E logo (or the hostname).
- Click Network Monitor link on the drop-down menu.
-
Click Edit Layout (pen icon).
-
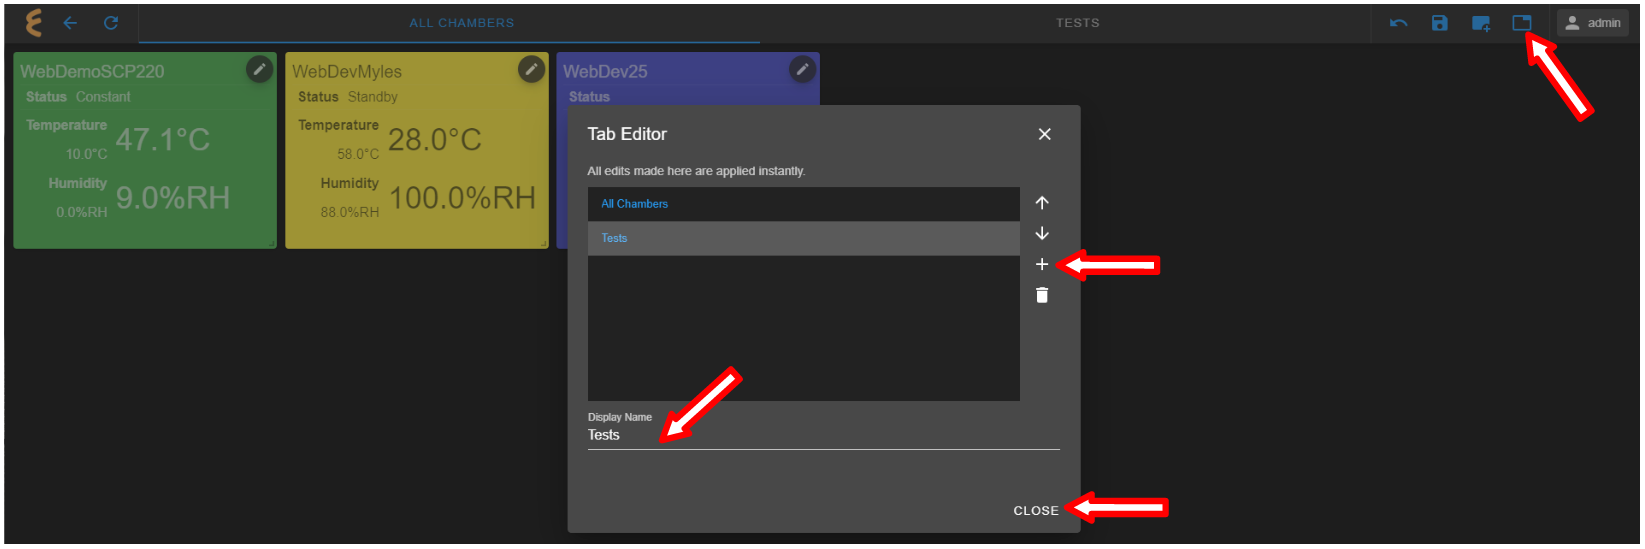
Click Edit Tabs; then, click + in the Tab Editor window and edit the Display Name field with TESTS, and click CLOSE.
-
Click the TESTS tab, then click Add Chamber/Device to select and populate two EWC devices.
Rearrange the layout and click Save to complete the configuration.
-
TESTS tab and ALL CHAMBERS tab can be toggled to display two groups of EWC devices, as illustrated in the following figure. An active tab is highlighted and underlined in blue (as indicated by the arrows).
-
Additional tabs may be created and added into the tab bar by repeating steps 5-7, as depicted in the following figure.
4.4.2 Removing an EWC Device
This short example illustrates how to remove an EWC device from a Monitor tab. As a concrete example, WebDev25 will be removed from the ALL CHAMBERS tab.
- Starting from the Network Monitor page, click the ALL CHAMBERS tab.
- Click the Edit Layout (pen icon).
-
Click the pen icon of the WebDev25 object, then click DELETE in the Chamber/Device Editor window as shown in the following figure.
-
Click Save to apply new settings to this tab. Only two EWC devices remain in this tab.
4.4.3 Adding a New EWC Device
This short example illustrates how to manually add a new EWC device (using WebDev25 as an example) to the TESTS tab using the Create New button.
- Starting from the Network Monitor page, click the ALL CHAMBERS tab. Note: It is not necessary to select ALL CHAMBERS, but selecting it allows a complete manual configuration (as will be apparent at step 4).
- Click the Edit Layout (pen icon).
- Click the Add Chamber/Device button and click Create New.
-
Apply the following steps to the Chamber/Device Editor:
-
Click the Show on Tab spin button to select TESTS from the list.
-
Enter MyWebDev25 in the Display Name field. Note: To display the EWC device by its hostname, WebDev25 may be entered here. This field cannot be left blank or an INVALID NAME will be displayed.
-
Enter hostname as "webdev25.local".
-
Enter its IP address (10.30.200.239).
-
Click the Device Version field to select 2.?.? from the list. The selected EWC is known to have version 2.x.x. The correct version must be selected or an error will occur.
-
Click ACCEPT.
-
-
Click Save.
-
Click the TESTS tab to view its new display and notice that WebDev25 is now identified as MyWebDev25.
Warning! At step 4 above, it is crucial to enter the correct IP address, since the system tries to locate the device based on that IP address on its network. A wrong IP address would produce an EWC error as depicted in the following figure. Here, steps 1-5 were repeated to create a new EWC device with a non-existing IP address.

To remove a misconfigured EWC device, such as MYTEST2, refer to the previous example on Removing an EWC Device.
4.4.4 Removing a Monitor Tab
This short example illustrates how to remove TESTS from the Monitor tab.
- Starting from the Network Monitor page, click the Edit Layout button (from within any active tab).
- Click Edit Tabs.
-
In the Tab Editor window, click to select TESTS in the tab list, then click the trash bin (to remove it) and click CLOSE.
-
Click Save to apply the changes. TESTS tab is now removed from the Monitor tab and no longer appears in the tab bar.
5 Overview
The Overview page displays the current status of the chamber and its operating mode. A user is brought to this page after logging into EWC. The following figure depicts Overview with the chamber in Standby as indicated in the status tab and its extension bar. This extension bar is only available in the Overview menu. The date/time posted in the extension bar is the date/time on the chamber/controller. While date/time stamp of data logs and Macros automated actions are based on the date/time on EWC, the controller date/time should also synchronize with that on EWC and the local device (that launched the Web browser). The date/time of EWC can be viewed under the Settings menu. It can also synchronize with that on the local device (to be discussed in the Settings menu).
The following figure depicts Overview showing the chamber in Constant mode.
The following figure depicts Overview showing the chamber in Program mode. Detailed information about the program, including what step is being executed, is listed in the extension bar (of the status tab). This feature provides the operator with useful information about the status of the chamber and the program.
Only users with read-write privilege can control the chamber operation mode from within this page. Supported operation modes are Standby, Constant and Program. Each tab in the status bar may be accessed to apply new settings at any time. This feature enables the operator to control the chamber without having to access the Start Stop menu in the menu bar. The following sections detail a step-by-step procedure how to control the chamber's operating mode via the Overview menu for users with read-write privilege.
5.1 Standby Setting
For authorized users with read-write privilege, to set the chamber in Standby mode, proceed with the following steps. Initially, the chamber is operating in Constant mode. We wish to switch its operation mode to Standby.
-
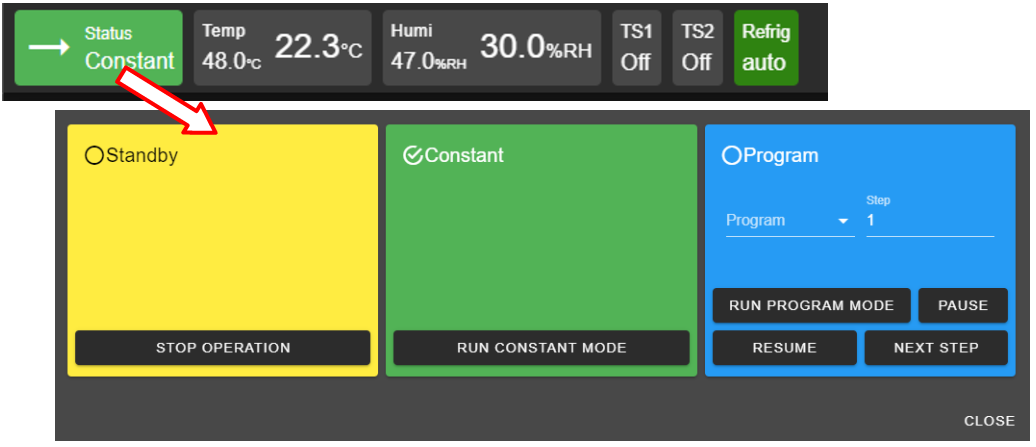
Click the status tab in the status bar to access the drop-down tabs, as shown in the figure.
An alternative way to access the drop-down tabs is to click on the extended tab of the status tab itself, as depicted in the following figure. The drop-down tabs display over the extend tab, as shown in the right figure. This extended tab is available only in the Overview page.
-
Click the STOP OPERATION button. EWC immediately moves to apply the operating mode to the chamber. A pop-up window appears in the lower-right corner to indicate the update of the operating mode. A check mark in the Standby tab indicates and confirms its standby mode.
-
To close the drop-down tabs, perform one of the following action:
- Click an empty area in the Main Display.
- Click a different menu in the menu bar.
- Click the status tab itself. or
- Click the CLOSE button underneath the alarm tab.
5.2 Constant Setting
For authorized users with read-write privilege, to set the chamber in Constant mode, proceed with the following steps. Suppose, initially, the chamber is operating in Standby mode. We wish to switch its operation mode to Constant.
-
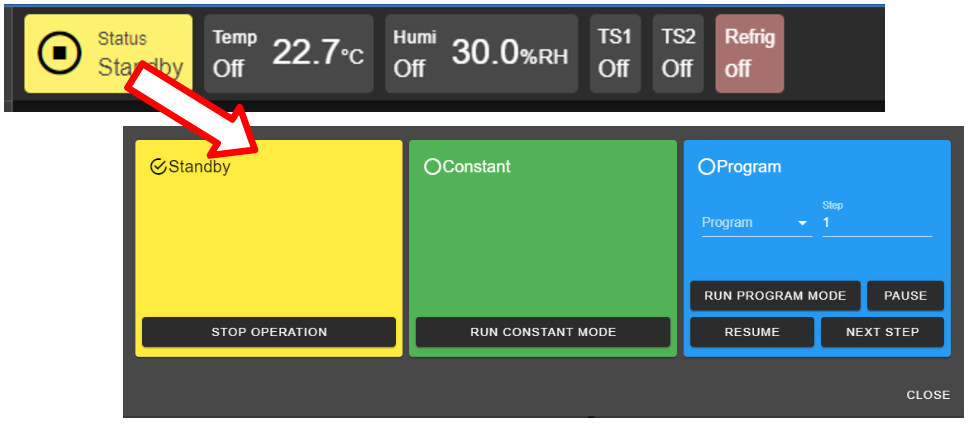
Click the status tab in the status bar. As depicted in the following figure, the chamber is in Standby mode.
-
Click the RUN CONSTANT MODE button in the constant tab. EWC immediately moves to apply the operating mode to the chamber.
-
To close the drop-down tabs, perform one of the following action:
- Click an empty area in the Main Display.
- Click a different menu in the menu bar.
- Click the status tab itself. or
- Click the CLOSE button underneath the alarm tab.
5.3 Program Setting
To set the chamber in Program mode means a profile (i.e., program) is loaded and executed.
- Click the status tab in the status bar or the extension bar of the status tab.
-
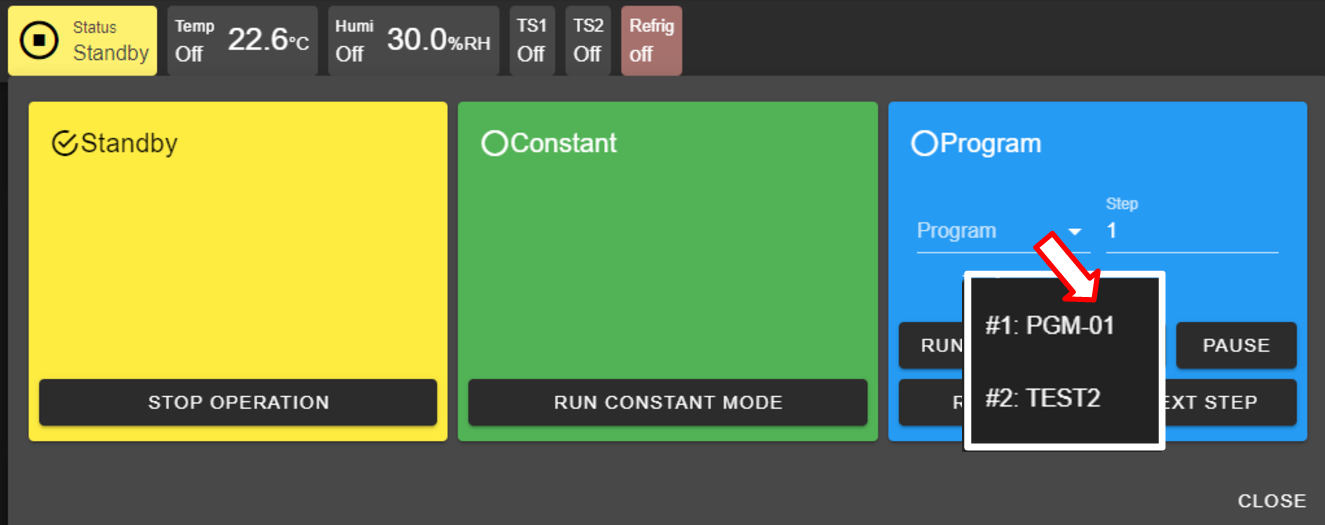
Click the radio button in the program tab to access the program list (see the figure below).
If no program is available for loading, the list contains slot numbers without programs, as depicted in the following figure. A program must be created first before it can be loaded for execution. Chapter 8 discusses how to create a program to control the chamber.
-
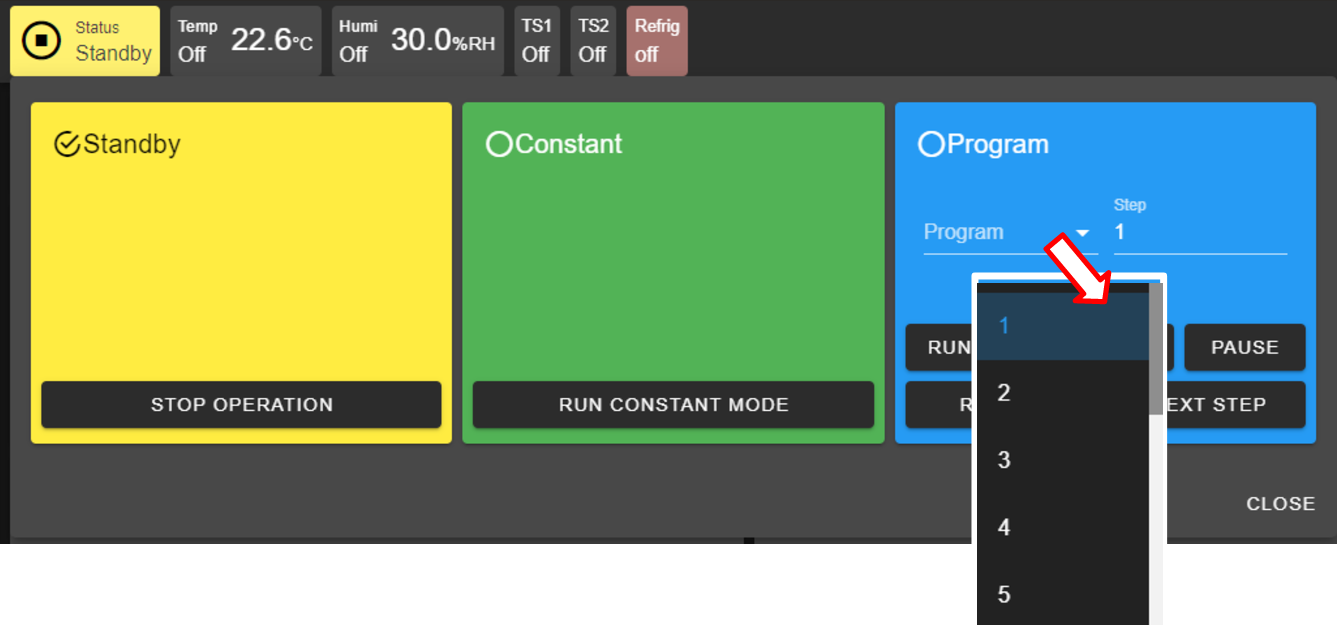
Click to select a program from the list. Apply the scroll bar, if necessary, to select the desired program.
- Enter a desired step number in the step field for program to start. Default start step is 1.
- Click the RUN PROGRAM MODE button to execute the program. EWC immediately moves to apply the operating mode to chamber. A pop-up window appears in the lower-right corner to indicate the update. Note: This program tab offers a few practical methods during a program execution. The Pause button can be used to pause the program. Program can be resumed via the RESUME button. Program instruction lines can be stepped through via the NEXT STEP button.
- Click the CLOSE button to view the status of program execution displayed in the status tab extension bar.
- To end or interrupt the program execution, switch the chamber to Standby or Constant mode via the status tab.
5.4 Clear Alarms
When EWC detects an alarm in the chamber, it also sets itself in an alert state by displaying a list of active alarms and fault names in the red window to require an immediate action from the operator, as depicted in the following figure.
A repeating beep on the local computer is also tripped to get the operator's attention. The SILENCE button can be used to turn off the beep. This alert window can be closed by clicking the CLOSE button or the X button. However, the alarm state still remains to be resolved as indicated by the Status tab in the following figure. To redisplay or expand the alarm list, click the red dot in the lower-right corner.
In an alarm state, operation is halted until all alarms triggered by chamber are resolved via the P300 (i.e., clear all alarms on the P300) before EWC (and the chamber) can resume the normal operation. Once all alarms are cleared, EWC will automatically clear all alert messages and resume normal operation by switching the chamber to a Standby mode.
5.5 Temperature, Humidity or Time Signal Settings
On the Overview page, settings of temperature, humidity, time signals or refrigeration can be controlled via the dedicated tabs in the status bar or the dedicated panes in the main display area, as depicted in the following figure.
5.5.1 Settings via the Status Bar
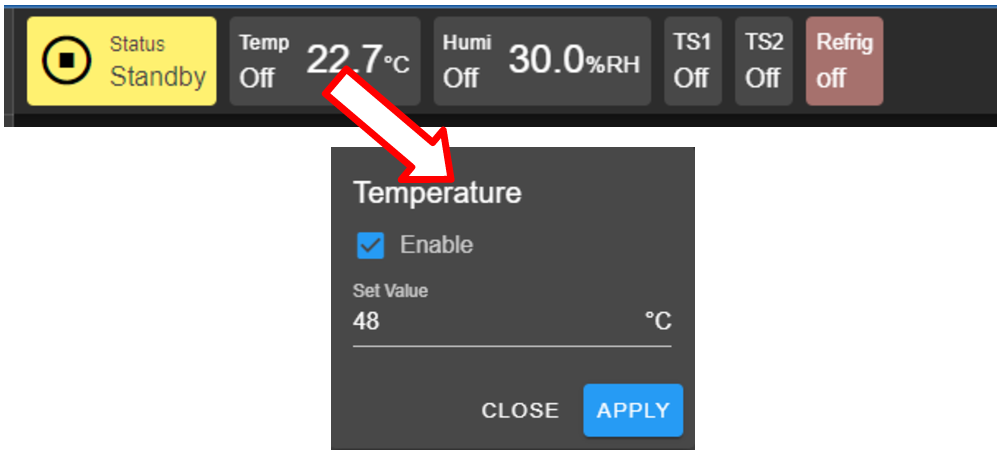
To set temperature with a new set value, complete the following steps:
- Click the Temp tab in the status bar.
-
In the drop-down pane, click the box to Enable temperature, and enter new value in the Set Value field or apply the up/down arrow to adjust the value (shown in the figure).
-
Click APPLY to apply the new setting.
- To cancel the setting, click the CLOSE button or the Temp tab in the task bar.
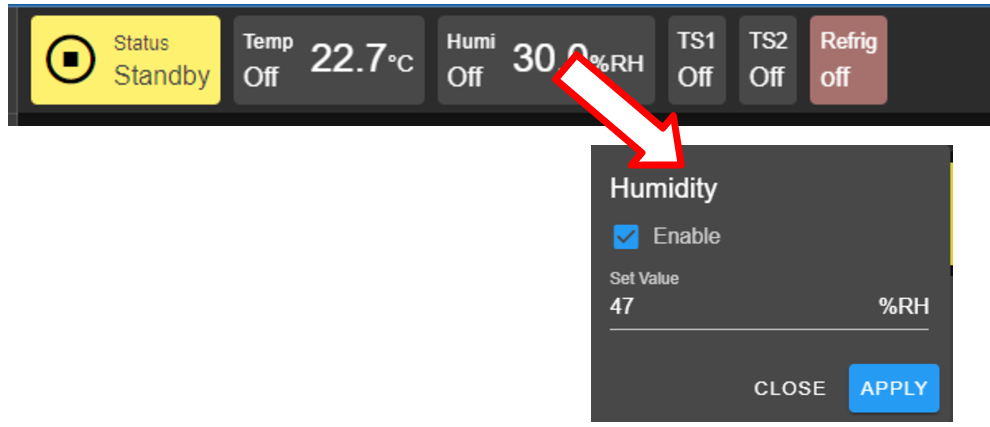
To turn on humidity and set its value, complete the following steps:
- Click the Humi tab in the status bar.
-
In the drop-down pane, click the box to Enable humidity, and enter new value in the Set Value field or apply the up/down arrow to adjust the value (shown in the figure).
-
Click APPLY button to apply the setting.
- To cancel the setting, click the CLOSE button.
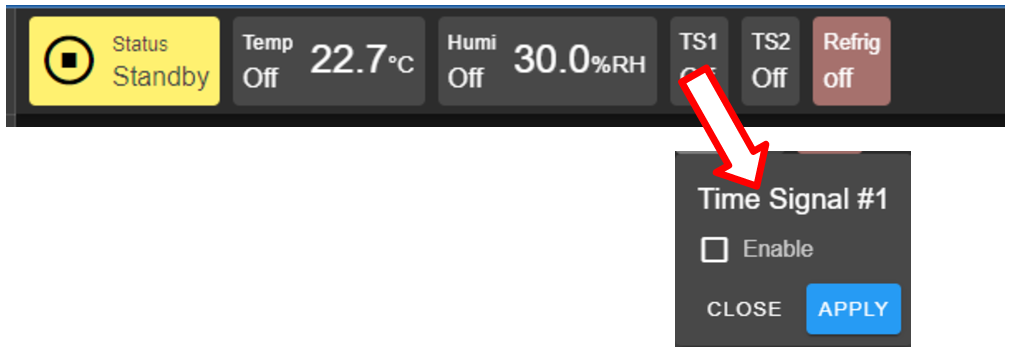
To turn on time signal 1 (TS1), complete the following steps. Repeat the same procedure to turn on additional time signals.
- Click the TS1 tab in the status bar.
-
Check the box to enable TS1 (shown in the figure).
-
Click APPLY.
- To cancel the setting, click CLOSE (instead of APPLY) or click the TS1 tab itself in the status bar.
To turn off TS1, apply the following steps:
- Click the TS1 tab in the status bar.
- Uncheck the box to disable TS1.
- Click APPLY.
- To cancel the setting, click CLOSE (instead of APPLY) or click the TS1 tab itself in the status bar.
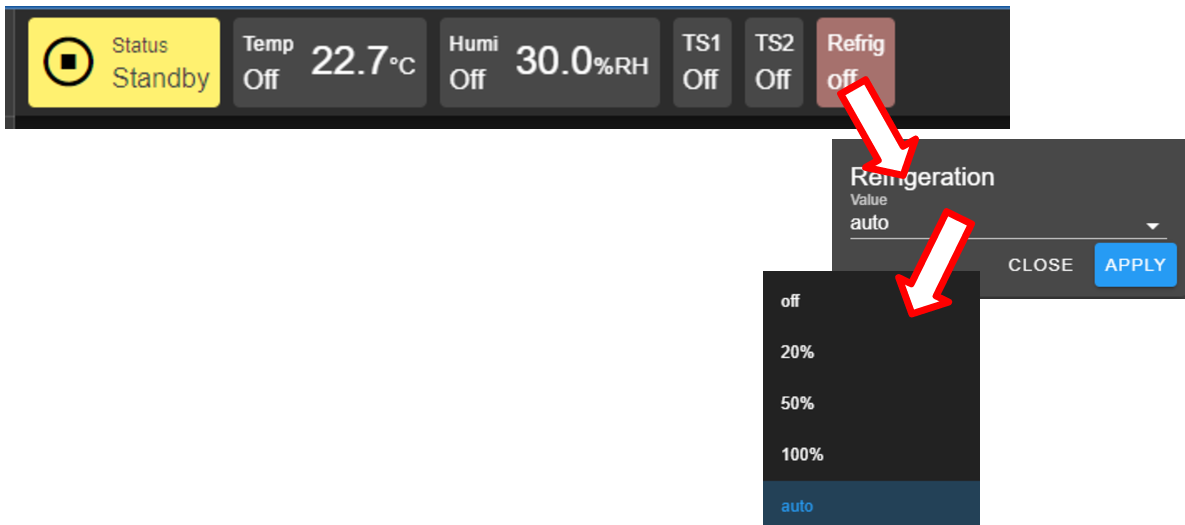
To turn on the refrigeration, complete the following steps:
- Click the Refrig tab in the status bar.
-
Check the radio button to select set value from the drop-down list.
-
Click Apply.
- To cancel the setting, click the CLOSE button.
5.5.2 Settings via the Dedicated Panes
With EWC, there are multiple ways to complete the same task. The dedicated panes for temperature, vibration or humidity, time signals, or refrigeration, in the main display area are actually clickable panes. These are CTA (call-to-action) panes through which new parameter settings (such as, temperature, vibration or humidity, time signal and refrigeration) can be applied.
To apply a new setting to temperature, complete the following steps:
-
Click the Temperature pane to access the input pane (shown in figure below).
-
In the input pane, click and enter new value in the Set Value field or apply the up/down arrow to adjust the value.
-
Click APPLY. To cancel the setting, click CLOSE (instead of APPLY).
The above procedure can be applied to humidity, vibration, time signal or refrigeration.
6 Trend
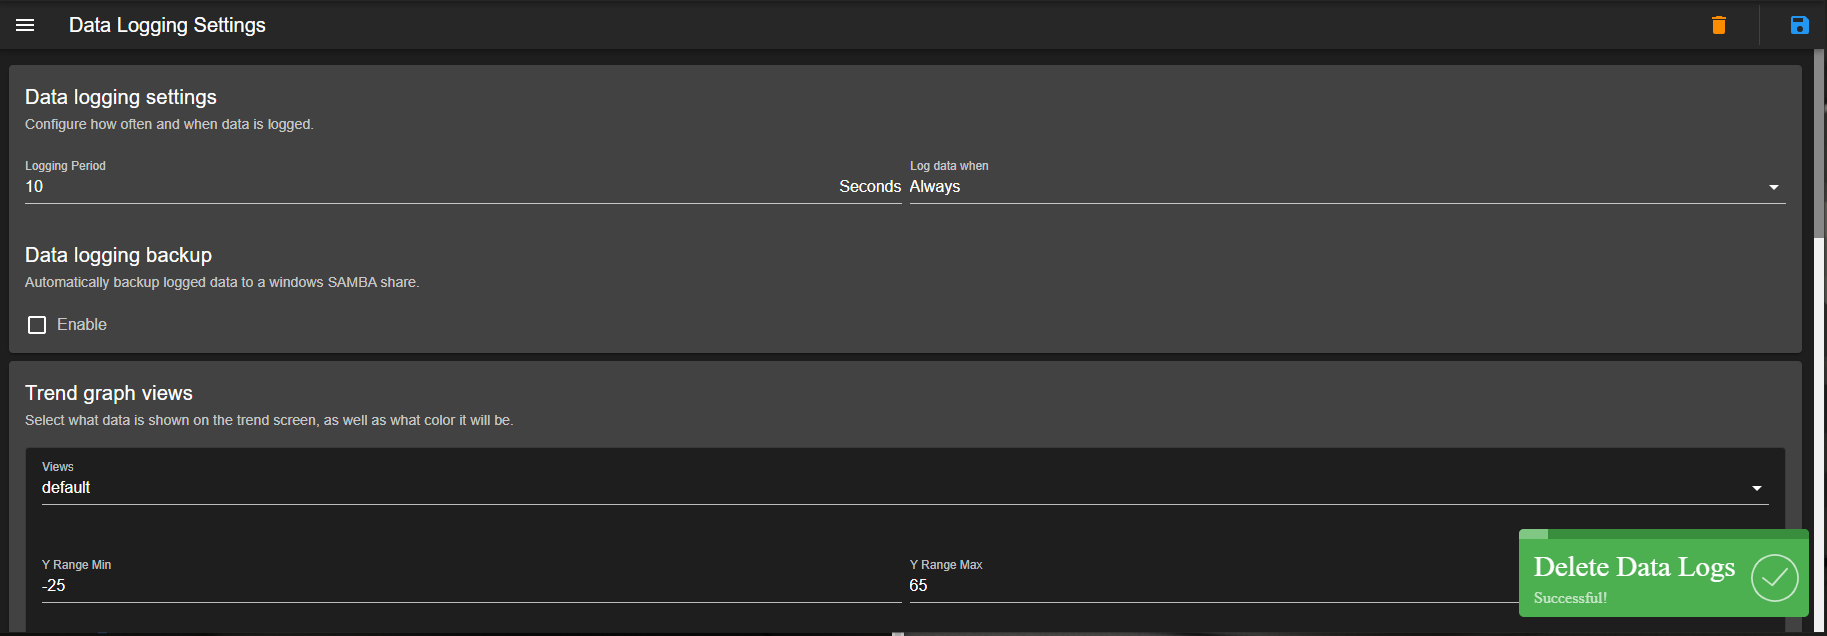
The Trend menu can be used by an operator to view a scatter plot of data points collected during the chamber operation. Data collection can occur in two distinct modes: Always and When Chamber is on. These two modes are selectable and configured under the Data Logging Settings submenu found under the Settings menu. Plot elements and detailed configuration of the trend graph will discussed on Data Logging Settings page in the Settings menu.
By default, the trend graph provides a scatter plot of data points collected during the last hour. Various options of plot range of data points accumulated more than one hour can be selected. Data can be downloaded in whole or in portion to be stored on the local computer as CSV file.
6.1 Trend: Components
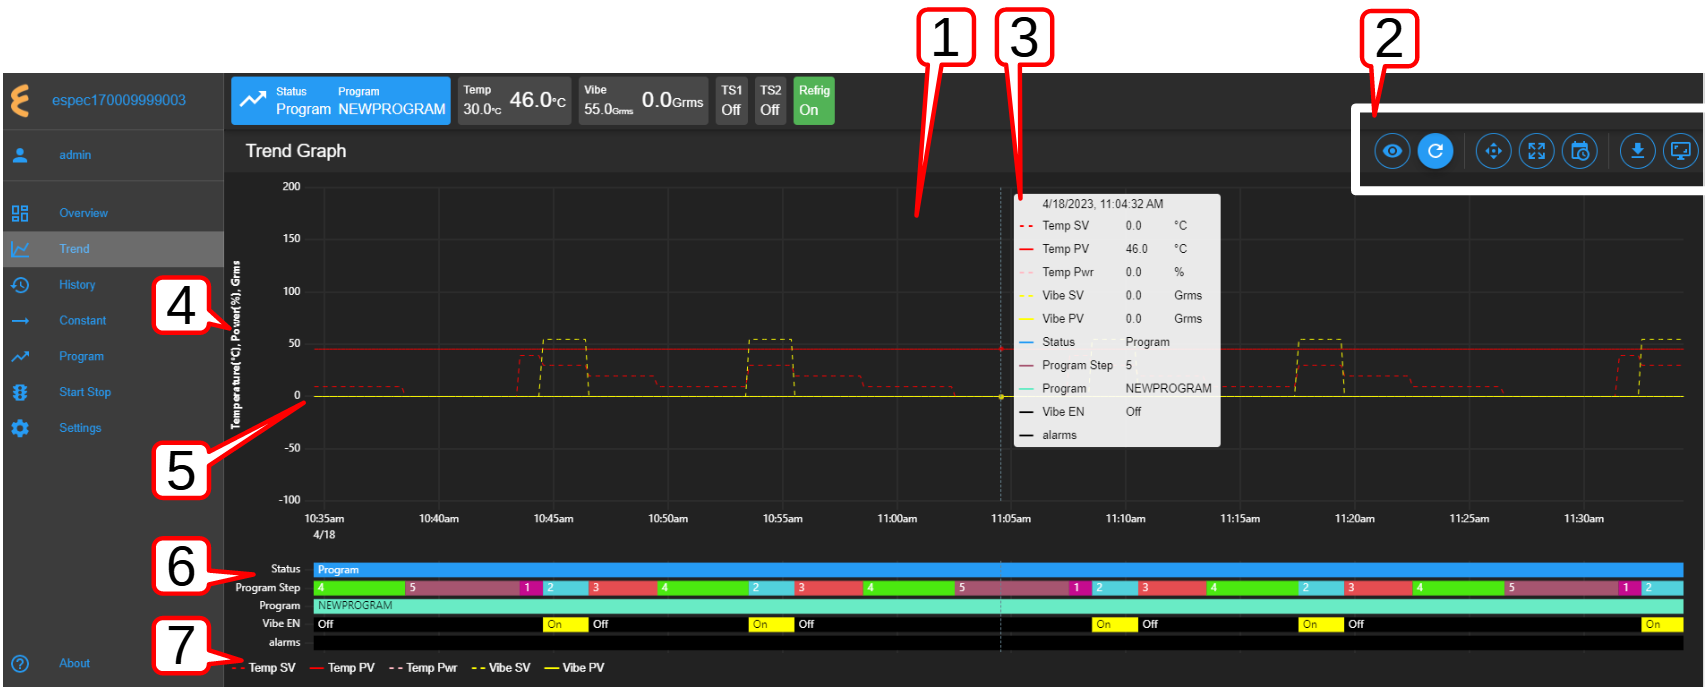
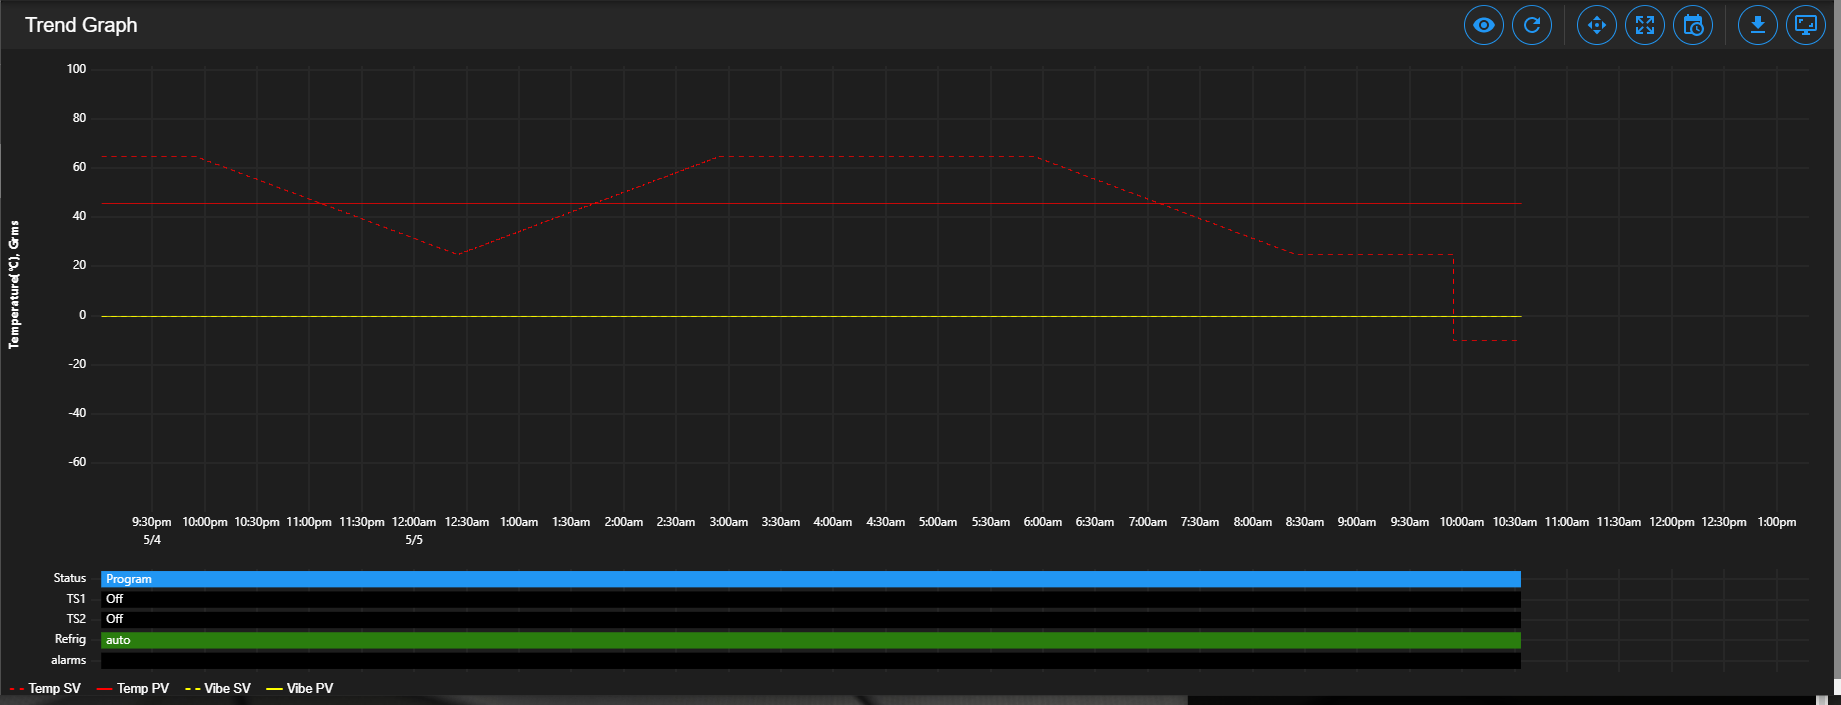
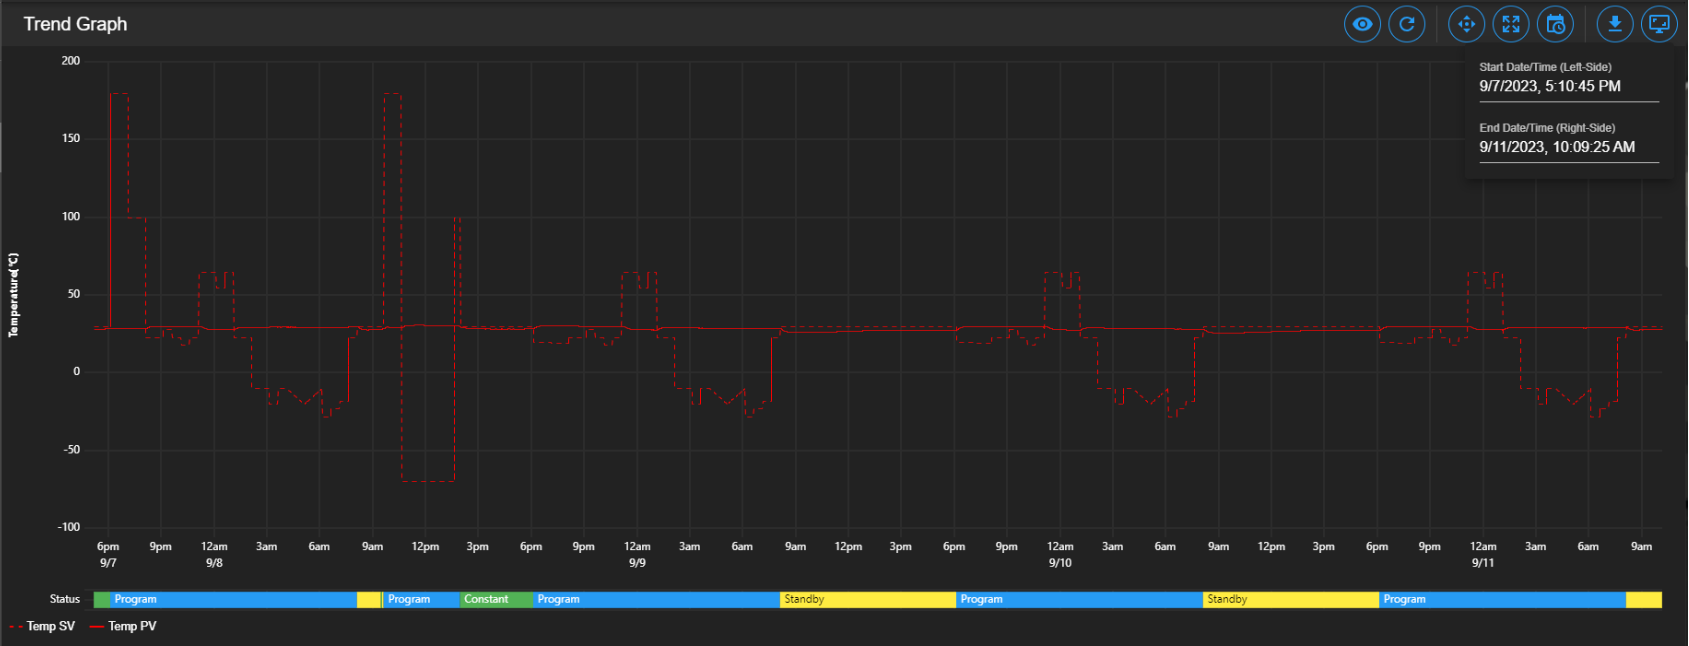
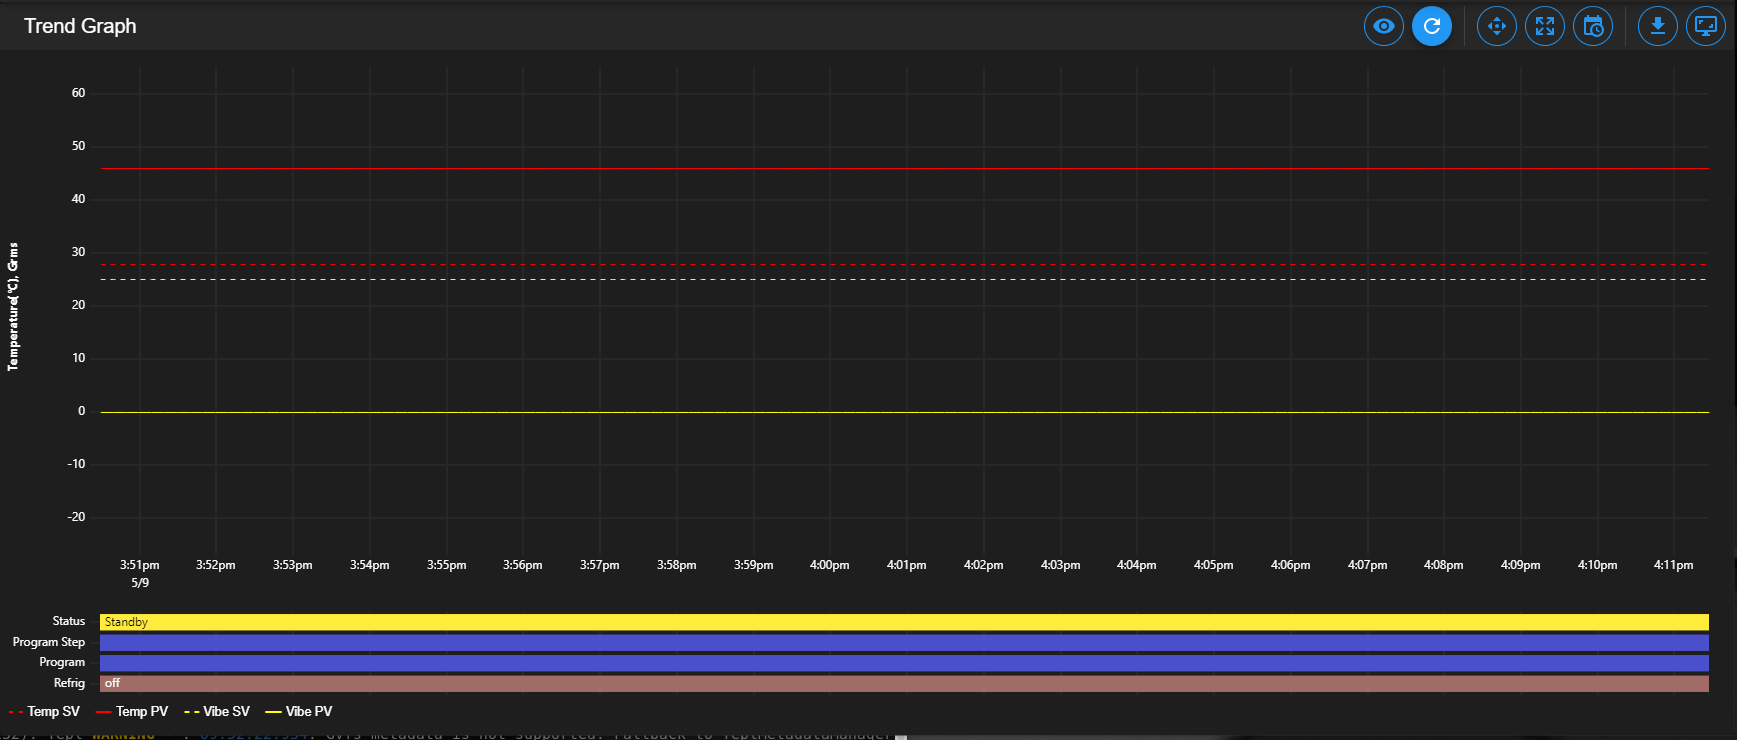
There are seven different groups that make up the main display of Trend and the scatter plot, as depicted in the following figure. The scatter plot shown in the figure is a result of the data points being collected with the chamber in program mode. Detailed descriptions of these groups based on the labels in the figure are outlined as follows:
-
Trend Graph: Data points collected from the chamber are rendered as a trend graph based on a scatter plot methodology. These data points--product temperature, air temperature, humidity, vibration, etc.--are plotted as a function of time. Temperature is displayed in degree Celsius, vibration in root-mean-square of acceleration (Grms or G), etc. The vertical y-axis represents the scale of these values. The horizontal x-axis represents the data logging runtime. Based on the default configuration, the chamber logs data points in a 10-second interval (refer to the Data Logging Settings submenu, under Settings). Depending on the type of chamber, data logging interval can be set to lower than 10 seconds. The grid scaling on both the y- and x-axes will change according to the application of the Pan/Zoom Controls buttons or the drag-and-select via the mouse and scroll wheel. Default setting can be restored by clicking the refresh button on the Web browser (not shown in the above figure).
-
Trend Graph Manipulation Buttons: Seven manipulation buttons are available to help manipulate and control the trend graph features and options. Detailed functionality and operation of these buttons are discussed in the following section.
-
Snapshot of Data: By hovering a mouse pointer on the trend graph area, a snapshot of the data at a particular time is displayed (shown in the figure). This feature allows a quick peek of the data at a certain point in time. Depending on the chamber's condition, the snapshot displays set values (SV) and process values (PV) of temperature, product or air temperature, or vibration, chamber operating mode or status, as well as program name and alarm. The contents in the snapshot are based on the selected options displayed in the legend set by the Graph View button of item 2 (above); and the color scheme selection under the User Interface Settings submenu (found under the Settings menu).
-
Y-axis Label: The y-axis displays the selected type of data points to be plotted, such as Temperature, Humidity, Vibration ,etc. These values are populated based on the selection of the Graph View under item 2 (above).
-
Line Graph: Different types or styles of graph--solid line, dashed line and color--are used to designate each type of data points in the plot to help for visualization and readability. As depicted in the figure, solid line represents process values, while dashed line represents set values with a distinctive color, as indicated in the legend (see item 7).
-
Status: Status of chamber operating mode is displayed along the time line on the trend graph, indicating when and how long the chamber was in specific operating mode. This feature provides a quick preview of the chamber operating status. The Pan/Zoom button of Trend Graph Manipulation Buttons (item 2) may be used to manipulate the display and shift the graph back into the past to view the chamber's operating mode.
-
Legend of Trend Graph: The legends are used to identify each item on the trend graph with color code, as well as line/dash graph, to designate the different type of data being plotted.
6.2 Trend Graph Manipulation Buttons
The following is a detailed list of the seven Manipulation Buttons of Trend Graph, item 2 in the previous figure.

-
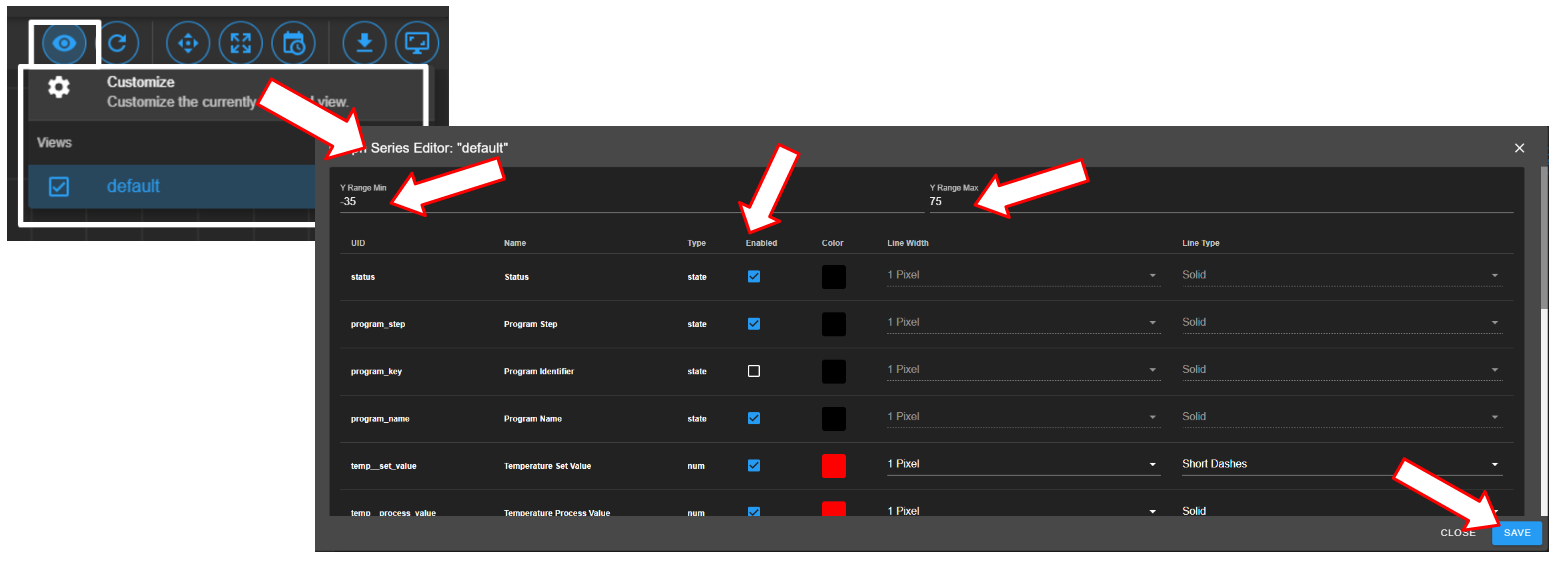
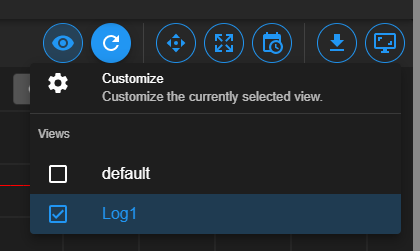
Graph View: Data visualization is very important. Elements or components of the trend graph are predefined by the configuration set in the Data Logging Settings submenu (found in the Settings menu). The Customize option depicted below allows the operator to select what to include in the trend graph to help simplify data visualization. Three different options represented by the arrows in the figure can be selected. The minimum and maximum Y range can be adjusted over the default values to help scale the graph for better visualization; different data types can be enabled for display. The Save button (last arrow) can be applied to save the settings and render the graph.
-
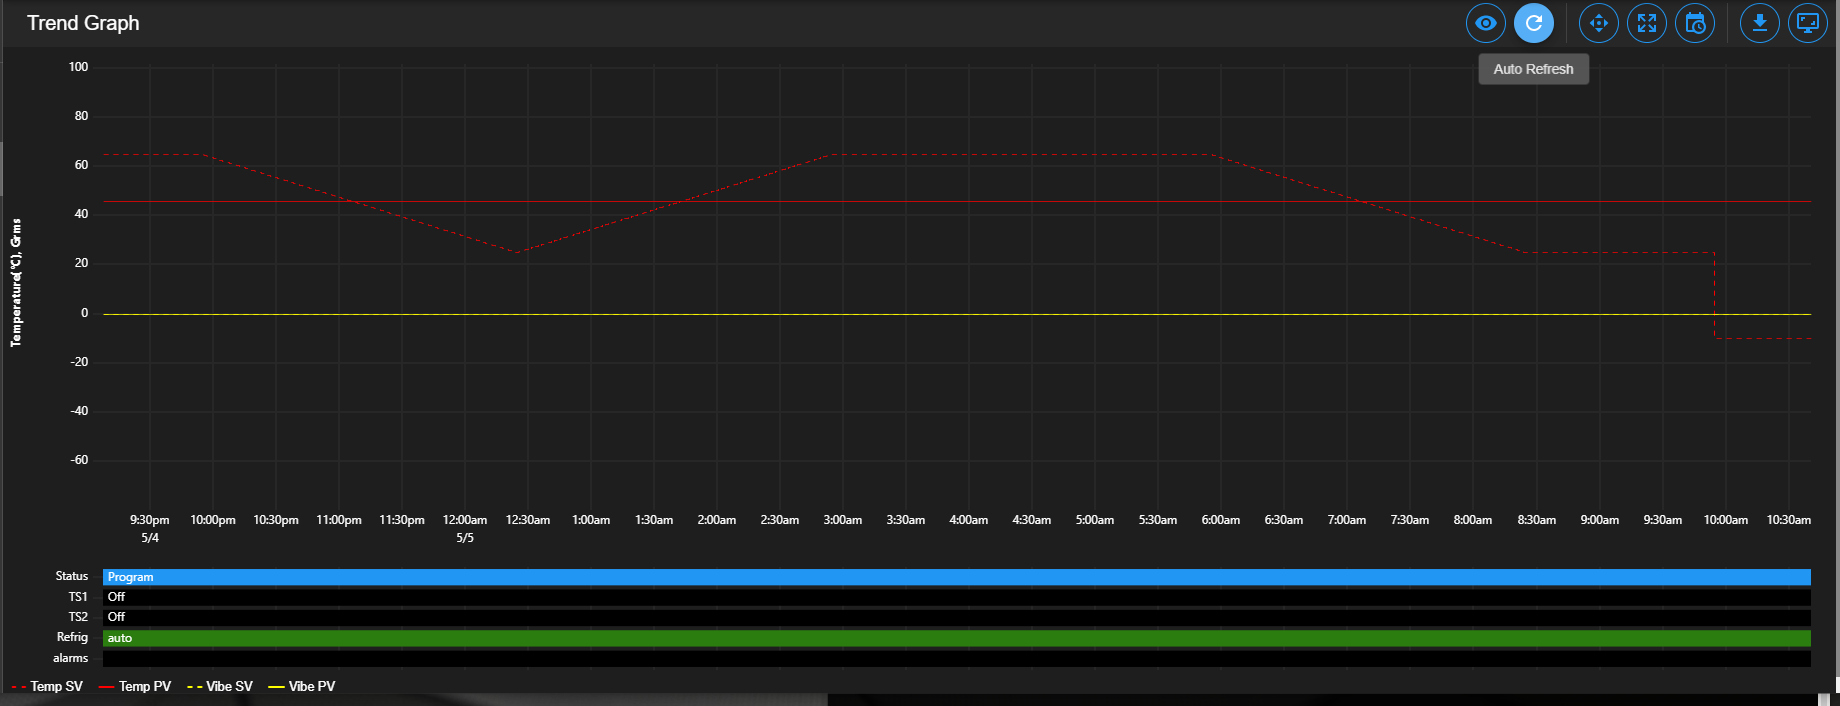
Auto Refresh: This Auto Refresh button reconstructs the graph to include data points up to the current time. Suppose a scroll wheel was applied to zoom out the trend graph that included future time which data points have not yet been sampled, as shown in the figure below.
The auto refresh button will rescale the graph to eliminate the gap (future time) on the right to expand and display the trend graph up to the current time.
-
Pan/Zoom Controls: The Pan/Zoom Controls button allows the operator to control and adjust the viewable section in the trend graph. This button presents six operation buttons to manipulate and display the trend graph as follows:
-
Zoom In: The Zoom In button allows the operator to zoom into a small section of the trend graph. Depending on the degree of zooming, the display area will be confined to a small set of data points ranging between minutes to hours. To reset the trend graph, click the Zoom Extents button, select Last Hour from the drop-down menu, then click the Auto Refresh button.
-
Zoom Out: The Zoom Out button does the opposite by allowing the operator to zoom out on the trend graph, thereby giving the operator an expansive view of the trend graph. To reset the trend graph, click the Zoom Extents button, select Last Hour from the drop-down menu, then click the Auto Refresh button.
-
Move Up: This button allows the operator to move up the graph along the vertical axis to adjust the viewable area of the scatter plot. To reset the trend graph, click the Zoom Extents button, select Last Hour from the drop-down menu, then click the Auto Refresh button.
-
Move Down: This button allows the operator to move down the trend graph along the vertical axis with the purpose to adjust the viewable area of the scatter plot. To reset the trend graph, click the Zoom Extents button, select Last Hour from the drop-down menu, then click the Auto Refresh button.
-
Move Left: This button allows the operator to pan left on the trend graph, offering a quick preview of a plot of data points tracing back the time in hours or days. With this feature, the operator can quickly gain a preview of past data points which the operator may have missed.
-
Move Right: This button does the opposite to Move Left by allowing the operator to pan right on the trend graph to the current time. To reconstruct the trend graph to contain the most recent data points, the Auto Refresh button allows the quickest operation.
-
-
Zoom Extents: With this button, trend graph may be provided using data points from within the last one hour, last two hours or the last six hours. To make adjustment of the trend graph based on these three selections, click on the Zoom Extents button, then click one of the selection from the drop-down menu.
-
Plot Range Selectors: Data points can be selected from start date/time to end date/time to produce a desired trend graph. Arbitrary date and time can be selected for the plot range, as depicted in the following figure.
To set the plot range,
- access the Plotted Range Selectors button.
- access the Start Date/Time; edit date (m/d/y) and time (H:M:S) fields or apply the calendar and clock icons to select date/time.
- apply ACCEPT
- access the End Date/Time; edit date (m/d/y) and time (H:M:S) fields or apply the calendar and clock icons to select date/time.
- apply ACCEPT. Note: Values of end date must be later (or greater) than start date.
-
Download Data: To download data and store it on the local computer, click the Download Data button and select Download Current View to download a portion of data from the displayed trend graph. To download the entire collection of data, select Download All Data. Data file will be stored in the Downloads folder of the local computer with filename: hostname_data_date.CSV.
-
Capture Screenshot/Download: Trend graph can be captured, downloaded and stored on the local computer in PNG file, as shown in the figure.

6.3 How to Handle Downloaded Data File
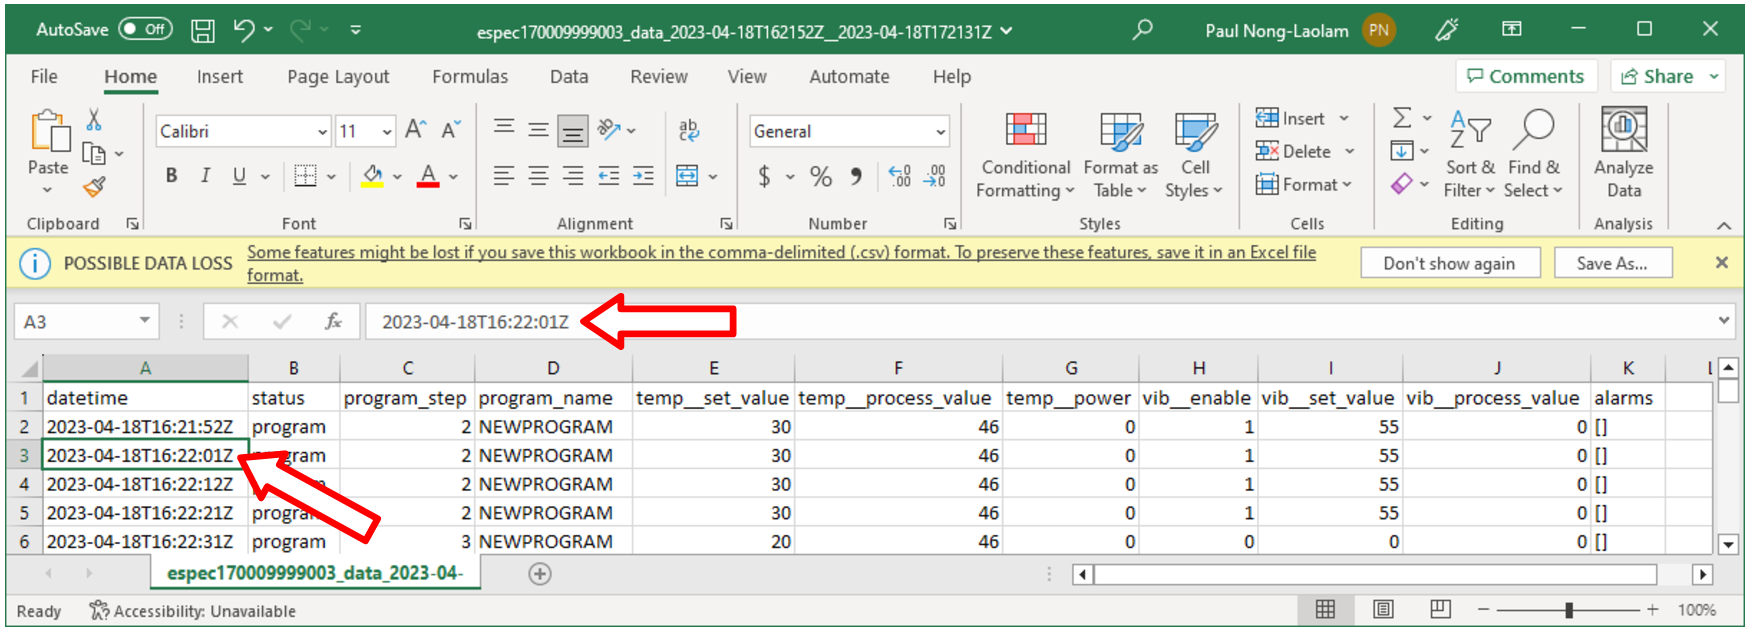
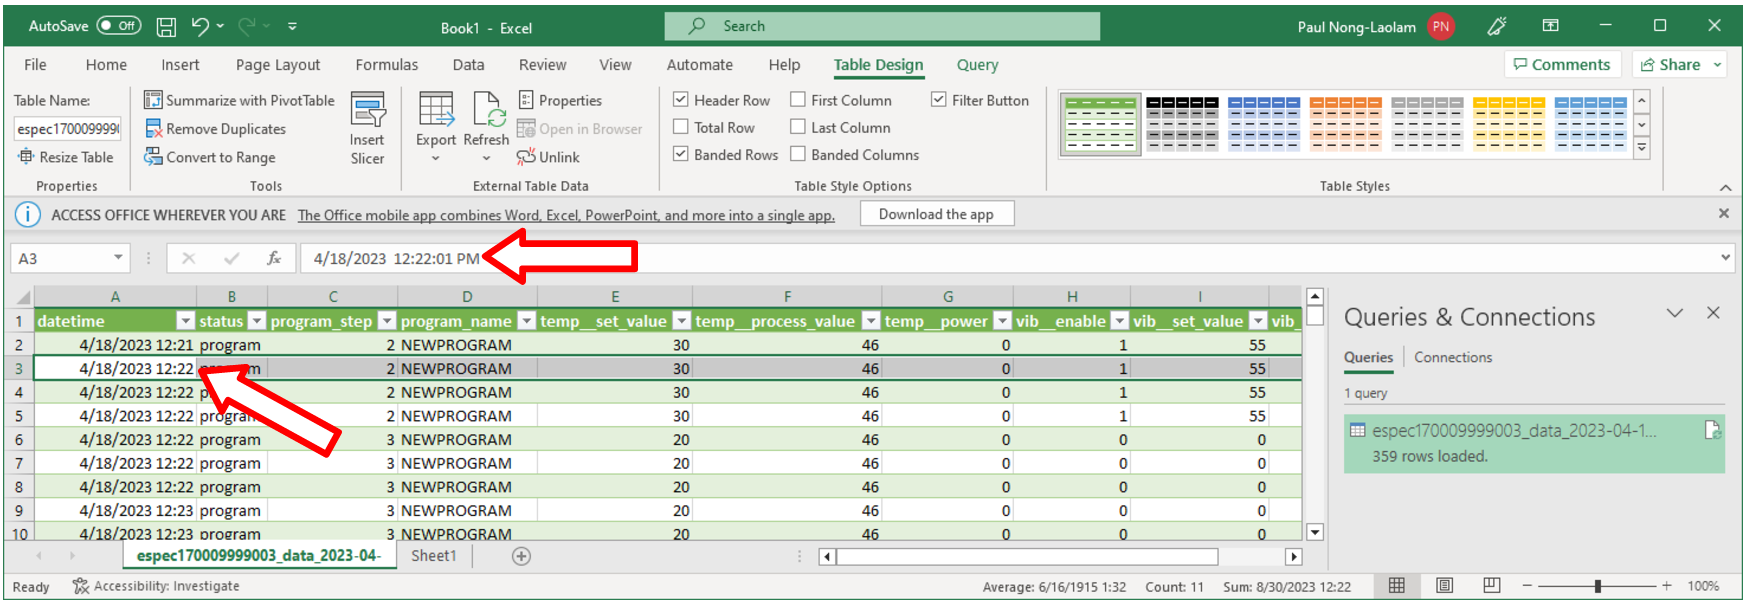
Data points collected from the chamber are stored in CSV format. The recorded time of the data points is stored based on a UTC (or Universal Time Coordinated, previously referred to as the GMT) instead of the local time. To preserve the integrity of the CSV file and its UTC time stamp, do not rename the data file with MS Excel extension or attempt to open it directly with MS Excel. Any attempt to force open it in MS Excel will result in the wrong time conversion as shown in the following figures.
The following figure displays the CSV file which was directly opened with MS Excel. The time stamp in the first column is wrong; it is still based on UTC time stamp indicated by the arrows.
The following figure displays the same CSV file which was properly imported into MS Excel with the correct time stamp conversion for local time indicated by the arrows.
The proper way to handle this CSV file is to import it using the following procedure to render the correct conversion of the UTC time to the local time on all data points.
Complete the following steps:
-
Select Trend in the main menu bar
-
Click the Download button (item 6 in the previous section) to download the data (current view or entire data) in CSV file
-
Launch MS Excel and start a new blank spreadsheet
-
Click the Data ribbon
-
Click From Text/CSV (that appears under the Home ribbon)
-
In the Import Data Window explorer, open the Downloads folder and select the downloaded CSV file (in step 2) and click the Import button (in the bottom).
-
Click the Load button to load data into the current spreadsheet.
-
To save the current spreadsheet as Excel Workbook, click Save As and follow the standard steps to complete the process.
7 History
The History page displays operation history of the chamber, its operating modes and statistics. Any alarms or alerts that were triggered during the chamber's operation are logged and displayed here. By default, history log of the chamber's operating modes, alarms or statistics from the previous week will be displayed, as depicted in the following figure. There are five important components in the History main display area. They are labeled and described as follows:
-
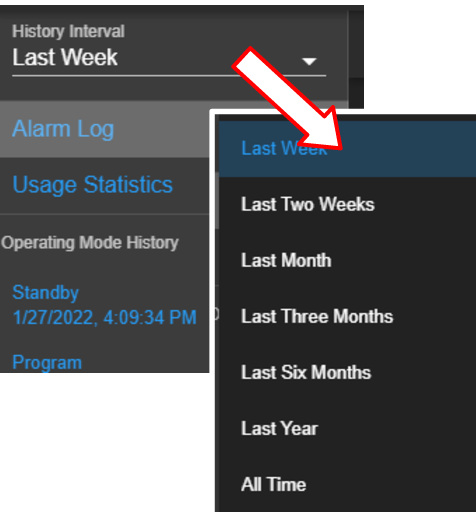
History Interval: Display options of the operating history are: one week, two weeks, one month, three months, six months, one year or the entire period of the chamber's operation. To access the history interval, click the radio button to select the period from the list.
-
Alarm or Statistics Submenus:
-
Alarm Log: By default, alarm logs will be displayed in the main display area. The logs indicate which alarm had occurred and when they were resolved (cleared). Most recent events are listed at the top. To view detail of each log, click on its name (with its log date and time).
-
Usage Statistics: To display the operation statistics, click on this submenu. Percentage of each operation mode based on the selection period in the History Interval is displayed as shown in the following figure:
Such information provides the operator a good idea of the overall performance of the chamber by identifying when and how much time it was in a certain operating mode.
-
-
Operating Mode History: A list of operating modes of the chamber is displayed here based on the option selected under the History Interval. Default listing is based on a one-week interval. A trend graph, identical to that produced in the Trend menu, based on the data points collected during the operating mode can be produced by clicking on the particular operating mode on this list, as illustrated in the following figure.
-
Show/Hide Submenu: To provide a larger real estate for the main display area, this Show/Hide button can be used to show or hide the History submenu. The following figure shows how the submenu is hidden and the main display area is expanded.
-
Main Display: The content of the submenu page of Alarm Log and Usage Statistics is displayed here (refer to item 2, above).
8 Constant
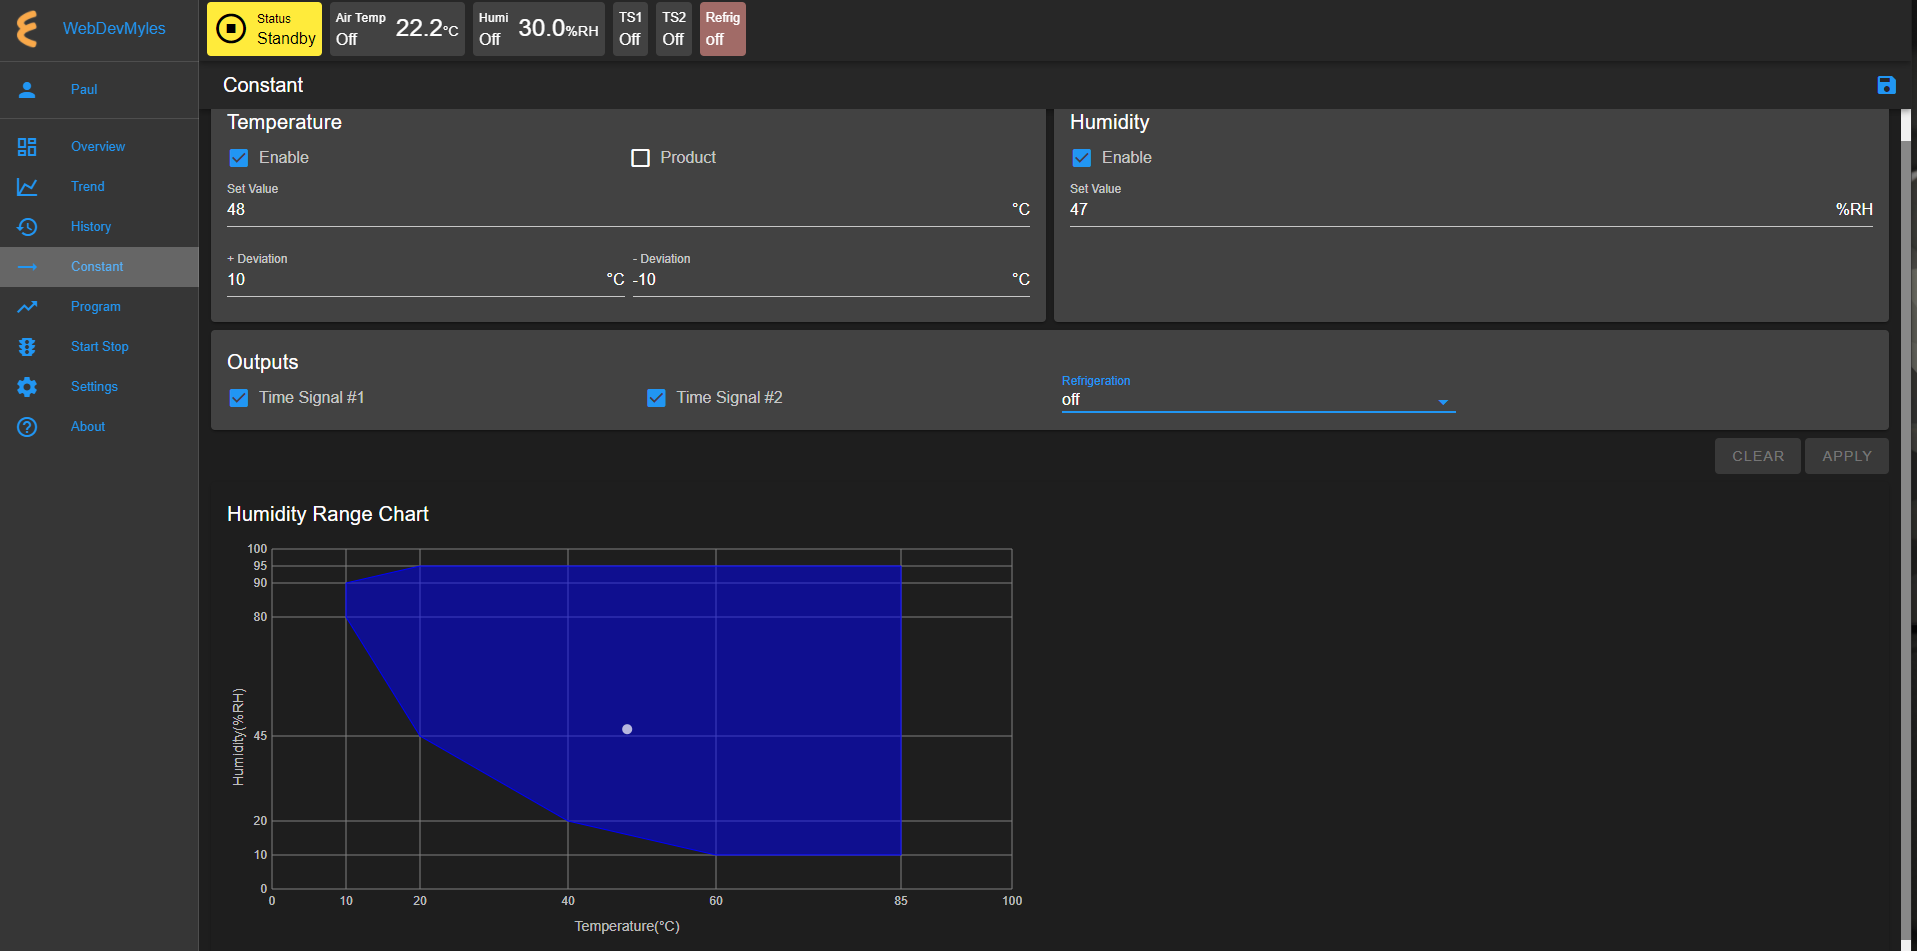
The existence of EWC Constant page is such that all features and their parameters are collected and displayed in one place to control their constant mode settings. The main display of Constant consists of three separate panes, displayed as Temperature, Humidity (or Vibration) and Outputs, as depicted in the following figure. These CTA panes provide input options to adjust the settings directly. The Humidity Range Chart is a two-dimensional graph of the current temperature-humidity relationship, displayed below these CTA panes.
The following sections describe how to configure and control each of these parameters.
8.1 Product or Air Temperature Setting
Complete the following steps to turn on or modify temperature setting:
- Enable air temperature or product temperature by checking the appropriate boxes.
-
Click the Set Value field and enter a new value, or apply the up/down arrow to adjust the value.
-
Adjust the plus/minus deviation in the appropriate fields.
-
Click the APPLY button or the Save icon (indicated by the arrows) to apply and save the setting. The red dot next to the Save icon indicates that the new setting has not been saved. If you exit this pane by accessing a different menu in the menu bar, a warning message will appear (shown in figure).
-
To cancel the setting, click CLEAR.
The new setting takes effect immediately with its new status displayed in the status bar. To reverse or cancel the setting, repeat the above steps to reset the set value and click APPLY.
8.2 Humidity Setting
Complete the following steps to turn on or modify humidity setting:
- Enable or disable humidity with the appropriate check mark in the box.
- Click the Set Value field and enter a new value, or apply the up/down arrow to adjust the value.
- Click the APPLY button or the Save icon (indicated by the arrows) to apply and save the setting.
- To cancel the setting, click CLEAR. If you exit this pane by accessing a different menu in the menu bar, a warning message will appear.
The new setting takes effect immediately with its new status displayed in the status bar. To reverse or cancel the setting, repeat the above steps to uncheck the box, reset the set value and click APPLY.
8.3 Time Signals Setting
Complete the following procedure to turn on output for any time signal:
- To turn on output for Time Signal # 1, place a check mark in its box.
- Repeat the above step for any time signal available in the main display area.
- Click the APPLY button or the save icon as indicated by the arrows in the above figure to apply and save the setting.
- To cancel the setting, click CLEAR. If you exit this pane by accessing a different menu in the menu bar, a warning will appear which requires you to save the setting before attempting to access any other menus.
The new setting takes effect immediately with its new status displayed in the status bar. To reverse or cancel the setting, repeat the above steps to uncheck the box and click APPLY.
It is important to note that all the parameters (temperature, humidity, vibration, time signal) in the main display can be adjusted altogether simultaneously with a single APPLY or save button. However, individual setting may provide security to avoid any adverse effect.
9 Program
The Program menu allows the operator to create a program to control the chamber. All the programming features available on the supported PLC's listed in Chapter 1 ("Introduction") can be composed into programs to control the chamber. The operator can: (1) open and view a program; (2) preview the output of the program; (3) edit and/or overwrite an existing program ; (4) delete program from the list; (5) rename program on the list; (6) download a program and store it on the local computer in JSON file; (7) upload a program from the local computer to EWC, and much more.
Here are some of the benefits of the Program menu:
- Easy to operate.
- Quick management of programs, programming or editing.
- Require less time to develop a new program or modify an existing program.
- Program Editor offers flexibility with multitasking capabilities.
- Control program operation and program end mode.
- Preview program operation before execution; operator can see exactly what the program does prior to its execution.
- Download program from EWC to the local computer for backup.
- Upload program from the local computer to EWC.
Only authorized users with read-write privilege can access and utilize the Program menu. The user must log into their account to access the Program menu based on their read-write privilege, as depicted in the following figure.
9.1 List Programs
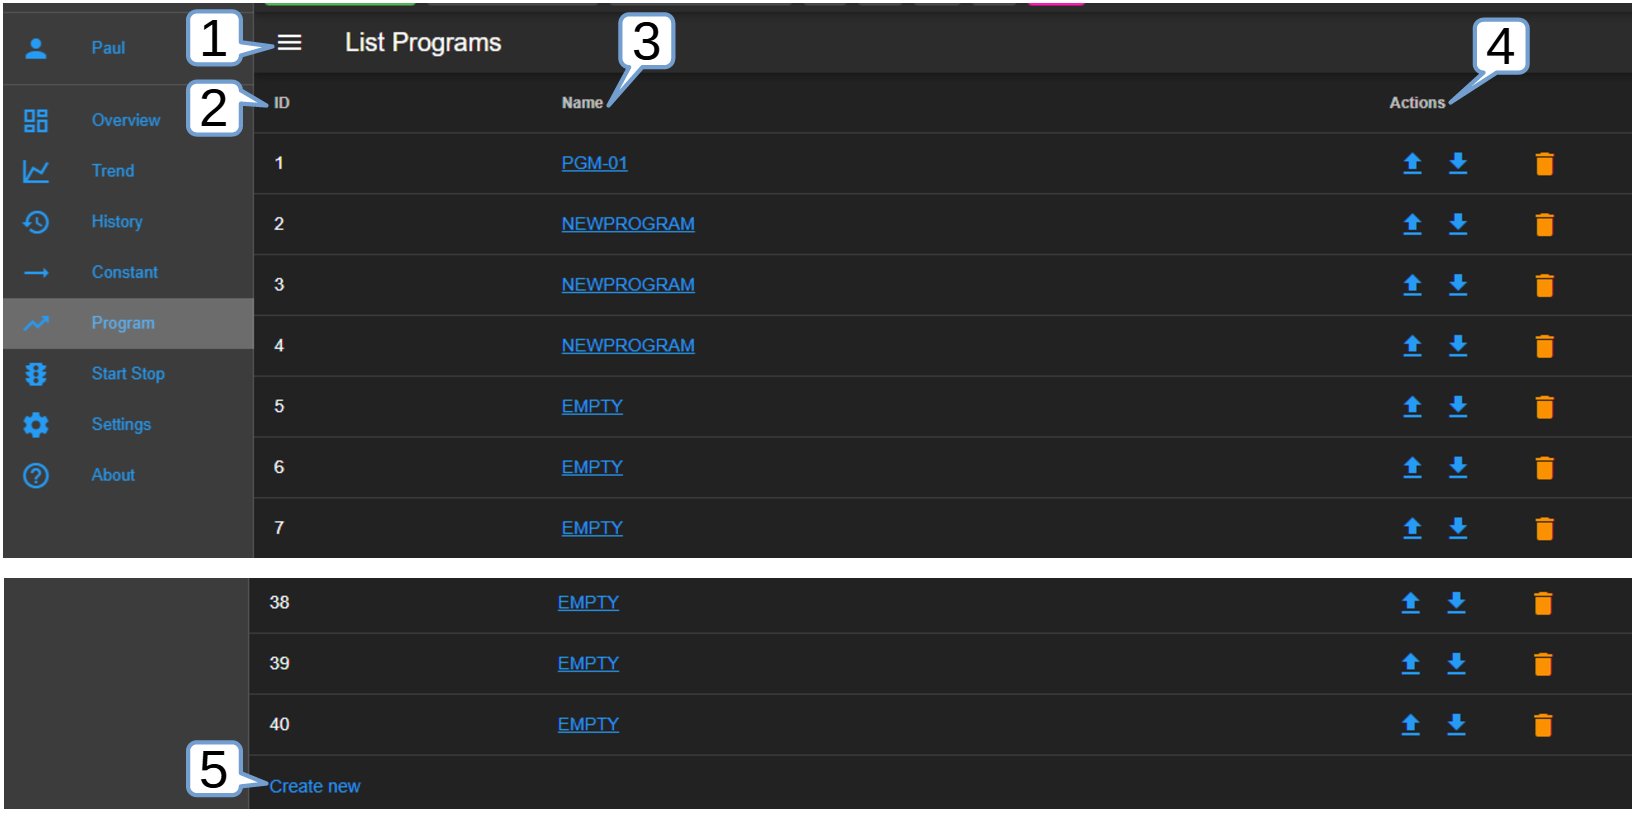
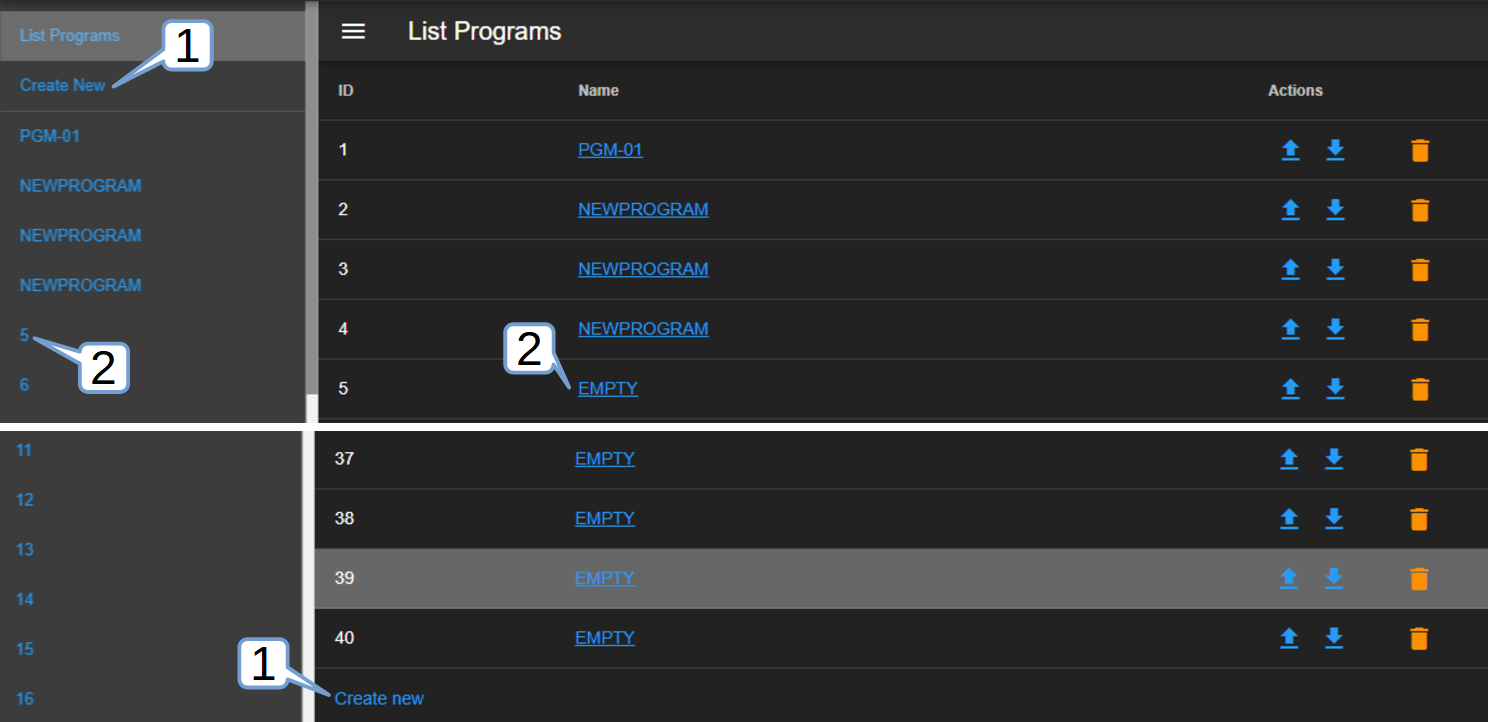
The following figure depicts a typical layout of the Program page with its submenu hidden. This is the default display of program list when the Program menu is accessed for the first time. Its UI components are numbered and explained as follows:
- Submenu Show/Hide: This button toggles between the ``show and hide submenu'' to allow the program editor utilize the entire main display area (see above figure).
- ID: EWC identifies each program by its slot number stored in the PLC register. This list reflects the actual list of programs read from the PLC register. A total of 40 program slots are available, numbered from 1 to 40. The system uses a program identification code (ID) to identify each program.
- Program Name: All available programs are listed under the Name column by program name. These programs are stored by their slot number. As such, identical program names may exist in different slots. Any slot not yet occupied by the program is marked EMPTY. Users can access each program under this list by clicking on the program name. The program editor then opens and displays the program instructions. Detailed operation of the program editor is discussed in the next section.
- Actions: Three action buttons (Upload Program, Download Program, Delete) are available for managing the program under each row.
- Upload: Program can be uploaded from the local computer to EWC which will then be stored in the PLC register using the slot number where the action was applied.
- Download: Program can be downloaded and saved on the local computer.
- Delete: A program to the left of the trash bin (where this action is applied) will be deleted. The PLC register will no longer contain this program.
- Create New: This button opens the program editor for creating a new program. The Create New button is conveniently placed in two locations: (1) under the ID list and (2) in the Program submenu (shown in the following figure).
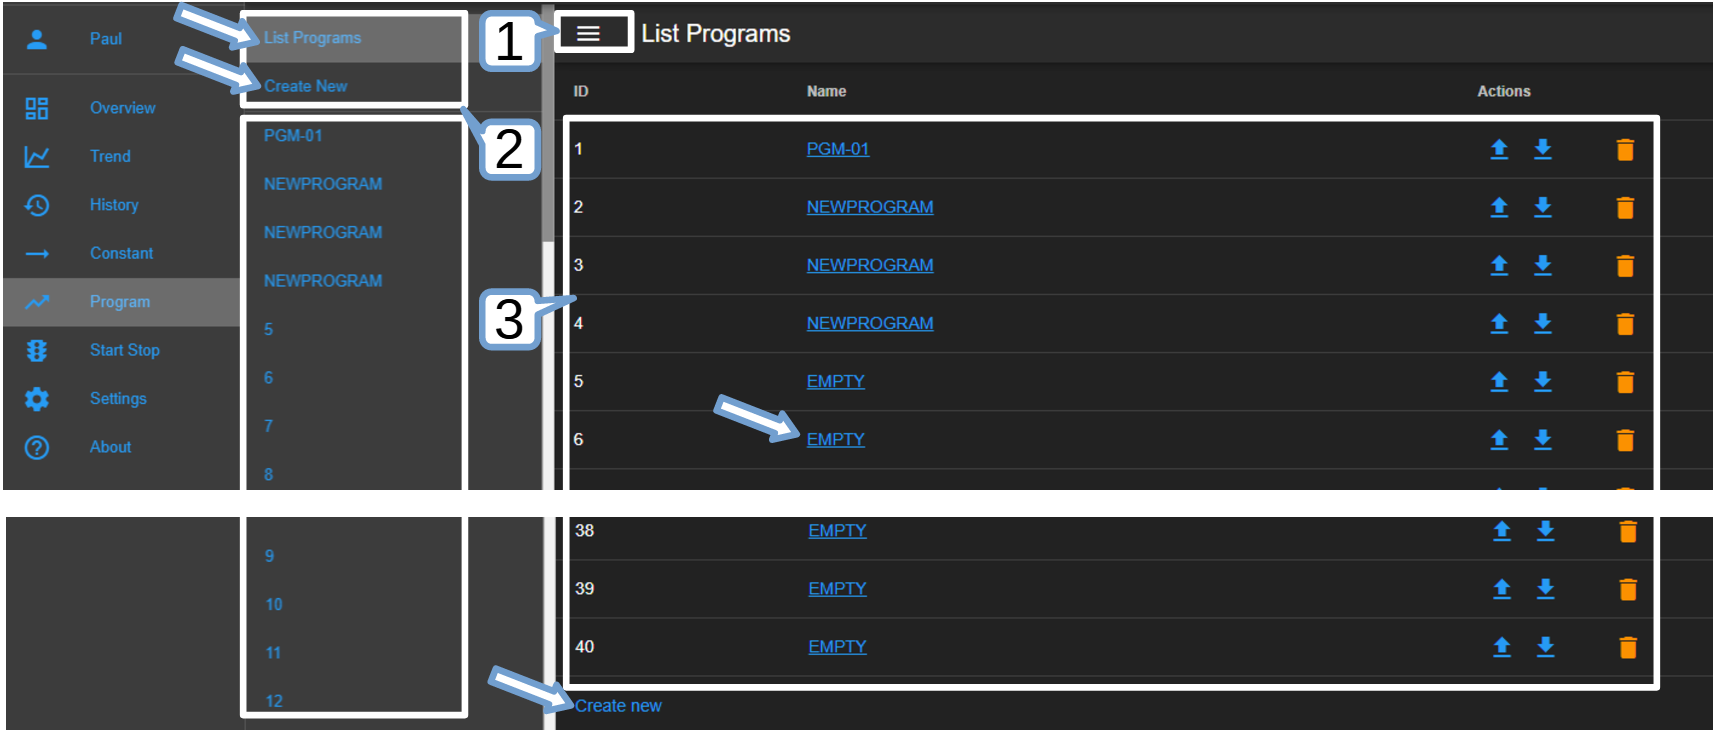
The following figure displays the Program page with its submenu unhidden. The submenu (item 2) has two operation buttons: (i) List Programs and (ii) Create New (program).
-
Show/Hide: The Show/Hide button can be used to hide or unhide the Program submenu (item 2 below).
-
Submenu: This submenu has two operation buttons (indicated by the arrows): List Programs and Create New (program). All the available programs in the chamber stored in EWC are listed below these operation buttons (shown in above figure). With the submenu hidden, the main display has a larger real estate to display the program elements.
- List Programs: The List Programs button offers a quick way to exit the program editor (explained in the following section). To exit the program editor mode, click this List Programs button. This action will cancel and exit the program editor being used to create, edit or import a program.
- Create New: Similar to the Create New button under the List Programs display page (item 3 below), this button opens the program editor with an empty template for constructing a new program. Detailed discussion is provided in the following section. A program from the local computer can also be imported into this empty template.
- List Programs: This is the main display of the program list depicted in the previous figure. Click the Show/Hide button (item 1) to hide the submenu and expand the List Programs display page.
9.2 Create New Program
A new program can be created via one of the buttons depicted in the following figure.
Each of these buttons follows a different pattern to complete the task.
-
Create New: Click the Create New button in the submenu or under the List Programs in the main display to launch the program editor to create a new program. An empty template is opened for a new program, as depicted in the following figure.
The new program being constructed does not yet have a predefined location. For this reason, the program editor has only the Save As option to save the program in a specific or a desired slot number, as depicted in the following figure.
-
EMPTY: A new program can be created using a specific slot number. Click the slot number in the submenu or the EMPTY button on a desired slot number under the List Programs in the main display to launch the program editor to create a new program. An empty template is opened for a new program, as depicted in the previous figure.
Since the slot number has already been defined, the program editor offers two options to save the program: (1) Save As by selecting a new slot number or (2) Save (on the current slot number).
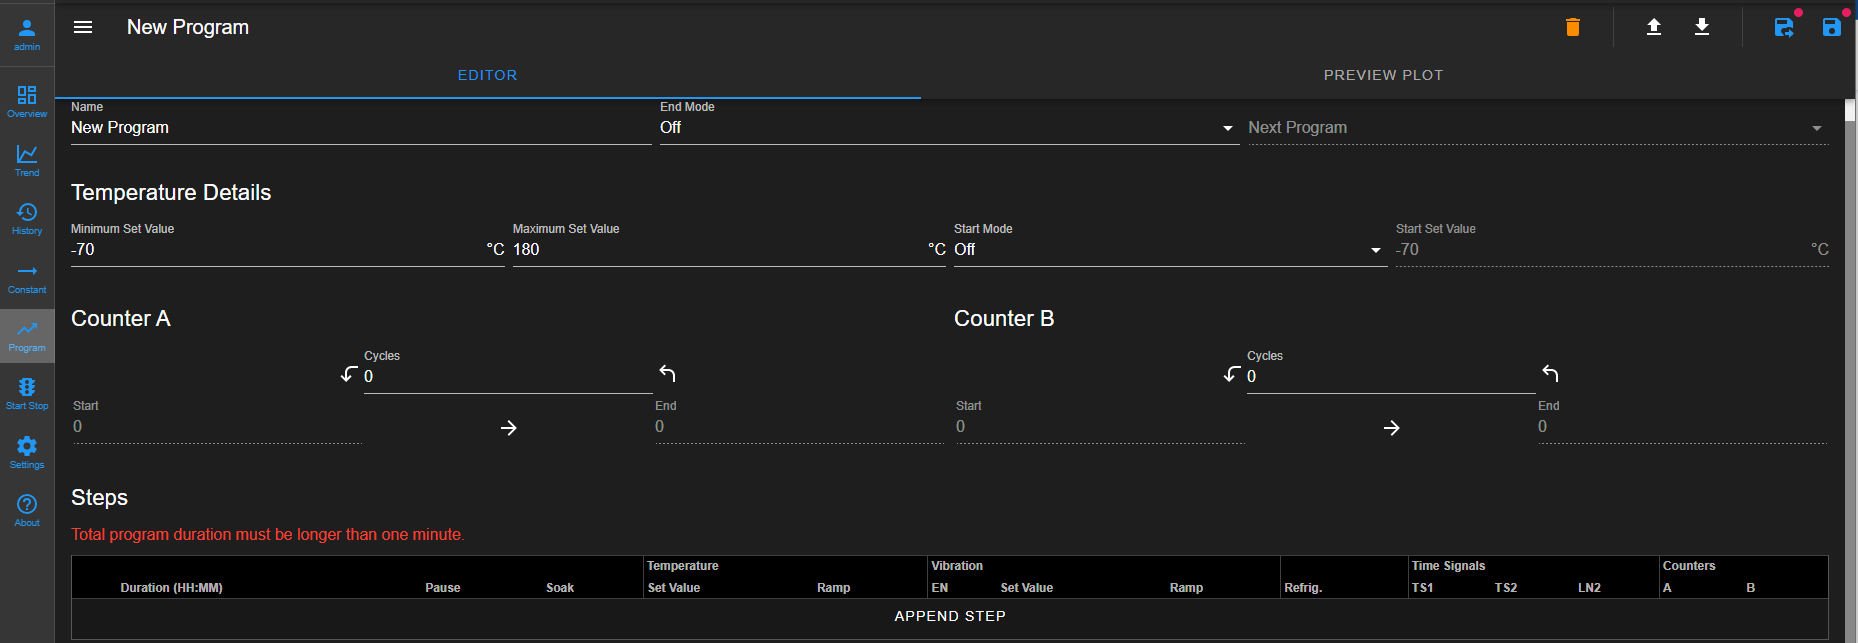
The following figure depicts the general layout of the empty template for a new program.
Depending on the available options and features (such as temperature, product temperature, humidity, or vibration) of the P300 PLC, each template has different components, as depicted in the following figure for a vibration featured P300 (Mechanical HALT chamber).
The UI and components of the program editor (pictured above) are numbered and described as follows:
-
Editor: By default, a program is open and placed in the program editor. It is highlighted in blue to indicate its active status.
-
Preview Plot: The output of the current program can be previewed via this button. Both the Editor (item 1 above) and this button can be used to toggle between the editing and previewing mode of the current program. The PREVIEW PLOT button is operational only when a program is loaded into the program editor or a program has been constructed in the program editor.
-
Submenu Show/Hide: This button toggles between the show and hide mode of the submenu. To utilize the entire main display area for the program editor, this button can be used to hide the submenu.
-
Program Name: An alphanumeric naming convention based on ASCII with lower- or upper-case letters applies to program name with up to 15 characters. Program name should be kept short and descriptive. Since each program is individually stored in a unique slot in the PLC, a unique name on EWC is not necessary. However, these programs must have unique names when they are stored on the local computer. When a program name is entered into this field, this name also appears in the title bar next to the show/hide button (item 3).
-
End Mode: An end mode available from four different options can be invoked after a program has completed its execution:
- Off: The chamber will be turned off at the end of the program.
- Standby: The chamber will be set to operate in a Standby mode at the end of the program.
- Constant: The chamber will be set to operate in a Constant mode at the end of the program.
- Program: The chamber will execute the next program listed in Next Program field. In theory, the PLC can continually execute different programs sequentially if each of those programs has its End Mode set to execute the next program on the list.
-
Next Program: A program to be executed following the completion of the current program.
-
Temperature/Humidity/Vibration Details: The minimum and maximum values of temperature, humidity or vibration are shown here for reference, including their start mode and set value. These are the specification values read off by EWC from the PLC. The display of these values depends on the type of chamber. The display may consist of Temperature Details, Temperature and Humidity Details or Temperature and Vibration Details.
- Minimum/Maximum Values:: These are the minimum and maximum values allowed by the chamber.
- Start Mode: Three options are available with start mode: Off, Process Value and Set Value. A program must consists one of these modes.
- Start Set Value: If a Set Value was selected (in the previous item), enter a set value here by entering the value in the value field or apply the up/down arrow to adjust the value.
-
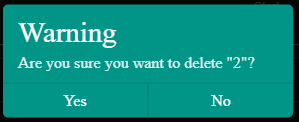
Append Step: As shown in the previous figure, the program editor has an empty template. No instructions or steps of program have been added. To create an instruction, a new step must be created (or added). This APPEND STEP button is used to add a new step. Once a program has a step, additional steps can be added using this button or the drop-down menu of the Step Number (to be explained below). The APPEND STEP button always adds a new step as the last step in the program. By contrast, the drop-down menu of the Step Number allows a new step to be inserted above or below the current step. It also has a delete button to remove any step from the program.
-
Step: A program step contains instructions (and parameters) for the chamber to carry out the tasks. Depending on the type of chamber, a program step may contain different components and parameters (associated with temperature, product temperature, humidity or vibration) outlined as follows:
- Duration: The duration specifies the length of time (measured in H:MM) that the said step goes through to complete its task. EWC accepts the input value in H:MM or in pure numerical value. If a pure numerical value is entered, EWC converts it to H:MM. For instance, if 15 is entered, the system treats it as 15 minutes, and the H:MM format, therefore, becomes 00:15. If 66 is entered, the system converts it to 01:06. Similarly, if 90 is entered, the system renders the value to 1:30.
- Pause: If enabled, the program will pause execution when this step completes its task.
- Soak: If enabled, the step will wait until the set point(s) are reached before the duration counter starts to count down.
- Temperature: The temperature control loop has two parameters:
- Set Value: The value that the temperature must attain.
- Ramp: If enabled, the set point will gradually change from that of the previous step to the set value of this step over the duration of this step. If disabled, the set point of the previous step will jump immediately to the set value of this step.
- Product Temperature Control: This option controls the product temperature (not the air temperature).
- EN: This option enables or disable the production temperature control.
- Deviation +: The allowable positive deviation between the product and air temperatures (must be positive).
- Deviation -: The allowable negative deviation between the product and air temperatures (must be negative).
- Humidity: The humidity control loop setting.
- EN: Enable or disable humidity control for this program step.
- Set Value: The value that the humidity must attain.
- Ramp: If enabled, the set point will gradually change from that of the previous step to the set value of this step over the duration of this step. If disabled, the set point of the previous step will jump immediately to the set value of this step.
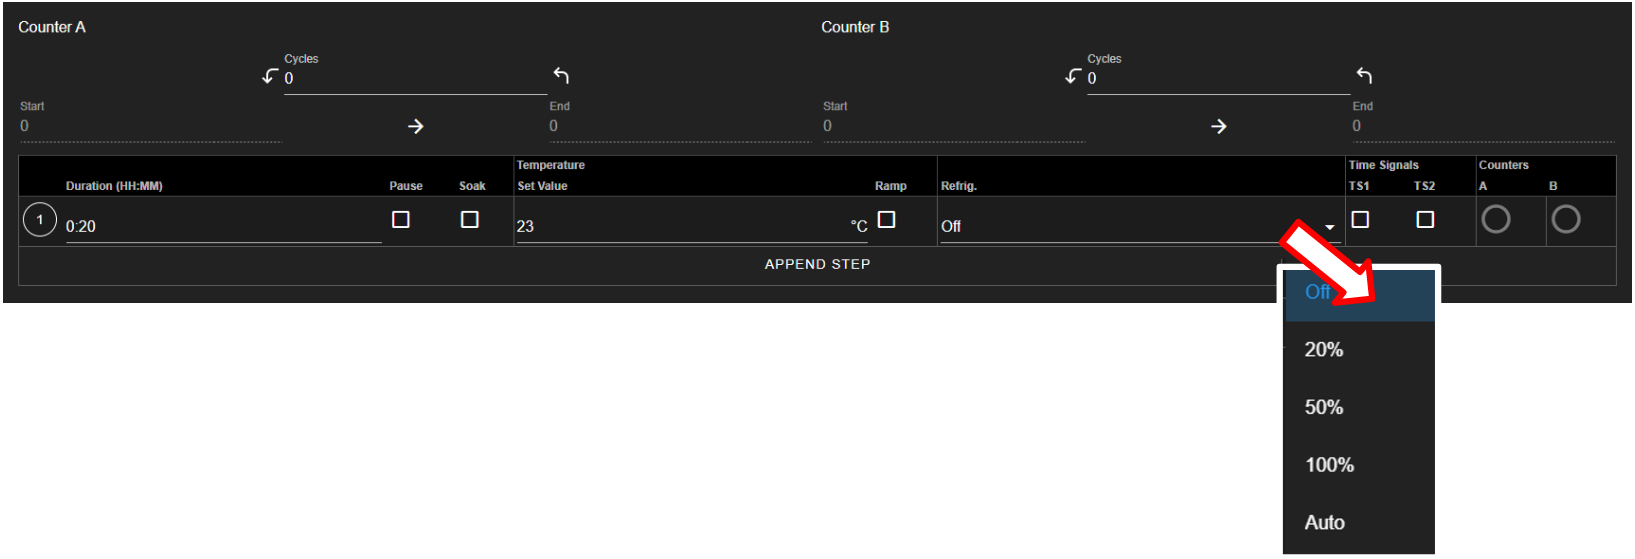
- Refrig.: This option offers configuration on the refrigeration system and its behavior during the execution of this step. It can be configured for automatic or manual cooling power percentage; it can be completely disabled.
- Time Signals: Each time signal can be switched to ON or OFF for this step. Time signal (TS) operation is step dependent. Suppose TS1 is turned ON at step 1 and the rest of the steps do not have TS enabled. In this case, TS1 will remain "ON" for the entire program. Thus, TS may be controlled independently, step by step.
- Counters: The counter can be used to repeat execution of a certain step (or set of steps) within the program. Both counter A and counter B can be set by enabling the check box in their respective column then dragging the start and end arrows to the desired step. The number of times to repeat the steps can be adjusted in the text box in each column. When the text box is checked (or selected), the number of the repeating step begins with 1.
-
Counter A, Counter B: The counter (or loop) feature allows a certain step (or a range of steps) to be repeated multiple times within the program. With the counter feature, a program contains fewer instructional steps, and thereby requires less coding. Two separate counters are available: Counter A and Counter B. A program may contain a loop configured to run within a loop, such as Counter A executes inside Counter B. Two loops can be configured to run separately, repeating separate set of steps (referenced by their numbers). For instance, Counter A can be configured to execute step 1 through step 3 for 5 times and Counter B can be configured to execute step 4 through step 6 for 3 times. ESPEC P300 PLC supports a maximum number of 999 cycles. Counter A or Counter B each requires three parameters to operate:
- Start: A value that specifies the step number to begin the loop.
- End: A value that specifies the last step in the loop.
- Cycles: A value that specifies the number of loops to complete the counter. The total number of loops is this number plus 1. Thus. if a program requires step 1 through step 3 to repeat three (3) times, the value for the Cycles will be 2.
-
File Manipulation: Five different buttons (icons) are available for file manipulation. Their action can be previewed by hovering the mouse pointer over them. They are described from left to right as follows.
-
Delete: Click on the trash bin icon to delete the current program. This action will delete the program in the program editor and its location in the current slot number of the PLC. A pop-up warning appears, as depicted in the following figure, to reaffirm the action.
-
Open Program: This button imports a program file from the local computer into the program editor. EWC only accepts a program in JSON format. To ensure compatibility, the program structure should be based on the one downloaded from EWC itself (see Download Program below).
- Download Program: This button downloads the current program file and stores it on the local computer. The program is saved in JSON format using slot number as its filename (e.g., 9.json).
-
Save As: Save the current program to a different slot number under the program list. This action brings up a program list, as depicted in the following figure, to select a new slot to hold the current program. To cancel this action, click the CLOSE button. WARNING!: A vacant slot should be selected to save the program. Otherwise, the current program will overwrite the existing one in the slot without prompting for reaffirmation, thus, destroying the program previously in that slot. The current program in a new slot still uses the same program name. To make it unique, edit item 4 (above) with a new name and apply the Save button (see below) to resave the program.
-
Save: This button saves the current program in the current slot on the F4T.
-
9.2.1 Programming: Add Program Step
The following example illustrates how to create a new program using four steps with both counters enabled to repeat these steps. Temperature and refrigeration are used to illustrate this example. The start mode for the temperature is set to Off. Each step will have its own set value as a target temperature value. The refrigeration will be set for a manual cooling power specified at 20% for the first three steps; the last step will have refrigeration power at 50%. The chamber will be turned off after the program completes its task. Counter A and Counter B will be used to demonstrate a loop running inside a loop; Counter A will between step 2 and step 3, while Counter B will loop between step 1 and step 4, thus making Counter A looping inside Counter B. All steps must be constructed before enabling these loops. Alternating time signals will be controlled. Slot 2 will be used to create this program. We begin from the main menu.
- Click Program in the side bar.
- Click EMPTY on slot 2 on the Program List. To follow along with this example, slot 2 should be empty.
- Program Name: Enter PROG2TEST in the program name field.
- End Mode: Set end mode to Off.
- Start Mode: Set temperature start mode to off.
- Add New Step: Click the APPEND STEP button.
-
Step 1: Complete the following fields for this step from left to right:
- Duration: Enter 0:20.
- Pause: Leave the Pause box unchecked.
- Soak: Leave the Soak box unchecked.
- Temperature:
- Set Value: Enter 23 or apply the up/down arrow to adjust the value to 23.
- Ramp: Leave the Ramp box unchecked.
-
Refrig.: Click the Off field or arrow button and select 20% from the drop-down list (shown in figure below).
-
Events:
- TS2: Check the TS2 box to enable time signal 2.
-
Counters: Loops for Counter A and Counter B can be configured once all the steps have been added.
-
Step 2: Click the APPEND STEP button to add a new step; then complete the following fields from left to right:
- Duration: Enter 0:10.
- Pause: Leave the Pause box unchecked.
- Soak: Leave the Soak box unchecked.
- Temperature:
- Set Value: Enter 24 or apply the up/down arrow to adjust the value to 24.
- Ramp: Leave the Ramp box unchecked.
- Refrig.: Click the arrow button and select 20% from the drop-down list (see above figure).
- Events:
- TS1: Check the TS1 box to enable time signal 1.
-
Step 3: Click number 2 in the circle at the beginning of step 2 (shown in the figure below). Select Insert After from the drop-down menu and edit the fields from left to right with the following parameters:
- Duration: Enter 0:10.
- Pause: Leave the Pause box unchecked.
- Soak: Leave the Soak box unchecked.
- Temperature:
- Set Value: Enter 32 or apply the up/down arrow to adjust the value to 32.
- Ramp: Leave the Ramp box unchecked.
- Refrig.: Click the arrow button and select 20% from the drop-down list (see above figure).
- Events:
- TS2: Check the TS2 box to enable time signal 2.
-
step 4: Click number 3 in the circle at the beginning of step 3 (see above figure). Select Insert After from the drop-down menu and edit the fields from left to right with the following parameters:
- Duration: Enter 0:10.
- Pause: Leave the Pause box unchecked.
- Soak: Leave the Soak box unchecked.
- Temperature:
- Set Value: Enter 34 or apply the up/down arrow to adjust the value to 34.
- Ramp: Leave the Ramp box unchecked.
- Refrig.: Click the arrow button and select 50% from the drop-down list (see above figure).
- Events:
- TS1: Check the TS1 box to enable time signal 1.
-
Counters: Both counters will be used to create a loop inside a loop structure. Counter A will loop through step 2 and step 3 twice; Counter B will loop through step 1 and step 4 once, with Counter A looping inside it.
- Counter A: Activate the counter by entering the cycle (loop) number, with start step and end step as follows:
- Cycles: Enter 2. Note: Before Counter A begins to loop, it already completed one loop; thus, 2 plus 1 equals 3, and 2 is the number used for the cycle number.
- Start: Enter 2 for step 2.
- End: Enter 3 for step 3.
- Counter B: Activate the counter by entering the cycle (loop) number, with start step and end step as follows:
- Cycles: Enter 1. Note: Before Counter A begins to loop, it already completed one loop; thus, 1 plus 1 equals 2, and 1 is the number used for the cycle number.
- Start: Enter 1 for step 1.
- End: Enter 4 for step 4.
The complete loop construction for Counter A and Counter B is depicted in the following figure.
This construction also results in the activation of counters in the program structure (last column) as depicted in the following figure.
- Counter A: Activate the counter by entering the cycle (loop) number, with start step and end step as follows:
-
Save Program: Click the Save icon indicated by the arrow, as shown in the following figure, to save the program in slot number 2. This figure also illustrates the complete program in the program template.
Navigating out of the editor without saving the program will trigger the following warning prompt:
-
Preview: Click the PREVIEW PLOT button to preview the output of the current program (see figure below). Click the EDITOR button to toggle back to the editor mode. Program cannot be saved while in the preview mode. In order to save the program, navigate back to the program editor to apply the Save or Save As button.
9.3 View, Edit, Save Program
This section describes how to open an existing program for viewing and editing. Changes made in the program can be written back to the file with Save. A new slot can be used for this updated program using the Save As option.
9.3.1 Open Program
To open a program for viewing or editing, click on its name under the Name list, as depicted in the following figure. Program PROG2TEST (indicated by the arrow) will be used for illustration. The Download (or Delete) button is only available if any slot under the Name list has a program in it, such as slot 1 and 2.
Once open, the program is placed in the program editor for editing. The file manipulation buttons (Delete, Open Program, Download Program, Save As and Save) offer different options to handle the program file or manipulate the program editor. These buttons will be explained in detail in the following sections.
9.3.2 Editing Program: Programming Example
This section illustrates the process of editing PROG2TEST program with additional steps and the ability to execute another program. The program to be executed after PROG2TEST completes its own execution is NEWPROGRAM in slot 1, as depicted in the previous figure. It contains only one step with temperature set value at 35 degrees C for the duration of 60 minutes, with refrigeration set to Auto and no time signal setting. PROG2TEST will consist of the following procedure:
- End Mode: Set end mode to execute a new program.
- Temperature Start Mode: Set temperature start mode with set value at 22 degrees C.
- Step 3: Insert a new step between 2 and 3 with temperature set value of 28 with soak feature for a duration of 30 minutes. Set refrigeration to Auto with time signal 1 on 2 off. Counter A will be adjusted to include this step. Counter B will be adjusted to still include Counter A inside it.
- Step 6: A new step to be added as the last step in the program with: temperature set value of 25, refrigeration of 50%, time signals 1 and 2 switched to On.
The editing process is as follows:
-
End Mode/Next Program: Click the End Mode field and select Program from the drop-down list (see figure below), then click the Next Program field and select the program from the drop-down list (NEWPROGRAM is used for example).
-
Temperature Start Mode: Click the Temperature Start Mode field and select Set Value. Apply the up/down arrow to adjust the set value to 22.
- Step 3: Click number 2 in the circle at the beginning of step 2 and select Insert After from the drop-menu and set the parameter as follows:
- Duration: Enter 0:30.
- Soak: Enable the soak feature.
- Temperature:
- Set Value: Enter 28.
- Refrig.: Select refrigeration to Auto.
- Events: Time signals 1 and 2 are off.
- Last Step: Click the APPEND STEP button and set the parameters as follows:
- Duration: Enter 0:30.
- Temperature:
- Set Value: Enter 28.
- Ramp: Enable the ramp feature.
- Refrig.: Select refrigeration to 50%.
- Events: Time signals 1 and 2 are on.
-
Loops: Adjust Counter A with start step at 2 and end step at 4. Adjust Counter B with start step at 1 and end step at 5, keeping the cycle number the same.
-
The final program and its output (preview) are depicted in the following figures.
-
Save Program: The new program can be saved back in its current slot with the Save button. However, other options are available to manipulate the program file. It may be necessary to save it in a different slot so that the original program can be retained in the current slot. The following section describes how to utilize the file manipulation buttons in detail.
9.3.3 Managing Program File via the Program Editor
This section describes how to apply the five file manipulation options available in the program editor (upper-right corner), as depicted in the following figure.
They are described as follows:
-
Delete: The trash bin icon, when applied, deletes the current program in the program editor; that program is purged from the current slot in the PLC register, with the EMPTY listed under the ID list. For safety measure, the system prompts a pop-up warning with a Yes/No option. After deletion, the Program menu updates the Name list.
-
Upload Program: This button imports a program file from the local computer into the program editor. By default, the system opens the Downloads folder on the local computer to upload the program file.
-
Download Program: The current program in the program editor can be downloaded onto the local computer as a backup. By default, the program will be stored in the Downloads folder. The hostname and program slot number are used as part of the downloaded filename (e.g., hostname_program_2.json).
-
Save As: Program in the program editor can be saved in a different slot, under a different name. To make the program name unique, the Name field may be edited with a new program name. This procedure thus requires a two-step process indicated by the arrows in the following figure. First, edit the program name; second, click the Save button and select a new slot from the drop-down list.
-
Save: Apply this button to update the program file. To help check the editing status of the program, the program editor utilizes a red dot placed above the Save or Save As button to indicate an update yet to be saved.
Navigating out of the editor without saving the update will trigger a warning prompt, as depicted in the following figure.
9.3.4 Managing Program File via the Name List
This section describes how to apply the three file manipulation options on the Name list, as depicted in the following figure.
These three options are listed and described as follows:
-
Delete: To delete PROG2TEST from the Name list (and the PLC register), click the trash bin icon indicated by the arrow (see figure below). As a safety measure, the system will prompt to confirm the action with a pop-up warning with a Yes/No option to proceed with the action. It may be necessary to apply the refresh button of the Web browser after deleting the program file from the Name list.
-
Upload Program: This button can be used to import a program from the local computer directly into a program slot on the Name list and the PLC register. To upload a program into slot 3, click on the Upload button, as indicated by the arrow in the figure. Navigate to locate the desired file on the local computer and double-click it to complete the process.
-
Download Program: To download a program PROG2TEST on slot 2, click on the Download button (on the same row). By default, the program file will be stored in the Downloads folder on the local computer; filename naming convention is hostname_program2_json.
10 Start Stop
This menu allows the operator with read-write privilege to control or manage the chamber with the following operation modes: Standby, Constant and Program. The following figure depicts these modes displayed in the main display area as individual tabs.
The Status tab in the status bar also provides access to these modes for control and operation. Refer to the Overview menu for detail on how to control the chamber operating modes.
10.1 Standby Mode
In a standby mode, the chamber is off. Its status tab in the status bar displays Standby. This status is confirmed by the check mark in the Standby tab in the main display, as illustrated in the above figure. Authorized users with read-write privilege may set the chamber to operate in Standby mode.
10.1.1 Start/Stop Standby Mode
A standby mode can be switched from constant or program mode as follows:
- Click the Start Stop menu.
- Click the STOP OPERATION button in the Standby tab.
EWC immediately moves to apply the operating mode on the chamber, with a check mark in the Standby tab. Standby is also displayed in the Status tab of the status bar, as illustrated in the above figure. To terminate the Standby mode, activation of a new mode is necessary.
10.2 Constant Mode
In a constant mode, the chamber operates using the constant configuration. Authorized users with read-write privilege may set the chamber to operate in Constant mode.
10.2.1 Start/Stop Constant Mode
A constant mode can be switched from a standby or program mode as follows:
- Click the Start Stop menu.
- Click the RUN CONSTANT MODE button in the Standby tab.
Its status tab displays Constant. This status is confirmed by the check mark in the Constant tab, as depicted in the following figure.
To terminate the CONSTANT mode, activation of a new mode is necessary. For instance, to switch the chamber from its Constant mode to Standby mode, click the STOP OPERATION button in the Standby tab. EWC immediately moves to apply the operating mode to the chamber.
10.3 Program Mode
In a program mode, the chamber carries out instructions of the program being executed. The status tab in the status bar posts Program, along with the name of the program being executed. This status is confirmed by the check mark in the Program tab, as depicted in the following figure.
Authorized users with read-write privilege may set the chamber to operate in Program mode by performing a series of operations in the Program tab. The following subsections explain how to run (execute) a program, pause, resume or step through the instructional steps in the program.
10.3.1 Run Program
A program mode can be switched from standby or constant. To load and execute a program to control the chamber, complete the following steps:
- Click the Start Stop menu.
-
Click the radio button in the Program tab to select a program from the list (scroll down, if necessary), as depicted in the following figure.
-
Click to select the desired program name.
- To start this program at a certain step, enter the step number in the Step field. Default setting is 0, which means to start program at step 1.
-
Click the RUN PROGRAM button to execute the program. EWC immediately moves to apply the operating mode to the chamber. The status tab and status bar now display the program being executed, as depicted in the following figure.
The Overview page maybe accessed to display the detail of the program being executed.
10.3.2 Pause/Resume Program
Authorized users with read-write privilege may control the chamber during program execution. Program mode may be interrupted and put in a "suspense mode" using the PAUSE button in the Program tab. To pause a program during execution, click the PAUSE button; all operations are suspended. An update notification appears in the lower-right corner. The Paused notification is posted in the status tab.
To resume the operation and continue program execution, click the RESUME button. An update notification appears in the lower-right corner. The chamber will continue to operate based on instructions in the program. Program name is posted in the status tab to indicate chamber is in Program mode and that program is being executed.
10.3.3 Stepping through Program
Without having to wait for each step in the program to complete its tasks for the entire duration in the instruction, an operator may step through the program to study the effects of the instructions in a certain step. While the program is being executed, click the NEXT STEP button to execute the next step in the program. This action may be repeated until the last step in the program is reached. The Overview page in combination with the extended tab maybe accessed to display the detail of the program being executed and its steps being stepped through. The following figure depicts program TempVib1 being stepped through to executing step 4.
10.4 Alarm Mode
An alarm mode is not an operation mode controllable by the StartStop menu as the previous three modes. An alarm mode occurs when the chamber is in an alarm state. When EWC detects the chamber in an alarm state, it sets itself in an alert state by displaying a list of active alarms and fault names in the red window to require an immediate action from the operator, as depicted in the following figure.
A repeating beep on the local computer is tripped to get the operator's attention. The SILENCE button can be used to turn off the beep. The CLOSE or X buttons can be used to close this window. However, the alarm state still remains to be resolved as indicated by the red Status tab in the status bar (shown in the following figure). To redisplay or expand the alarm list, click the red dot in the lower-right corner.
10.4.1 Clear Alarms
The chamber is set in the Alarm state as a result of an alarm or alarms triggered in and by the chamber. EWC relays all alert messages to the operator for immediate action or intervention to prevent further damage to the chamber or any test products inside the chamber.
In an alarm state, all operations are halted until all alarms triggered by chamber are resolved by clearing all alarms via the PLC's HMI (see the chamber and PLC operation manual for detail). When all alarms are cleared, EWC will automatically clear all alert messages and resume normal operation by switching the chamber to a Standby mode.
10.5 Timers
The Timers tab provides a quick way to apply the Macro Editor to automate a simple macro action to extend the operating mode of the chamber. There are two timer types: One-time timer and repeated timer. The one-time timer or one-shot timer allows an operator to set up a single (hence, one-time) operation on the chamber, while the repeated timer permits an operator to set up a repeated operation on the chamber. The repeated timer will operate indefinitely until it is disabled. The following figure depicts these two timer types.
-
One-Time: This timer fires the constant mode operation at 3:06:58 PM on 9/6/2023. The timer instruction and 3:06:58 PM must be configured ahead of time, later than the current time in order for the operation to take effect. For this reason, EWC date/time must synchronize with the current or local date/time (refer to Date/Time Settings under the Settings menu for detail). The one-shot timer is date/time dependent.
-
Repeated Daily/Weekly: This line is added after the first line got executed. Since it is set to occur after the first line, it will trip at 3:15 PM on Wednesday and Thursday of the week (in reference to the current date/time of EWC). The action executes a program from slot 2 (also referenced by the program name). When program execution is complete, the chamber will be set in the operating mode specified by the instruction in the program. This timer type is date/time independent; the operation will recur until the timer itself is removed from the Timers list or disabled with the Enabled box unchecked.
-
Add Timer: A new timer can be added using the Add Timer button, which will be added at the bottom of the list.
-
Remove/Delete: Each timer can be removed using the X button to its right.
-
Save/Apply: To start the timer, the Save or Apply button must be used. The two timer instructions (depicted above) are saved under the Macro Editor called Operation Timer 1 and Operation Timer 2, respectively. If the timers are edited with new instructions and saved, the system generates a new name Operation Timer 3 for the third timer, with a numeral incremented by one per each update. If the timer instructions are all removed from the Timers list, and a new timer is created and saved, the system starts over with Operation Timer 1, with its numeral incremented by one on each new update. This information can be viewed under the Macros submenu (under the Settings menu).
10.5.1 Program Mode: One-Time Timer
A one-shot timer sets the Timers to fire a certain action once based on the set date and time. With this feature, a selected program can start at a certain day and time once. The running program can be paused, resumed or stopped by another (subsequent) one-shot timer. An operator can plan to stop a certain program and switch the chamber to a different mode with the one-shot timer.
The following example illustrates how to set a one-shot timer to switch the chamber from Standby to Program and execute the said program starting with step 1.
- Log in using the admin account
- Access the Start Stop menu
- Touch or click the ADD TIMER bar
-
Select/confirm that One Time is selected from the drop-down list of the Timer type; by default, One Time is selected.
-
Touch or click the date/time field under the Timer Properties and apply the calendar and time to set the desired time. Note: Date and time must be ahead of the current date and time on the EWC system.
Note: For a one-time operation, it is easier to use the Offset button (on the right of the date/time field) to adjust the future time, as depicted by the arrows in the following figure. Here, EWC will add the time to the current time to calculate when this action will fire.
-
Under Operation, select Program: Run Program
- Under Program, select from name (or slot number)
- Under Step, select what step to start
-
Apply the setting with the APPLY button
Note: Both the Save and APPLY buttons provide the same effect. Either button can be used to save the settings and apply the action.
-
The program in slot 21 (as depicted in the example) will commence at 5:59:28PM (according to the EWC local time).
10.5.2 Removing or Adding a Timer
The one-shot or repeated timer can be removed from or added to the Timers list with the X or ADD TIMER button. Each new timer is added to the bottom of the list and takes effect after each update.
To add a new timer and use it, simply apply the ADD TIMER button. The following figure illustrates how a second timer is added to switch the chamber from a program mode (activated by the first timer) to Constant. Here, program from slot 21 gets executed (by the timer in the first line) at 1:20:15 PM, with execution time to last several hours. The timer in line 2 will switch the chamber to Constant mode at 2:00:00 PM.
Different timers on the list can be enabled or disabled using the Enabled box. Additional timer can be added to the Timers list and updated to take effect, provided the time is set for future time.
10.5.3 Constant Mode: One-Time Timer
The following example illustrates how to configure a one-shot timer to stop the current program and switch the chamber to Constant at a specific time. The timer is configured as a new instance with one line by itself, as depicted in the following figure. The action is instant and the program being executed will be stopped immediately; therefore, the action must be applied with care.
- Log in using the admin account
- Access the Start Stop menu
- Clear all or current timer settings with the X button (if necessary).
- Touch or click the ADD TIMER bar
- Confirm that One Time is selected (or make selection from the drop-down list).
- Touch or click the date/time field under the Timer Properties and apply the calendar and time to set the desired time.
- Under Operation, select Standby: Stop Operation
-
Apply the setting with the APPLY button. The timer is now saved in the Macros list.
-
The timer is activated at the set time, as depicted in the Macros list under the Operation Timer 1 script. To view the Operation Timer 1 action, access the Settings menu and select Macros from the submenu.
10.5.4 Program Mode: Weekly Repetition
With a weekly repeated timer, a program can start on a certain day, at a certain time. The following example illustrates how to execute a program on a weekly basis (one day during each week) at a certain time. Here, we set a program execute every Tuesday at 4:00 PM.
- Log in using the admin account
- Access the Start Stop menu
- Clear all or current timer settings with the X button (if necessary).
- Touch or click the ADD TIMER bar
- Touch or click Timer Type and select Repeated Daily/Weekly
- Edit the time to 4:00 PM
- Check the box under T. The calendar format is Sunday(S) to Saturday (S).
- Under Operation, select Program: Run Program Mode
- Under Program, select program in the desired slot number (slot 8, PROGTEST8, was used as an example).
- Set and select program step 1 to begin execution.
-
Apply the setting using the APPLY button. The complete configuration is depicted in the following example.
This timer can be disabled or enabled by manipulating the Enabled box. If you stop the program or switch the chamber to a different mode (such as, Constant), while this timer is still enabled, the selected program will recur on Tuesday at 4:00 PM the following week. To disable the timer permanently, it must be removed from the list (with the X and APPLY button).
10.5.5 Program Mode: Daily Repetition
The following example illustrates how to execute a program on a daily basis, from Monday through Friday, at 5:00 PM during each week.
- Log in using the admin account
- Access the Start Stop menu
- Clear all or current timer settings with the X button (if necessary).
- Touch or click the ADD TIMER bar
- Touch or click Timer Type and select Repeated Daily/Weekly
- Edit the time to 5:00 PM
- Check the boxes under M through F. The calendar format is Sunday(S) to Saturday (S).
- Under Operation, select Program: Run Program Mode
- Under Program, select program from the desired slot number slot number (PROTEST7 from slot 8 was used as an example). Set and select program to begin at step 1.
-
Apply the settings with the APPLY button. The complete configuration is depicted in the following figure.
The following trend graph is a result of the timer from a different chamber (used for illustration here) with its configuration set to run over several days. The trend graph was produced by extrapolating the data from the last three days (Friday through Sunday). It shows how program was repeated each day at 6:05 PM and ended shortly before 9:00 AM, as indicated by the status bar at the bottom of the graph. The chamber was put in a Standby mode until 6:05 PM, at which time the program recurred.
This timer can be disabled or enabled by manipulating the Enabled box. If you stop the program or switch the chamber to a different mode (such as, Constant), while this timer is still enabled, the selected program will recur on the next day. To disable it permanently, the timer can be removed from the list (with the X and APPLY button).
10.5.6 Multiple Timers: One-Time or Repeated Daily/Weekly
The Timers list may contain multiple timers with different instructions for a specific operation. Multiple timers allow for sequential activations, order of script execution or specific execution via the enabled box selection, etc.
The following figure depicts a list of multiple timers, each with a specific function and operation, which has been prepared to execute in the top-to-bottom paradigm.
Each entry in the above figure is added after the previous one (above it) has been executed. All of which are enabled by default. Only timer 1 (top line) and timer 4 (bottom line) remain in effect, since the middle two are one-shot timers. In addition, the last timer is also a one-shot timer and it will end after the program it has executed has ended. Each timer causes action to take over the previous one.
11 Settings
The Settings menu in the menu bar is the administration page where different settings and configurations can be applied to EWC and the chamber. The administrator who manages EWC should take the necessary precautions to limit or allow users with certain privileges to access and control this menu and its submenus. Refer to User Settings submenu in the following section for detail on how to enforce user policy and access privileges to different users on EWC.
The Settings menu has thirteen (13) different submenus listed under two separate groups in the submenu bar, each with its own link to its page. To access each submenu, click Settings in the menu bar to bring up the submenu bar. When the Settings menu is accessed for the first time, it displays its submenu bar underneath the Show/Hide button, as depicted in the following figure.
The items associated with the UI of the Settings menu are described as follows:
- Settings: This Settings menu should be accessible only to the administrator or a qualified operator with administrator's privileges.
- Show/Hide: This button can be used to toggle between full display and submenus accessibility.
- Submenu Bar: Click the submenu name (or its icon) to manage and control its settings.
- System Backup: The Export/Import (up/down arrow) buttons provide options to download or upload a full system backup.
The following subsections discuss each of these submenus in detail.
11.1 Controller Settings
Note: This submenu is available only for the T-series and P300 chambers. If this submenu is grayed out, your chamber does not support this feature. Subsections 10.1.1 through 10.1.4 are devoted for the T-series, while subsection 10.1.5 discusses the controller settings for the P300.
The Controller Settings submenu is only available for chambers equipped with Allen Bradley CompactLogix, ControlLogix and Micro8xx PLC series. Such chambers are referred to as T-series chambers. This submenu will be grayed out for any chamber other than the T-series chamber.
The Controller Settings submenu allows the operator to set different parameters of the chamber's control features. This submenu divides into four separate tabs: General, Calibrate Thermocouples, Calibrate Accelerometers, and Diagnostics, as depicted in the following figure. The General tab is displayed by default, when this submenu is accessed.
Under the General tab, different settings are available for Temperature Settings, Vibration Settings and Misc Settings; all of which can be browsed and configured by scrolling through Web page.
The current configuration of the chamber can be downloaded as a backup via the Export to local file button in the upper-right corner. The export file will be stored in the Downloads folder on the local computer, in JSON format (with filename as TyphoonV1.json). New settings can be performed and applied using the Save button in the upper-right corner. This configuration file can be uploaded back into EWC any time.
11.1.1 General
The General tab lists the general specifications of the chamber, such as Temperature, Vibration and other miscellaneous items. Each item is listed with description of its operation and features. With this tab, an operator can directly control and reconfigure the specifications of the chamber. As depicted in the following figure, if a user sets a temperature value higher than the specified parameter, EWC will flag the user to apply the setting below the threshold value.
To apply a new configuration, perform the following steps.
-
Click the Export to local file button (item 1, indicated by the arrow) to download the current configuration as a backup. The configuration file will be stored in the Downloads folder on the local computer under the name TyphoonV1.json. This practice is a precaution measure to safeguard the original configuration in case the chamber's general configuration needs to be restored.
-
Enter a new set value or click the up/down button on each line next to the parameter unit (in the middle column) to adjust the value, as shown in the above figure.
- Scroll down the tab to apply settings to the rest of the parameters.
- Click the Save button (item 3, indicated by the arrow) to save the current settings.
To load a configuration from a backup file, click the Import button (item 2, indicated by the arrow), then select the configuration file (in JSON) on the local computer.
11.1.2 Thermocouple Calibration
To calibrate different thermocouples settings, click the up/down button of the Offset and/or Scale columns to adjust the value.
11.1.3 Accelerometer Calibration
To calibrate different accelerometer settings, click the up/down button of the Offset and/or Scale columns, Sensitivity and User Sensitivity columns to adjust the value.
11.1.4 Diagnostic
It may be necessary to perform a diagnostic test on the chamber after a maintenance. This tab allows an operator to perform a certain diagnostic tests on the chamber.
-
Turn on the Diagnostic Mode (indicated by the arrow). This action will enable the START button.
-
Click the START button (indicated by the arrow) to update the diagnostic mode. A message box pops up (in the lower corner) to indicate diagnostic update process.
-
Click the START button (Again) to initiate the diagnostic test. The Chamber On button (under the Run Status tab) should turn from gray to green. Diagnostic is being performed; changes on values of different parameters will be displayed under Temperature, Vibration and User Relays.
-
To terminate the diagnostic test, click the Stop button. The chamber will be turned off and switched back to the Standby mode.
- Turn off the Diagnostic Mode (see Step 1).
11.1.5 P300: Temperature and Vibration Settings
The following figure depicts two different controller settings for the P300, temperature and vibration.
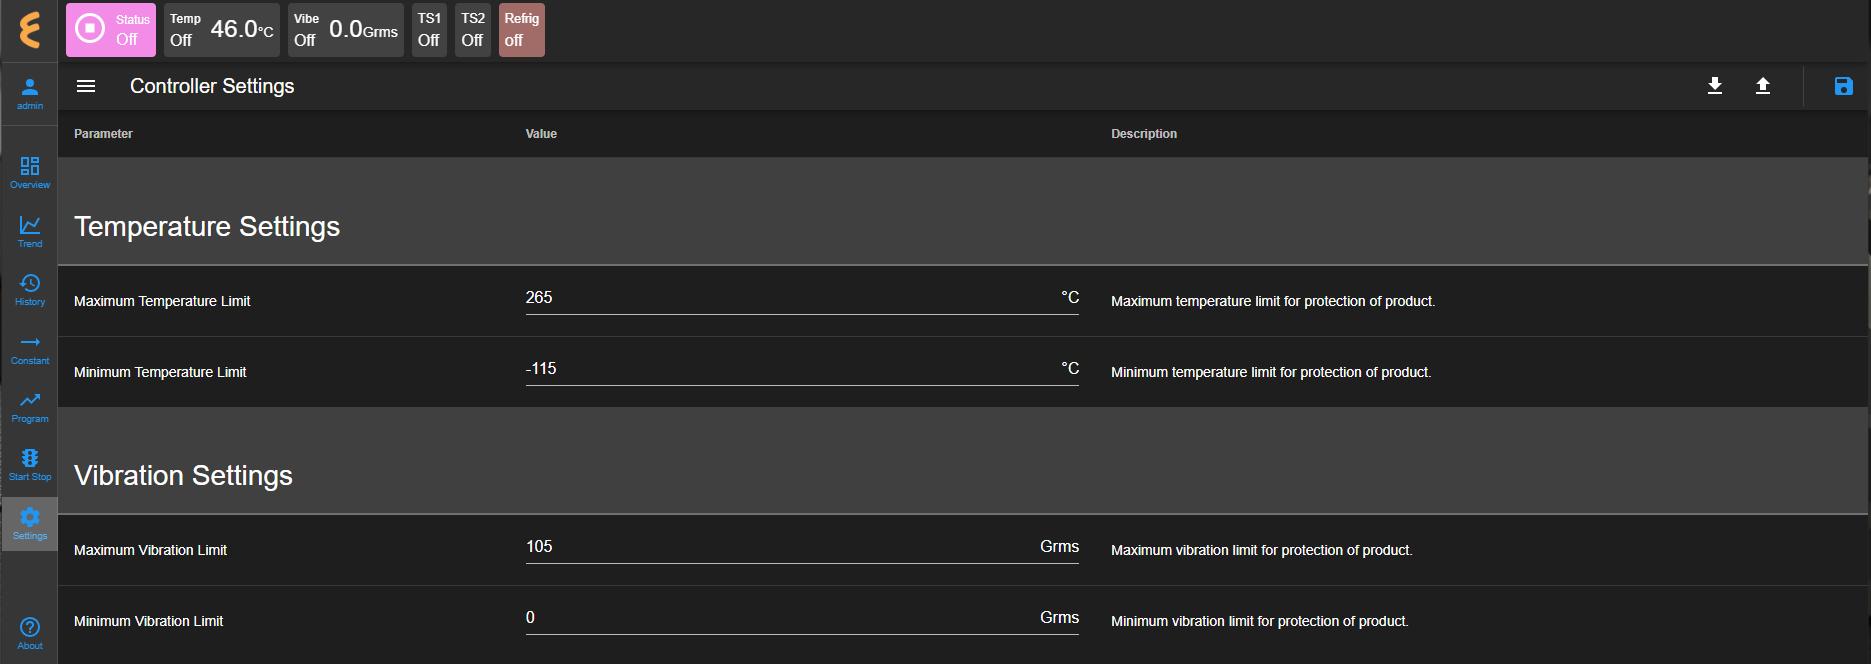
These two parameters allow the P300 to operate within its set limits, in terms of maximum and minimum operation values. Consult the chamber operation manual for the minimum and maximum settings for each parameter.
To set the maximum and minimum values for Temperature or Vibration,
- Enter a new maximum value in the Temperature Value field or click the spin button next to the Unit to change the value.
- Enter a new minimum value in the Temperature Value field or click the spin button next to the Unit to change the value.
- Enter a new maximum value in the Vibration Value field or click the spin button next to the Unit to change the value.
- Enter a new minimum value in the Vibration Value field or click the spin button next to the Unit to change the value.
- Click Save (upper right corner) to save the settings.
- To download the settings, click the Export (down-arrow) button. The settings will be saved in JSON file (filename: espec.json) on the local computer. This file can be used to restore the settings using the Import (up-arrow) button.
11.2 Data Logging Settings
Contents in the trend graph discussed in the Trend menu are dictated by the settings on this page. Data points collected from the chamber will bear a date/time stamp of EWC, shown in the upper-left in the system bar, regardless of the date/time on the controller (see the extension bar of the status tab in Overview). For practical purposes, date/time of EWC should reflect the current date and local time zone.
Two panes for data logging are available to support the configuration (as depicted in the following figure). They are described as follows:
-
Data Logging Configuration/Settings: Data logging is controlled by the logging frequency and chamber operating mode. By default, logging frequency occurs at a 10-second interval. An arbitrary value can be set but the setting is limited to the response of the chamber for a frequency less than 10 seconds. Two operating modes control data logging: Always and When Chamber is on. The following section discusses in detail how to set logging frequency and operating mode. Data logs can be archived via a Samba technology that allows file sharing between two different platforms (such as, Linux and MS Windows or Linux and Mac). Our EWC is already configured to use Samba to transfer and store logged data. Samba configuration on the target platform is the responsibility of the user.
-
Trend Graph Views: Data points and types (such as, temperature, humidity, etc.) can be manually selected to appear in the trend graph. Selection can be made based on the check mark placed in their respective boxes (shown in the following figure). Color decoration can be selected for plot legends. Different logs for a trend graph can be created. Detailed steps for these settings are discussed in the following sections.
11.2.1 Setting Logging Interval and Operating Mode
To set a new data logging frequency and operating mode, complete the following steps.
- Log in as admin (or into an account with access privilege to the Settings menu).
- Access Data Logging Settings page from the Settings menu
- Enter a new frequency value in the Logging Period field (indicated by the arrow) or click the spin button next to the Seconds unit to set a new value.
-
Click and select Always or When Chamber is on as shown by the arrow. Default setting is Always.
Note: If the operating mode When Chamber is on is selected, data logging only occurs when the chamber is on. This setting can dramatically change the behavior of the trend graph in the Trend menu.
-
Click the Save button (upper-right corner) to save the settings.
- To delete current setting, click the trash bin icon.
11.2.2 Data Backup via Samba
To set data logging backup using Samba, you must first configure or create a Samba share on your computer or server. Then complete the following steps:
- Turn on Samba with the check mark in the box to enable the feature.
- Set the backup frequency via the drop-down. Three options are available: (1) Once per day, (2) Once per hour, and (3) every 5 minutes.
-
Enter the correct path to the shared folder on your server with the complete credentials (username and password).
-
Click the Save button (upper-right corner) to save the settings.
11.2.3 Trend Graph View Options
Trend graph contents can be controlled via several options that include the type of data, color for legend and plot range. These settings can be stored in different view options with unique view names to represent different trend graphs.
The following steps outline the procedure to create a new log view (called Log1) for a trend graph to include data type (Temp and Vibration) with set and process values, chamber status, program name, step number, refrigeration and set the appropriate y-range for display. Only five items to be enabled and included in the trend graph.
- Click Views and select Create New View (shown by the arrow)
- Enter Log1 in the New view name field
-
Click the check mark on the right to accept the name.
-
Set the min and max values for the y-range to -25 and 65, respectively.
-
Enable Status, Program Step, Program Name, Temperature set and process values, vibration set and process values, and refrigeration with the check marks in their boxes. Scroll down the page to enable all of them (as shown in the figure). Color picker, line width and line type for the selected data will be based on the default setting.
Note: View name can be edited or removed using the trash bin or pen icons to the right of Log1.
-
Click the color picker to select a desired color for each data type.
- Click the Save button at the upper-right corner.
- Access Trend on the menu bar.
-
Click the Graph View icon (see figure)
-
Click Customize then select Log1.
-
Trend graph now displays the custom view Log1.
11.2.4 Clear Data Log
It may be necessary to start a new data log. Click the Trash bin to clear the current log. A warning dialog box appears to reconfirm the action with a Yes/No option to proceed.
The structure of data log will be deleted from the data file immediately after confirmation. EWC moves to prepare a new data log in the file with another pop-up warning (depicted in the following figure).
Once data begins to accumulate, a trend graph can be produced. Refer to the Trend menu in the menu bar for detail on the trend graph.
11.3 Macros
Frequently used tasks can be automated by creating and running macros. Macros are a series of scripted commands and instructions grouped together to accomplish a certain task. These scripted commands can be triggered automatically by the state of the chamber or by an authorized operator through a manual manipulation. Automated tasks through macro-scripted actions can range from sending e-mail notification about test completion to synchronization of operation between multiple chambers.
The following figure depicts the Macros setup page with a default scripted action called Alarm Emails. The lock symbol indicates that the contents of the Alarm Emails script cannot be modified, since it was generated by EWC.
The submenu of Macros consists of four main operation buttons for managing and manipulating the macro scripted profiles:
- Create New: A new macro script can be created via this Create New button.
- List of Macro Actions: A list of all macro scripted profiles on the system. Click on its name to display its contents in the macro editor page (item 3).
- Macro Scripts: The first macro script on the list (item 2) is listed in the main display by default. Its contents can be viewed using the macro editor (main display).
- Import from local file: A macro scripted profile can be imported from the local computer. Apply this button to import a macro profile from the local computer. The macro editor will be launched to display the contents of the profile. The Save As button needs to be applied to save the imported profile; its name will appear under the list of macro actions (item 2).
NOTE: Many operations associated with the macros require that EWC has access to the Internet.
11.3.1 Macro Editor and Trigger Options
A macro script can be created to contain various trigger options. The Create New button, when clicked, launches the macro editor, within which the operator can compose the macro scripts to set different alert and trigger options. The components of the macro editor are listed as follows:
-
Name: A macro has a unique name to identify its action or task.
-
Enable: The macro action can be enabled or disabled. When enabled, trigger will take effect based on the chamber condition specified in the macro script.
-
Trigger: A macro may be triggered by any of the following types:
-
Always: The macro will run every time. This type of trigger is not recommended.
-
Never (Manual Only): The macro must be manually triggered by an authorized operator or an API request.
-
Program State: The macro script will run when an execution state in the selected program has changed based on the parameters listed in the following figure.
- Program State: Under the Program State options (drop-down menu in the above figure), a trigger alert can happen when there is a change in the program execution (designated as Program Changed), when a program has started or stopped (Program Started, Program Stopped); or a step within the executed program has changed (Step Changed), or a step has started or stopped (Step Started, Step Stopped). All of these options can be incorporated into the Program State trigger type.
- Program: A specific program may be selected to trigger the effect if the condition is met. If Any (default setting) is selected, any program will cause the trigger effect if the trigger condition during execution is met.
- Step Number: A specific step in the selected program can be used to trip the trigger effect if the condition is met, such as when step 5 in the selected program has completed its execution.
-
Alarm State: The macro will run when the state of an alarm has changed. The parameters that specify the alarm state are listed in the drop-down menu shown in the following figure. The alarm list is chamber and PLC dependent.
-
Date/Time Trigger: The macro will run at a specified time or date and time with periodic operation. When the date/time matches the configured "Month", "Day of the Month", "Year", "Day of the Week", "Hour", "Minute", and "Second" the macro will fire. This operation can be configured for a one-time trigger or a periodic trigger, as depicted in the following figures.
-
Additional trigger types can be selected from the trigger list that include time signals, loop temperature, custom expression and logical operations. All of which have the same programming or scripting paradigm based on specific parameters and trigger conditions. A single macro script can be created to monitor a list of programs, their status or conditions, using a set of complex logical operations selected from the list of trigger types (such as, and, or, not).
-
-
Multiple Trigger Types: Additional trigger types can be added via the (+/-) button, with options to insert additional trigger type using Insert Before or Insert After buttons. Trigger type can be removed from the list via the Delete button.
-
APPEND: The action or actions of the trigger (item 3, above) can be implemented in the body of the Operations template. The APPEND button can be applied to add and compose the trigger operations. The components of the trigger operations are outlined as follows:
a. Conditional Statement: The conditional statements of trigger operations consist of If, Else If, Else and Wait For. These conditional statements can be used to check the type(s) of trigger operation.
b. Type of Condition: The type of trigger used in the conditional statement.
c. Additional Conditions: additional conditions can be added via (+/-) button. The available options are: Insert Before (current type), Insert After (current type), Delete.
d. Alert Method: Available alert methods for the trigger operation. Default option is: Mail: Send a custom e-mail.
e. E-mail Address: The operator's e-mail address in this block will be used to send an alert e-mail. Multiple e-mail addresses can used, one e-mail address per line.
f. Subject title: A descriptive subject title is important in an alert e-mail.
g. Message: The message in the e-mail should be brief and descriptive.
h. Manage Trigger Operations Steps: With this button, management of trigger operations steps is possible with the Inset After, Insert Before or Delete options.
i. Add Trigger Operations Step: The APPEND button appends an additional step at the bottom of the step list.
-
Operations: Components of the trigger Operations are outlined in the previous and the following figure. The default operation type is E-Mail: Send a custom email. Different operation types can be selected from the list. Each selected type is used in the conditional statement to trip the operation. Multiple types can be implemented by applying the (+/-) button. The operation type thus consists of three fields: (1) who to send the alert, (2) subject of the alert, (3) message of the alert. Multiple operations can be added using the APPEND button to create additional or multiple operations.
-
File Manipulation: Three file manipulation options are available in the main macro editor when the Create New option is applied. These are Export to local file, Import from local file and Save.
After the macro script has been composed and saved, additional options are available as follows:
The current macro script can be deleted from the macro editor with the Delete button (trash bin). A warning appears to reconfirm the action.
This script can be invoked to test its operation by applying the person icon. If the macro operation involves sending out an alert e-mail, the recipient on the e-mail list will immediately receive the e-mail alert. EWC can send out e-mail alerts only if it has access to the Internet because, by default, it uses SMTP Office 365 for the email protocol.
11.3.2 Example: A Macro Script with Alarm Alert
The following example illustrates a simple macro script to send out an e-mail alert when the chamber trips an alarm (any alarm). In order for the macro setup to work, EWC must have access to the Internet. The procedure for this example is outlined as follows:
- Click Macros in the Settings submenu.
- Click Create New.
- Click the Name field in the macro editor, enter ALARM01 for the macro name. Confirm that the trigger is enabled (with its box checked).
-
Click the type field under the Trigger type and select Alarm State from the list (as shown).
-
Click the Alarm State field and select Tripped from the drop-down list as its parameter (as shown).
-
Confirm that Any is selected under the Alarms option. The complete selection type, state and alarms options is depicted below.
-
Click APPEND to add the operations instructions.
- Confirm that the logic If is selected by default to check the condition, and the condition type Always is select. This is to ensure that an alert will be sent out whenever an alarm is tripped.
- Confirm, under the Operation Type, that "E-Mail: Send a custom email" has been selected.
- In the Recipients block, enter the operator's e-mail address. Multiple e-mail addresses can be used, with one e-mail address per line.
- Enter the subject title of the e-mail in the Subject.
- Enter the message to be included in the e-mail in the Message body box.
-
Click the Save button. The macro list now has the macro script listed by its file name. If you attempt to exit the macro editor (by clicking on other submenus or menus), a warning message will appear (as shown below).
-
To test the macro script, click the person icon. The operator should receive an e-mail alert from EWC.
The complete macro script is depicted in the following figure.
11.3.3 Example: Macro Script with Program State and Alarm Alert
Here is an example of the use of two logical Or conditions of the trigger type to monitor two specific programs (PROGTEST001 and PROG3TEST) and trigger the e-mail operation. Two logical If conditions monitor the program state and alarms; an alert is sent out accordingly. The first If condition is set up to monitor the program activity; the second If condition monitors any alarm occurrences. Note: This sample macro script is presented to illustrate the flexibility of the macro editor. There are numerous ways to achieve the same the task noted here.
To construct the macro script, proceed as follows:
-
Click Create New on the Macro submenu.
-
Click the Name field and enter ALARM02.
-
Confirm that the trigger is enabled (with its box checked).
-
Under Trigger:
- Click the Type field and select Program State from the drop-down list.
- Click the Program State field and select Program Started from the drop-down list.
- Click the Program field and select PROG2TEST on slot 2. NOTE: PROG2TEST must be made available on the program list.
- The last option on step number is set as default for the trigger to apply at any step.
-
Click the (+/-) and select Insert After to add a new trigger type, as shown in the figure.
-
Click the Type field and select Or from the drop-down list.
- Click the Type field and select Program State from the drop-down list.
- Click the Program State field and select Program Started from the drop-down list.
- Click the Program field and select PROG3TEST on slot 3. NOTE: PROG3TEST must be created and is available on the program list.
- The last option on step number is set as default for the trigger to apply at any step.
-
Apply the (+/-) button to add two more trigger type steps to contain the logical Or and Alarm State as depicted in the following figure which depicts the complete configuration of the conditional statements in the trigger logic:
-
Click APPEND under the Operations block to create the first step of the trigger operation.
- Confirm that If condition is selected (by default).
- Click the Type field and select Always from the list. This is to ensure that an e-mail alert will be sent out if the state of a specified program occurs.
- Confirm that E-Mail: Send a custom email is selected (by default) for Operation Type.
- Enter the recipient's e-mail address in the Recipients block, one e-mail address per line.
- Enter subject title in the Subject block.
-
Enter a brief message in the Message Body block. The complete configuration is illustrated as follows:
-
Click the operation step number (number 1 in the circle, as shown below) and select Insert After to add a new step to the trigger operation.
- Confirm that If condition is selected (by default).
- Click the Type field and select Alarm State from the list.
- Click the Program State field and select Tripped from the list.
- Confirm that Any is selected by default under the Alarms field; it is to ensure any alarm will trigger this action.
- Confirm that E-Mail: Send a custom email is selected (by default) for Operation Type.
- Enter the recipient's e-mail address in the Recipients block, one e-mail address per line.
- Enter subject title in the Subject block.
- Enter a brief message in the Message Body block to indicate alarm has been tripped. The complete configuration is illustrated as follows:
-
Click Save to save this macro scripted profile.
-
Testing the Macro Script: Click the person icon to test and run the macro script.
-
If the run is successful (that is, no errors are found in the script), a Successful message appears and an e-mail alert is sent to the recipient(s) listed in the Recipients block.
-
If the run failed, an error message appears as shown below. The macro script does not work.
-
11.4 Running Time Meters
Note: This submenu is available only for the T-series chambers. If it is grayed out, your chamber does not support this feature.
Available only for the T-series chambers, the Running Time Meters page provides a list of the operating condition of the hardware components or devices installed inside the chamber. The following figure depicts the Running Time Meters submenu with the submenu bar hidden by applying the Show/Hide button (item 2 in the previous figure).
By analogy, the list shows the odometer of all the devices. It shows how long each device has been in operation (i.e., running) listed under the Total Time column. It shows the recommended maintenance when each device has reached its recommended total runtime. It also shows the history of maintenance or service on each device, as well as its past due maintenance interval. Such information serves to provide the life expectancy of each device.
To reset the total runtime for each device after service or maintenance, click the Reset button in the upper-right corner indicated by the arrow.
11.5 User Interface Settings
EWC, Version 3.3, is very customizable. Its UI can be configured with features and color decorations to meet the operator's personal preferences. The following figure depicts the UI and its current setting that displays a list of the operating mode, its name and color in the top pane, input/output display setting in the bottom pane. The current operating mode is Program, as depicted in the Status tab, with the color based on the one defined on the Operating Status Display Settings list. The input/output TS1 signal in the Status bar is also based on the color defined on the list in the bottom pane.
With the User Interface Settings submenu, the operator can manage the operating status color and input/output text description. Different display color can be adjusted or removed completely using the trash bin icon under the Actions list (last column). Any undefined color will get a default color of forest green.
11.5.1 Managing Operating Status
To add and define a color for a specific operating status, complete the following steps:
- Click the Add Missing Entry field and enter ID name under the UID list (first column).
- Click the color icon (under the Color list) to pick and select a desired color.
- Click the + button under the Actions list.
- To cancel the current setting, click the trash bin (Restore Defaults) indicated by the arrow in the upper-right corner. This action will revert the operating status colors to their default settings.
- To apply the current setting, click the Save button in the upper-right corner.
- Repeat the process for a different UI and apply the Save button again.
To define a new color for a specific operating status, complete the following steps:
- Click the color icon for a desired operating status name and select a desired color.
- To cancel the current setting, click the trash bin (Restore Defaults) indicated by the arrow in the upper-right corner. This action will revert the operating status colors to their default settings.
- To apply the current setting, click the Save button in the upper-right corner.
- Repeat the process for a different UI and apply the Save button again.
Note: There are only five predefined operating status modes: Standby, Constant, Program, Alarm and Off. The ID code for them are standby, constant, program, alarm and off, respectively.
11.5.2 Managing Input/Output Status
The available input/output status names (particularly, the time signals) are based on the chamber configuration. According to the following figure, TS1 in the status bar uses the color defined under the format column.
The default on/off colors for the time signal are green/black, respectively. These on/off colors can be customized by selecting a desired color from the color panel. The name of the time signal can also be customized to something more descriptive by editing the Custom Name field both for Full or Short. The short name is used and displayed in the status bar. New settings require the Save button be applied to take effect. The Restore Defaults button (trash bin icon) reverts the configuration to its default setting.
11.6 API Settings and Programming Interface
EWC offers several interfaces for other application software to read or write the parameters from or to the target chamber. One such method is the API (Application Programming Interface) front-end application with two separate methods: General and Delimited ASCII.
With the GENERAL setting, RESTful API can be quickly configured via the authentication mode and a direct controller access, using the No Authentication and Enable settings, respectively. Default communication priority level is 6.
The DELIMITED ASCII configuration supports the text command application based on ASCII commands. Different rules and syntax settings apply to provide the correct ASCII commands, as depicted in the following figure.
11.6.1 Communication Protocol for ESPEC P300, SCP220, ES102
Direct communication with ESPEC P300, SCP220 or ES102 controller via raw data through EWC can be achieved using the raw TCP protocol. The TCP forwarder listens for a raw TCP stream on port 10001. Through this method, native commands of P300, SCP220 or ES102 can be issued directly at the text terminal. One practical method for this communication is through the use of a terminal emulator called PuTTY installed on the operator's PC running GNU/Linux, Mac OS or MS Windows.
There are two types of data transmission exist for this protocol:
- Command Data: The command data consists of two types: (1) Monitor commands and (2) Setting commands. The monitor commands are used to monitor the conditions of the chamber, while the setting commands are used to change or configure the settings of the chamber.
- Response Data: The response data are basically data returned (responded) by the controller in response to the command data.
The command data issued at the text terminal on the host computer has specific syntax and semantics based on a two-component format: command data and delimiter. The response data sent from the controller also contains a two-component format: response data and delimiter. The delimiter is the carriage return (CR) character followed by a line feed (LF), abbreviated as CRLF. Refer to the "P300, SCP220 or ES102 Controller Communications Option Manual" for complete details on them.
- The command data consists of the following format: [command data][delimiter]
- [command data] is any command found in the "P300, SCP220 or ES102 Controller Communications Option Manual".
- [delimiter] is CRLF. The effect of pressing the Enter key on the keyboard produces the CRLF on the terminal.
- Example: MON?
- The response data consists of the following format: [response data][delimiter]
- [response data] can be any of the following:
- If the command data is issued to query for a data, response data consists of data in the format outlined in the "P300, SCP220 or ES102 Controller Communications Option Manual".
- If the command data is issued to set a parameter, response data (if set command was successful) consists of "OK: [command data]", where [command data] is the command that prompted the response.
- If there was an error executing the command, the response data will be "NA: [error message]". Error messages and their meanings are listed in the "P300, SCP220 or ES102 Controller Communications Option Manual". There is a time-out on the interface protocol request. If the target controller takes too long to respond to the command data, an error message "NA: SERIAL TIMEOUT" will appear. If this type of error reoccurs, double check the status of the target chamber and the TCP forwarder on EWC or restart PuTTY.
- [delimiter] is CRLF.
- [response data] can be any of the following:
- The interface will timeout after one hour of no activity.
11.6.2 Configuring PuTTY for Raw Data Communication
The following procedure illustrates how to launch and set up PuTTY (installed on MS Windows 10) to communicate with ESPEC P300, SCP220 and ES102.
- Log into EWC as admin.
- Obtain its IP address (refer to Network Settings under the Settings menu).
- Click the API Settings submenu under the Settings menu.
-
Enable the Direct Controller Access by checking the box (indicated by the arrow in the figure below).
-
Apply the Save button.
- Reboot EWC (refer to the ``Server Settings'' section on how to reboot the system).
-
Launch PuTTY and enter the following parameters in the appropriate fields illustrated in the figure below.
-
Enter EWC IP address (10.30.100.96 shown as example).
-
Enter 10001 for Port number.
-
Click to select Raw for communication.
-
Click Open to initiate communication.
-
11.6.3 Examples of Command and Response Data
The following examples illustrate the use of a command data issued on ESPEC P300, SCP220 and ES102, respectively.
-
ESPEC P300: The following figure illustrates five command data issued sequentially at the PuTTY terminal to read values from the P300. All command data are followed by the question mark (?). These command data are: ROM?, MON?,PRGM MON?, PRGM SET? and PRGM DATA? The MON? and PRGM DATA? commands were issued with their appropriate options and parameters (as indicated in the command line).
-
ESPEC SCP220: The following figure illustrates six command data issued sequentially at the PuTTY terminal to read values from the SCP220. All command data are followed by the question mark (?). These command data are: ROM?, MON?, TEMP?, PRGM MON?, PRGM DATA? and RUN PRGM MON? The PRGM DATA? commands was issued with its appropriate parameters (as indicated in the command line).
-
ESPEC ES102: The following figure illustrates five command data issued sequentially at the PuTTY terminal to read values from the ES102. All command data are followed by the question mark (?). These command data are: ROM?, CONSTANT SET?, RUN PRGM?, and PRGM DATA? The CONSTANT SET? and PRGM DATA? commands were issued with their appropriate options and parameters (as indicated in the command line).
11.6.4 Communication Protocol for the Watlow F4T
The communication protocol provided for the Watlow F4T is Modbus TCP port 502. Due to its slow performance, the Modbus TCP interface is not recommended to use for communicating with EWC. The Watlow F4T's own Modbus TCP interface should be used instead.
PuTTY can be used to communicate with Watlow F4T directly via its Modbus TCP port 5025 or via EWC using TCP port forwarding through the same port number (5025). The following procedure outlines the steps to configure PuTTY to communicate with Watlow F4T through TCP port forwarding via EWC. This protocol allows Watlow F4T to be communicated via the raw SCPI commands. This protocol requires that Watlow F4T firmware version be at least 03:06:011 which was released in May 2017. Our ESPEC Chamber is equipped with F4T with its current firmware version (at least 04:07). Thus, communication via SCPI protocol is possible.
Launch PuTTY and enter the following parameters in the appropriate fields illustrated in the figure below.
-
Enter IP address of EWC, with 10.30.100.96 shown as example.
-
Enter 5025 for Port number.
-
Click to select Raw for communication.
-
Click Open to initiate communication.
The following figure illustrates four command data issued sequentially at the PuTTY terminal to read values from Watlow F4T and one command to set a value (or parameter) on Watlow F4T. All query commands are followed by the question mark (?). They are: *IDN?, :SOURCE:CLOOP1:PVALUE?, :OUTPUT1? and set command :OUTPUT1 PARAM (that is, :OUTPUT1 ON). For details on the use of SCPI and its raw commands, visit Watlow.com website.
11.7 Chamber Interface
The Chamber Interface submenu plays a crucial role in the configuration of EWC and chamber for control and operation. Configuration involves selecting the right chamber category, model type and controller, as well as any optional features available for the said chamber. Next, a proper communication protocol between the chamber and EWC must be established. The type of controller dictates the type of communication protocol.
-
TCP/IP Interface: TCP/IP protocol is the default communication interface for a T-series chamber or a chamber equipped with Watlow F4T. The following figures depict a typical configuration of the T-Series and F4T chambers.
-
Serial Interface: For a chamber equipped with ESPEC SCP220, ES102 or Watlow F4, default communication interface is the serial RS-232; default communication interface for ESPEC P300 is RS-485, but RS232C can also be used for communication. The following figures depict a typical configuration for a chamber equipped with ESPEC SCP220, ES102 or Watlow F4 via the serial RS-232 interface and RS485 for P300.
The following figure depicts a configuration for an F4T chamber via a serial interface.
Two options are available for interface configuration: Simple and Expert. The settings depicted in the above figure are based on the Simple option; they were completed at the facility during testing. This configuration can be confirmed during the Setup Wizard procedure (as outlined in Section 2.4) when EWC operates for the first time with the chamber. For this reason, there is generally no need to configure the settings, unless a new setting is required.
The following subsections outline the different configuration procedure for all PLCs supported by EWC. Select the appropriate subsection that applies to your chamber and PLC.
11.7.1 T-Series Chamber Interface: Simple Configuration Option
Under the Simple option, communication between the chamber and EWC is configured through three predetermined parameters: (1) Chamber Category, (2) Chamber Model and Controller, (3) Communication Interface. They are depicted in the following figure.
Refer to your documentations that were shipped with the chamber to obtain information for these parameters. They are required to successfully configure EWC to control your chamber.
-
Chamber Category: Click the text field under Chamber Category to access a drop-down list, as depicted in the following figure. Select your chamber category from the list that matches the one described in your chamber manual.
-
Model Selection: Click the text field under Model to access a drop-down list, as depicted in the following figure. Select your chamber model from the list that matches the one described in your chamber manual.
-
Communication Interface: By default, EWC applies TCP/IP to communicate with the T-Series chamber using a set of predefined network parameters, as shown in the following figure. An internal network (based on 121.165.141.0/24) was set up for this communication with an IP address of 121.165.141.156 assigned to EWC and 121.165.141.61 to the Allen Bradley PLC.
The predefined parameters of the chamber communication interface, based on the above figure, are described as follows:
-
i. Internal Network: This is the internal network that exists between EWC and the chamber. It is statically configured using Class A network protocol.
-
ii. Server IP Address: This is the IP address of EWC. It is statically configured as 121.161.141.155. The Ethernet port designated for this network is labeled as eth1. Refer to the following diagram on the EWC hardware.
-
iii. PLC IP Address: This is the IP address of the Allen Bradley PLC, statically configured as 121.165.1141.61.
EWC hardware has two Ethernet ports; each is predefined and configured for a specific network connection, as depicted in the following figure. eth1 is preconfigured for internal network between EWC and PLC; eth0 is preconfigured to connect EWC to the main network. Thus, during network troubleshooting, these two ports must have the correct cables plugged into them. To help identify eth0 (when the EWC hardware is enclosed in a box), use the HDMI port as a reference; eth0 is adjacent to it.
The following figure depicts the two IP addresses used by EWC for the two Ethernet ports designated in the above figure.
-
-
Save Settings: There are three options to manage the chamber interface configuration (shown in the figure).
- Export to Local File: Click the down-arrow button to download the current settings for backup. The configuration file (in yaml) will be stored on the local computer with filename: chamber_interface_1.yaml.
- Import from Local File: Click the up-arrow button to import a configuration file from the local computer. To apply the new settings from this file, click the Save button.
- Save Settings: After modifying the parameters in the expert option, click the Save button to apply the current settings.
11.7.2 SCP220 Chamber Interface: Simple Configuration Option
Under the Simple option, communication between the chamber and EWC is configured through three predetermined parameters: (1) Chamber Category, (2) Chamber Model and Controller, (3) Communication Interface. They are depicted in the following figure.
Refer to your documentations that were shipped with the chamber to obtain information for these parameters. They are required to successfully configure EWC to control your chamber.
-
Chamber Category: Click the text field under Chamber Category to access a drop-down list, as depicted in the following figure. Select your chamber category from the list that matches the one described in your chamber manual.
-
Model Selection: Click the text field under Model to access a drop-down list, as depicted in the following figure. Select your chamber model from the list that matches the one described in your chamber manual.
-
Communication Interface: Default communication protocol between EWC and SCP220 PLC is RS232 via Serial interface (as depicted in the following figure). The only predefined parameter for this protocol is the serial baud rate at 9600.
EWC will automatically select and configure a serial port designated as /dev/ttyUSB0 (or /dev/ttyUSB1) for its interface.
-
Save Settings: Three options are available for managing the chamber interface configuration. These are Export to local file, Import from local file and Save, as depicted in the figure.
- Export to Local File: Click the down-arrow button to download the current settings for backup. The configuration file (in yaml) will be stored on the local computer with filename: chamber_interface_1.yaml.
- Import from Local File: Click the up-arrow button to import a configuration file from the local computer. To apply the new settings from this file, click the Save button.
- Save Settings: After modifying the parameters in the expert option, click the Save button to apply the current settings.
11.7.3 ESPEC P300 Chamber Interface: Simple Configuration Option
Under the Simple option, communication between the chamber and EWC is configured through three predetermined parameters: (1) Chamber Category, (2) Chamber Model and Controller, (3) Communication Interface. They are depicted in the following figure.
Refer to your documentations that were shipped with the chamber to obtain information for these parameters. They are required to successfully configure EWC to control your chamber.
-
Chamber Category: Click the text field under Chamber Category to access a drop-down list, as depicted in the following figure. Select your chamber category from the list that matches the one described in your chamber manual.
-
Model Selection: Click the text field under Model to access a drop-down list, as depicted in the following figure. Select your chamber model from the list that matches the one described in your chamber manual.
-
Communication Interface: Default communication protocol between EWC and P300 PLC is RS485 via Serial interface. The only predefined parameter for this protocol is the serial baud rate at 19200.
EWC will automatically select and configure a serial port designated as /dev/ttyUSB0 (or /dev/ttyUSB1) for its interface.
-
Save Settings: Three options are available for managing the chamber interface configuration. These are Export to local file, Import from local file and Save, as depicted in the figure.
- Export to Local File: Click the down-arrow button to download the current settings for backup. The configuration file (in yaml) will be stored on the local computer with filename: chamber_interface_1.yaml.
- Import from Local File: Click the up-arrow button to import a configuration file from the local computer. To apply the new settings from this file, click the Save button.
- Save Settings: After modifying the parameters in the expert option, click the Save button to apply the current settings.
11.7.4 ESPEC ES102 Chamber Interface: Simple Configuration Option
Under the Simple option, communication between the chamber and EWC is configured through three predetermined parameters: (1) Chamber Category, (2) Chamber Model and Controller, (3) Communication Interface. They are depicted in the following figure.
Refer to your documentations that were shipped with the chamber to obtain information for these parameters. They are required to successfully configure EWC to control your chamber.
-
Chamber Category: Click the text field under Chamber Category to access a drop-down list, as depicted in the following figure. Select your chamber category from the list that matches the one described in your chamber manual.
-
Model Selection: Click the text field under Model to access a drop-down list, as depicted in the following figure. Select your chamber model from the list that matches the one described in your chamber manual.
-
Communication Interface: Default communication protocol between EWC and ES102 PLC is RS232 via Serial interface (as depicted in the previous figure). The only predefined parameter for this protocol is the serial baud rate at 9600.
EWC will automatically select and configure a serial port designated as /dev/ttyUSB0 (or /dev/ttyUSB1) for its interface.
-
Save Settings: Three options are available for managing the chamber interface configuration. These are Export to local file, Import from local file and Save, as depicted in the figure.
- Export to Local File: Click the down-arrow button to download the current settings for backup. The configuration file (in yaml) will be stored on the local computer with filename: chamber_interface_1.yaml.
- Import from Local File: Click the up-arrow button to import a configuration file from the local computer. To apply the new settings from this file, click the Save button.
- Save Settings: After modifying the parameters in the expert option, click the Save button to apply the current settings.
11.7.5 Watlow F4T Chamber Interface: Simple Configuration Option
Under the Simple option, communication between the chamber and EWC is configured through three predetermined parameters: (1) Chamber Category, (2) Chamber Model and Controller, (3) Communication Interface. They are depicted in the following figure.
Refer to your documentations that were shipped with the chamber to obtain information for these parameters. They are required to successfully configure EWC to control your chamber.
-
Chamber Category: Click the text field under Chamber Category to access a drop-down list, as depicted in the following figure. Select your chamber category from the list that matches the one described in your chamber manual.
-
Model Selection:
- Type: Click the text field under Type to access a drop-down list, as depicted in the following figure. Select your chamber type from the list that matches the one described in your chamber manual.
-
Controller: Click the text field under Controller to access a drop-down list, as depicted in the following figure. Select your controller type from the list that matches the one described in your chamber manual.
-
Communication Interface: Default communication between EWC and F4T PLC is TCP/IP connected via port eth1 as depicted in the following figure. This internal network was set up for this communication with 10.30.200.241 as IP address assigned to EWC and 10.30.200.242 to the F4T.
EWC hardware has two Ethernet ports; each is predefined and configured for a specific network connection, as depicted in the following figure. eth1 is preconfigured for internal network between EWC and PLC; eth0 is preconfigured to connect EWC to the main network. Thus, during network troubleshooting, these two ports must have the correct cables plugged into them. To help identify eth0 (when the EWC hardware is enclosed in a box), use the HDMI port as a reference; eth0 is adjacent to it.
The following figure depicts the two IP addresses used by EWC for the two Ethernet ports designated in the above figure.
-
Interface Type: It is to be emphasized that TCP/IP is the default communication protocol. There is no need to make any selection for the interface type, except to confirm that TCP/IP has been selected. If your chamber uses a serial interface for communication with EWC, and the chamber manual specifies such information, then make sure to select Serial from the drop-down list. Confirm also that the F4T has the right settings for ModbusRTU protocol (via Settings, Network and Modbus).
- Network Interface: If EWC uses TCP/IP as the default communication, then LAN is the default selection. The WAN option is a configuration where the internal network does not exist between EWC and the F4T. This option requires a reconfiguration of the network setup with both EWC and F4T part of the (customer's) main network. This setup may require assistance from ESPEC customer support.
-
-
Save Settings: There are three options to manage the chamber interface configuration, as depicted in the upper-right corner.
- Export to Local File: Click the down-arrow button to download the current settings for backup. The configuration file (in JSON) will be stored on the local computer.
- Import from Local File: Click the up-arrow button to import a configuration file from the local computer.
- Save Settings: To update the current setting, click the Save button.
11.7.6 Watlow F4 Chamber Interface
Under the Simple option, communication between the chamber and EWC is configured through three predetermined parameters: (1) Chamber Category, (2) Chamber Model and Controller, (3) Communication Interface. They are depicted in the following figure.
Refer to your documentations that were shipped with the chamber to obtain information for these parameters. They are required to successfully configure EWC to control your chamber.
-
Chamber Category: Click the text field under Chamber Category to access a drop-down list, as depicted in the following figure. Select your chamber category from the list that matches the one described in your chamber manual.
-
Model Selection: Click the text field under Model to access a drop-down list, as depicted in the following figure. Select your chamber model from the list that matches the one described in your chamber manual. Under Controller, select Watlow F4.
-
Communication Interface: Serial interface is the default communication protocol between EWC and F4 PLC. The only predefined parameter for this protocol is the baud rate, setting at 19200.
EWC will automatically select and configure a serial port designated as /dev/ttyUSB0 (or /dev/ttyUSB1) for its interface.
-
Save Settings: Three options are available for managing the chamber interface configuration. These are Export to local file, Import from local file and Save, as depicted in the figure.
- Export to Local File: Click the down-arrow button to download the current settings for backup. The configuration file (in yaml) will be stored on the local computer with filename: chamber_interface_1.yaml.
- Import from Local File: Click the up-arrow button to import a configuration file from the local computer. To apply the new settings from this file, click the Save button.
- Save Settings: After modifying the parameters in the expert option, click the Save button to apply the current settings.
11.7.7 Chamber Interface: Expert Configuration Option
The list of settings in the expert option is a configuration that was applied using the settings in the simple option. All settings initially applied in the simple option were stored in the expert list. Once applied and stored in the expert list, the settings shown in the simple option may not reflect the actual configuration between the chamber and EWC. Therefore, the correct interface and chamber settings must be examined in the list of the expert option.
The expert option offers flexibility for customizing the interface configuration for the intended chamber. Only an operator with knowledge of the PLC configuration and the yaml syntax should modify the settings. Knowledge of the PLC features and its I/O modules is required to successfully configure EWC to connect to and use the chamber. The expert option consists of a list or set of parameters structured in yaml syntax, as depicted in the following figure. EWC scans this file and parses the parameters to apply the settings for chamber operation.
Refer to the specific item that applies to your chamber and PLC.
-
T-Series: The following figure illustrates the Expert configuration of a T-series chamber.
-
Watlow F4T: The following figure illustrates the Expert configuration of an F4T chamber.
-
Watlow F4: The following figure illustrates the Expert configuration of an F4 chamber.
-
ESPEC P300: The following figure illustrates the Expert configuration of a P300 chamber.
-
ESPEC SCP220: The following figure illustrates the Expert configuration of an SCP220 chamber.
The contents in this yaml file begins with the sample rate configuration and the type of interface used for communication, indicated by the arrow. The list continues with all the available features and specifications of the chamber that include temperature, humidity and vibration range.
Custom configuration can follow any one of these two methods:
-
Content Modification: Modify the contents of the yaml file, with an appropriate yaml syntax and data structure. For the new settings to take effect, click the Save button.
-
Uploading Yaml File: Click the Import button to upload the yaml configuration file from the local computer. The contents of this file must follow the syntax and data structure of yaml.
It is important to have a backup of the original yaml file listed on this page. Click the Export button (down-arrow) in the upper-right corner to download the yaml file to store on the local computer. This file can be used to quickly restore the chamber interface settings.
11.8 Date/Time Settings
To keep an accurate date/time of the data log, it is important to have the correct date/time on EWC (and the chamber). Data log will bear a date/time stamp used by EWC. By default, the date/time on EWC is configured to synchronize using the Network Time Protocol (NTP) server provided by the Debian network time pool. Based on this setting, the synchronization can only occur if EWC has access to the Internet.
If EWC does not have access to the Internet, the NTP server of the Debian network time pool does not work; and its date/time will be out of sync. If your network, isolated from the Internet, has its own NTP, EWC can be instructed to use that NTP server. If your network does not have an NTP server, you may synchronize the date/time manually or with that of the local device (your PC or laptop). We outline these procedures as follows:
11.8.1 Local NTP Server
This setup procedure is useful for EWC that is isolated from the Internet and an alternative NTP server is available to provide date/time synchronization. EWC synchronizes its date/time using the NTP server directive on the first line (top line) of the list (as depicted in the following figure). Therefore, a desired NTP server must occupy the top line.
Complete the following steps to set up EWC to use a local NTP server:
- Log in as admin
- Click (or select) Settings in the menu bar
- Click (or select) Date/Time Settings
- Edit the hostname or IP address of the local NTP server to occupy the top line (using the NTP Server # 1 field), with the exact format in that field. For example, 0.IP-address will be 0.10.30.200.222; for hostname, it will be 0.mylocalTserver.com, etc.
-
Click the Save button in the upper-right corner to save the current settings.
Note: The X or APPEND buttons indicated by the arrows can be used to delete/remove or add a new directive. A new directive will be added to the bottom of the list. This option may be useful for archiving or saving the original directive in the top line.
11.8.2 Manual Date/Time Configuration
The date/time of EWC can also be configured manually. Complete the following steps to edit the date/time on EWC:
- Log in as admin
- Click (or select) Settings in the menu bar
- Click (or select) Date/Time Settings
-
Scroll down the page to Server - Date/Time and click or select the date/time field under Current Server Date/Time.
-
Make the necessary adjustments using the drop-down calendar and time as depicted in the following figure.
Note: On a touchscreen system, the calendar and time adjustment is depicted as follows:
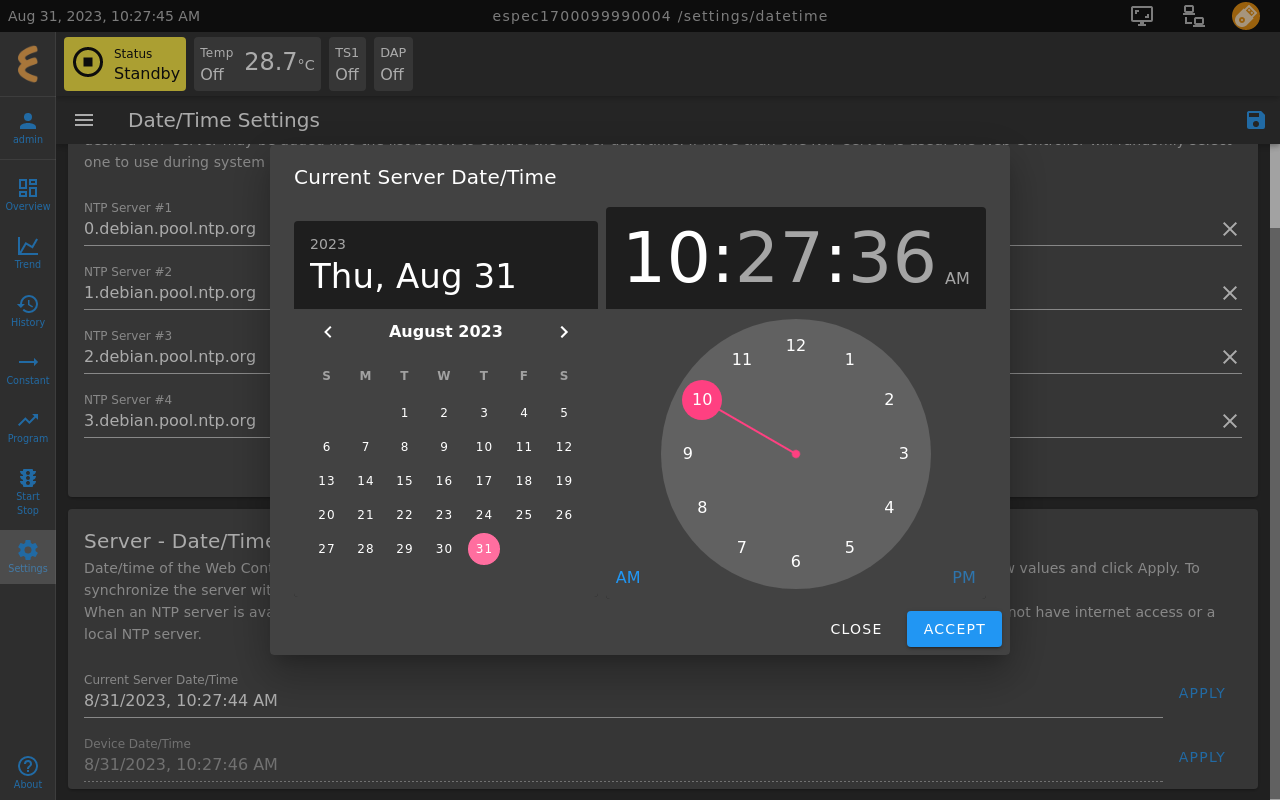
-
Close the date/time calendar.
- Click the APPLY button on the right.
- Click the Save button in the upper-right corner, as indicated by the arrows in the figure of step 4.
11.8.3 Automatic Synchronization
If a local NTP server is not available and EWC does not have access to the Internet, such as a standalone system (custom F4T or T-series chamber), the date/time of EWC can be configured to synchronize with the local date/time of your laptop/PC (provided it has the correct current date and time). This synchronization will take place automatically via the Web browser that was used to access EWC from the said laptop/PC.
-
Set up a simple static network system to consist of chamber and laptop/PC, as illustrated below. Refer to the Initial Setup for detail.
Note: The above figure also illustrates a scenario with a chamber equipped with its default touchscreen HMI, where date/time synchronzation cannot be applied (indicated Invalid Date in the Current Server Date/Time field).
-
Access EWC via its hostname or IP address (192.168.0.83 or a static IP address assigned to it).
- Log in as admin
- Click (or select) Settings in the menu bar
- Click (or select) Date/Time Settings
- Scroll down the page to Server - Date/Time.
- Confirm that date/time under the Device Date/Time field is current and correct.
- Click the APPLY button on the right.
- click Save.
11.9 Email Settings
The Email Settings submenu provides a few practical features. It includes setting email encryption, password authentication, administrator's account recovery and alert via email about the operating condition(s) of the chamber. By default, the mail server is configured without a password authentication or encryption.
11.9.1 Mail Sever Encryption and Password Authentication
To set up the mail server connection with encryption, place a check mark in the Require SSL/TLS box and apply the Save button (indicated by the arrow). To set up a password authentication for the mail server, enter the password in the Password field and apply the Save button again.
11.9.2 Account Recovery Email
To set up the administrator's account recovery, enter the e-mail address in the Account Recovery E-Mail field and apply the Save button (indicated by the arrow). A one-time password will be sent to this e-mail address to recover the administrator's account.
11.9.3 Setting Email Alert
To set up e-mail alert to receive notification of the operating conditions of the chamber, complete the following steps:
- Enter the recipient's e-mail address in the Recipients box (indicated by the arrow). Multiple e-mails can be used in the Recipients box with one e-mail address per line.
-
To test an e-mail notification, click the Test Email button (shown in the following figure). Note: EWC uses SMTP Office 365 for the e-mail protocol and therefore it must have access the Internet in order for the e-mail notification to operate.
-
To save the settings, click the Save button in the upper-right corner (as shown in the above figure).
11.10 Firmware
EWC is designed with the ability to continually receive improvements in the form of a firmware update to provide bug fixes and firmware (software) upgrade with new features. Firmware update applies one of two approaches:
- Automatic Firmware Updates,
- Offline Firmware Updates (Manual).
EWC has been carefully designed to be robust and stable, incorporating a mechanism to protect its operation during a firmware update. Technically, the system keeps two versions of the firmware: (1) Current version of the operating firmware, (2) Previously installed version.
EWC switches its operation on the new firmware immediately after a successful update. All configuration and data logging files will be brought over to operate on the new firmware. The transition is so subtle, mostly taking place internally, that the operator may not even notice the changes in the system. If firmware update fails, the system reverts to its previous version known to be in the stable state until the update issue is resolved.
11.10.1 Automatic Update and Remote Management Service
Each EWC has a unique registration number based on the chamber serial number which is used to identify each EWC for an automatic firmware update through the cloud service provider called Mender. The process provides remote service support with risk tolerant and efficient over-the-air updates. Automatic firmware update is enabled by default with the check mark in the box (depicted in the previous figure). It can be turned off by removing the check mark and saving the settings with the Save button (upper-right corner).
The remote management service, disabled by default, is a feature that allows ESPEC software engineering team to access and troubleshoot your EWC remotely through Mender. This feature requires enabling Automatic Firmware Update Service which in turn requires that EWC has access to the Internet as indicated in the previous figure.
Customer and their IT department have complete control and freedom to dictate the use of Mender cloud service and remote management service. Should they decide to use the service, they must enable it as follows:
- EWC must have access to the Internet.
- Log into EWC as admin.
- Access the Firmware submenu under Settings.
- Enable the Remote Management Service (by checking the ``Enable'' box).
- Click the Save button (in the upper-right corner) to apply the setting.
- Reboot EWC (refer to the ``Server Settings'' section on how to reboot the system).
11.10.2 Offline Manual Update via HMI
For a standalone system (e.g., T-series and Custom F4T chambers with a touchscreen), disconnected from a network or the Internet (see the following figure), automatic update via the cloud service cannot be completed.
For such a system, the following procedure must be performed:
- Set the chamber in Standby mode.
- Obtain Firmware Update Package from ESPEC and store it on a USB device.
- Plug the USB device (from step 2) into the USB port of EWC, located at the base of the touchscreen (or at the base of its arm).
- Select the Settings menu, then select Firmware submenu.
-
Touch the blue bar with "SELECT UPDATE FILE" (in the Offline Firmware Updates panel), as indicated by the arrow in the figure.
-
A list of files on the USB device is displayed. Locate and select (touch) the package with .mender extension and confirm its name is listed under the File Name field (see arrow), then apply the update using the OPEN button.
-
The system begins to upload the update file which will take several minutes.
-
When update is complete, reboot the system with the REBOOT button.
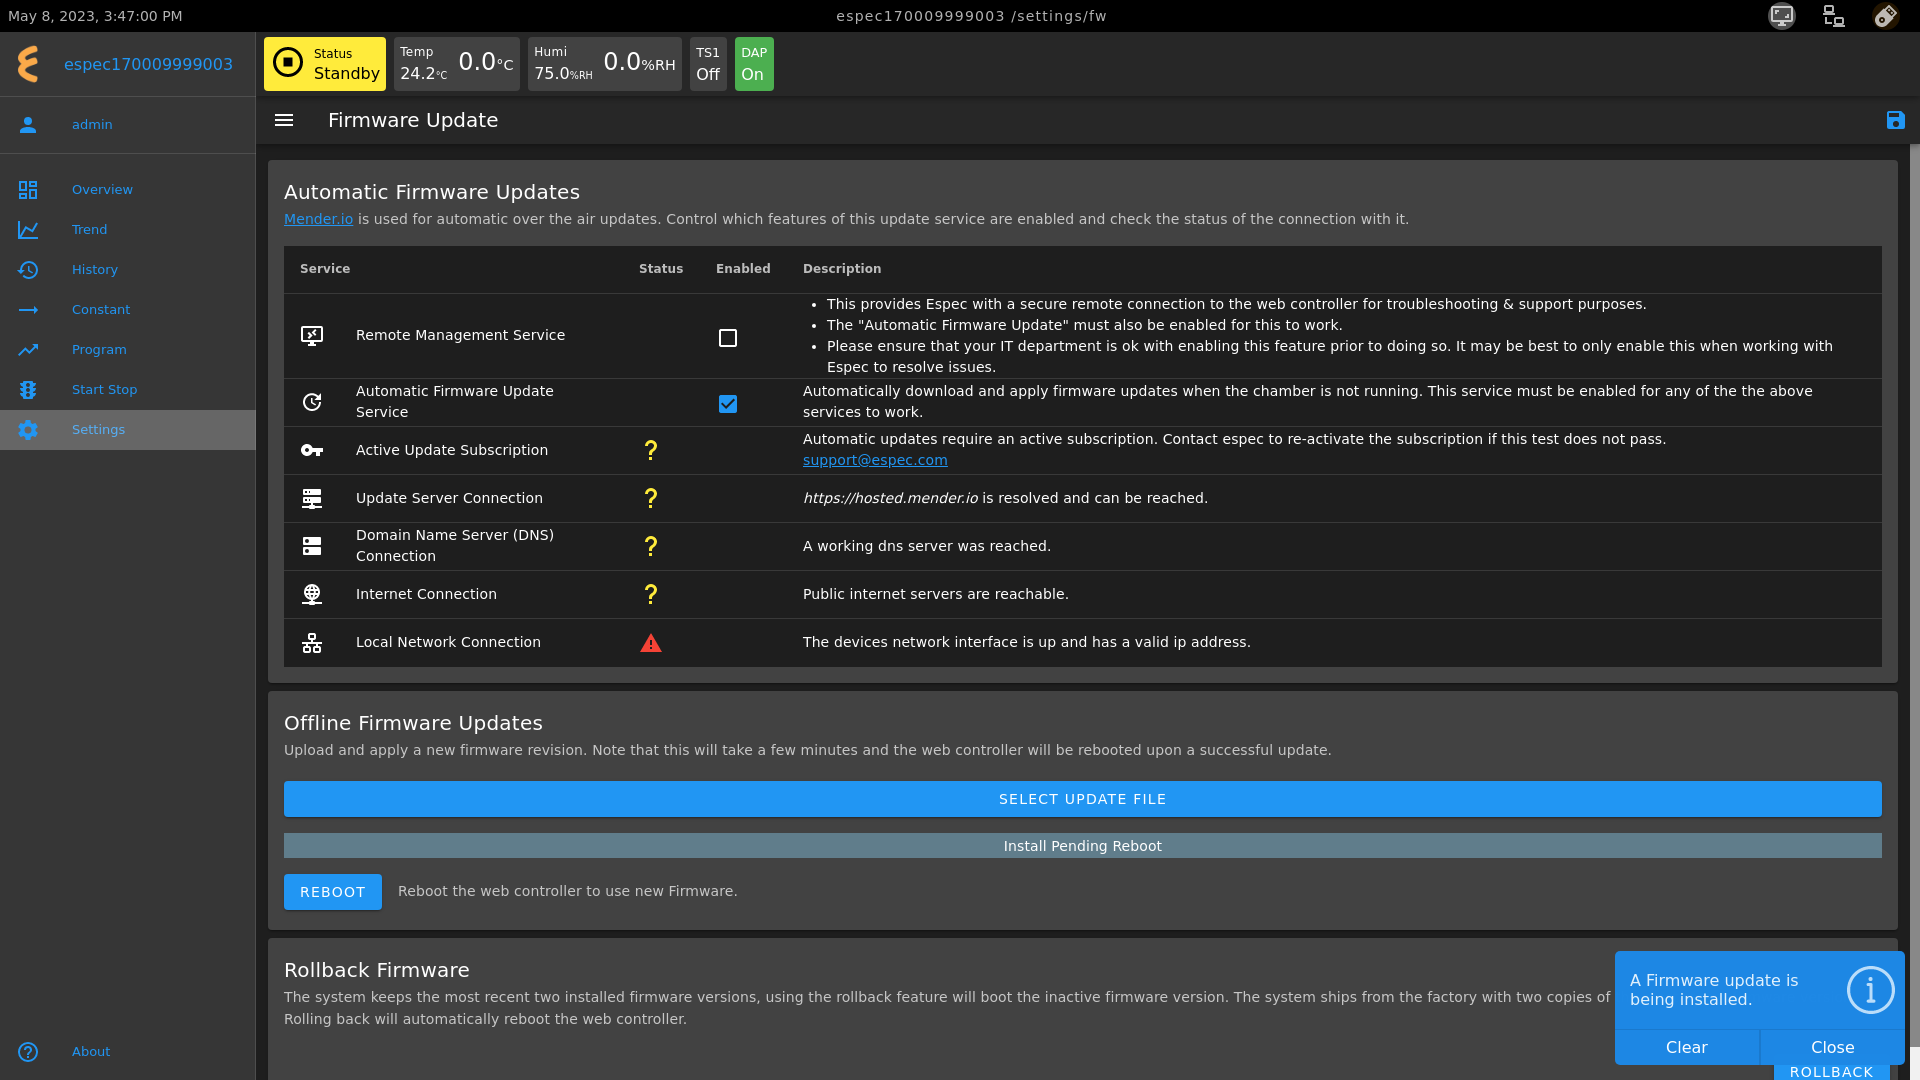
-
Your EWC has been updated. Its new firmware version can be found under the About menu.
11.10.3 Offline Manual Update via Local Network
For a system on the local network without access to the Internet, firmware update is still possible. This situation is depicted in the following figure.
Complete the following steps to apply the manual firmware update:
- Obtain Firmware Update Package from ESPEC and store it on the local computer.
- Access EWC from the local PC (Step 1) and log in as the administrator.
- Click Settings on the menu bar.
- Click Firmware in the submenu.
-
Drag-and-drop the package in the white box (indicated by the arrow), or click the white box and browse through a folder for the package on the local computer.
-
Once an update package has been loaded, the system begins to install the new firmware, as shown in the following figure.
-
Click REBOOT, as indicated in the figure, to restart the system.
11.10.4 Rollback Firmware
EWC can rollback its firmware to the previous stable state by clicking on the ROLLBACK button as depicted in the following figure.
11.11 HMI Settings
The HMI Settings submenu is available only when EWC detects a monitor (touchscreen or non-touchscreen) directly connected to its HDMI or video display port during its startup (i.e., during booting). The following figure depicts the HMI Settings submenu displayed on the detected touchscreen. This submenu is not visible on the Settings submenu when accessed via a Web browser on a local computer (on the local network).
The HMI Settings submenu has three manipulation buttons or options on the upper-right corner, described as follows:
- Terminal: This option is currently disabled for security reasons.
- Restart Application: Click the refresh icon to apply or clear changes on the HMI setting and restart the UI application.
- Save: Click the Save button to save changes on the current settings.
Four different HMI setting options are available for configuration:
- Time Zone,
- Language,
- Display Timeout
- Automatic Login
These four options have specific description to support their functionality. as depicted in the following figure, via the drop-down menu and via the on-screen keyboard.
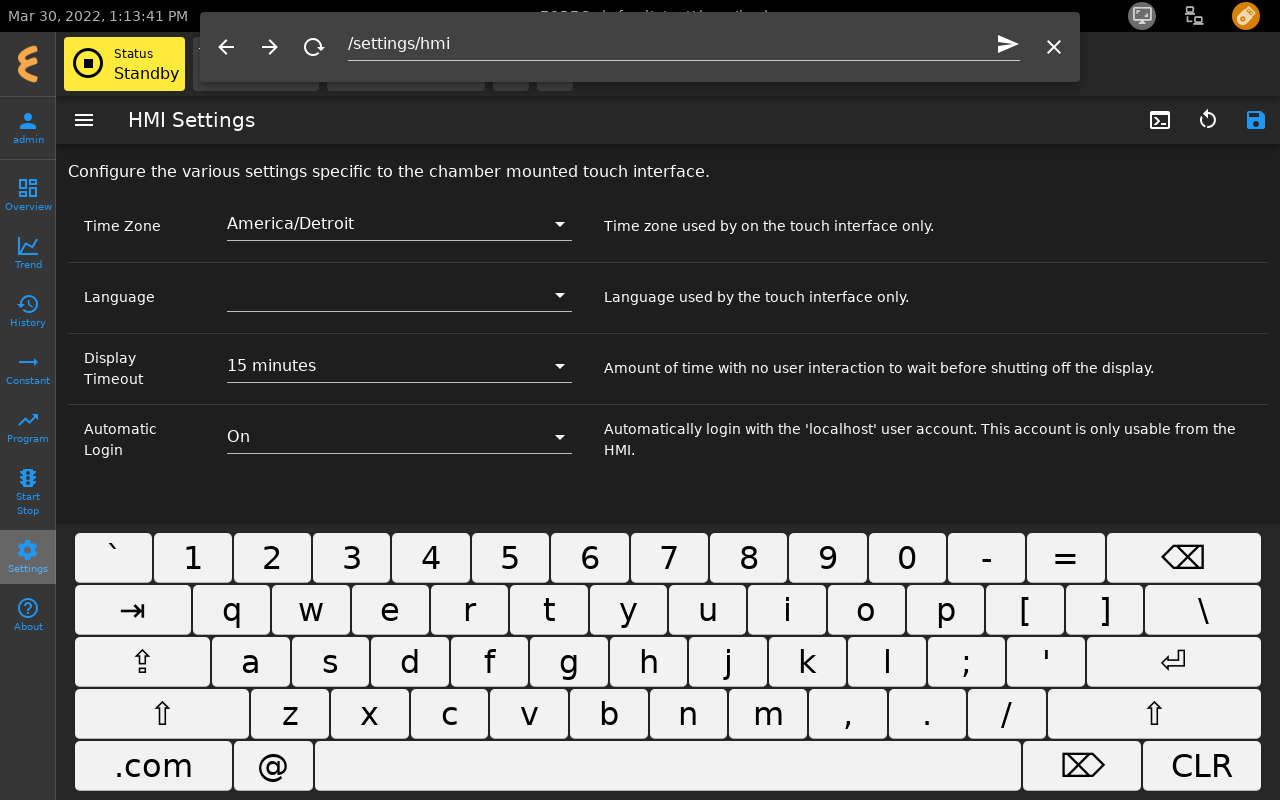
11.12 Network Settings
The Network Settings page allows the administrator to manage network settings on EWC. This page consists of three separate panes to display the specific network information and settings of the system. They are listed and described as follows.
Network Interface Configuration (eth0): The first pane displays network information of EWC, its hostname, network type and configuration. As depicted in the following figure, this EWC is part of a DHCP network, as confirmed by the check mark in the DHCP box and the IP address listed in the second pane (below) under the eth0 column.
If EWC is not part of a DHCP network and is not using a static networking protocol, EWC will use its fallback static network protocol with IP address 192.168.0.83 (appears in the IP address field and in the second pane under eth0). A PC connected directly to eth0 via a cross-over cable or a network hub can access EWC using the same subnet. If EWC is not connected to any network or its eth0 is unplugged, the eth0 entry in the second pane will be empty. The DHCP check mark remains in the box to indicate that EWC is ready to join a DHCP network (if available).
The following figure shows how EWC uses a static network protocol. The DHCP box is unchecked and its static network information is displayed in the IP address field in the first pane and under eth0 in the second pane.
Current Network Status: The EWC hardware (Up2Board) has two Ethernet ports, labeled as eth0 and eth1 each is preconfigured for a specific network function; eth0 is preconfigured to join the main network while eth1 is reserved for an internal network connection with a PLC (e.g., T-series or F4T). Thus, this pane displays the network status for both ports. While the first pane (above) already displays enough information for EWC and its eth0, this pane displays the MAC address of each port, which can be used to confirm or set up a network connection. As shown in the figure, eth1 is unused, designated by the special-use case of 169.254.213.60 assigned by an interface.
For an internal network connection with Watlow F4T, eth1 contains network information as depicted in the following figure.
DHCPCD Output Logs: The third pane is for network debugging purposes. Generally, it displays information produced by the output logs of the dhcpcd system service to determine network lease or connection issues.
11.12.1 Network Information on a Standalone System
For a standalone system, such as the T-series and custom F4T chamber, no network setting is required. The first pane shows its fallback network setting. However, with its DHCP enabled (default from the factory), the system can readily join a DHCP network as soon as it detects one.
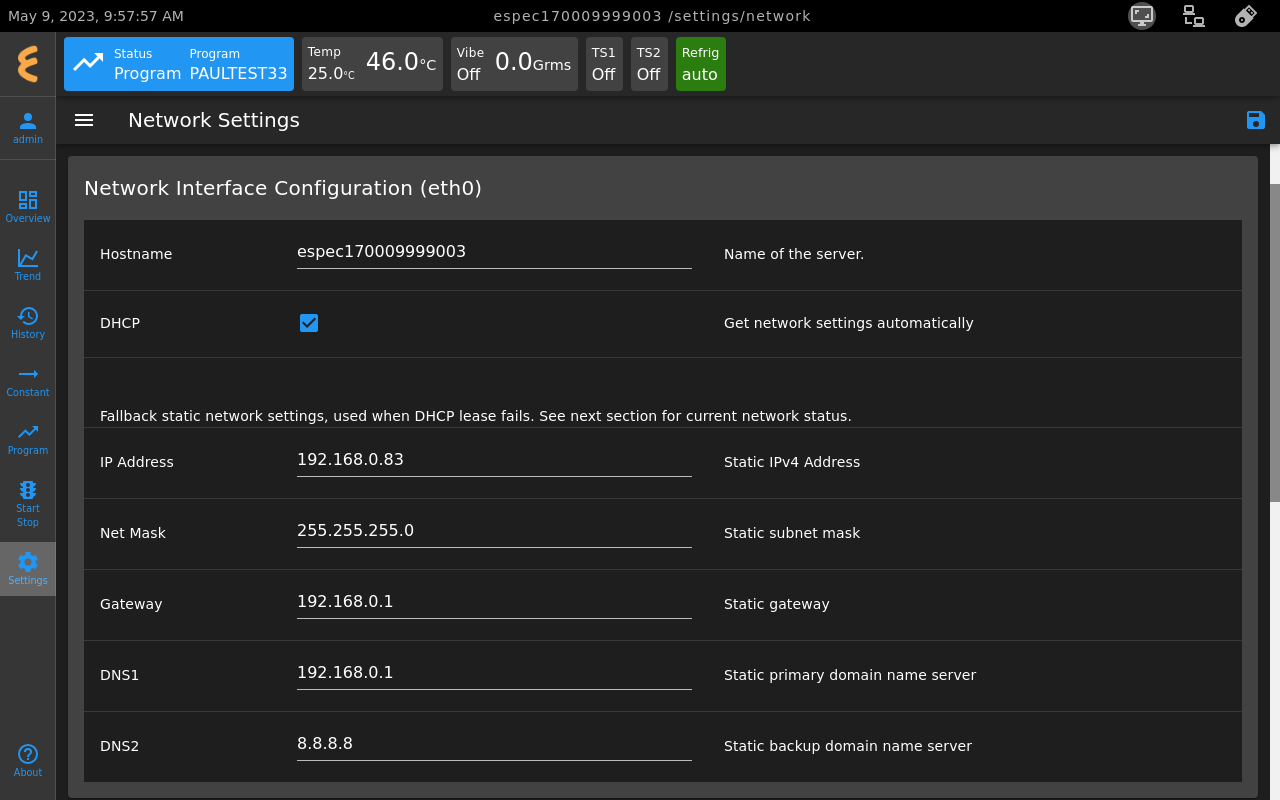
The second pane does confirm the network status of EWC as a standalone system with no IP address listed under the eth0 column.
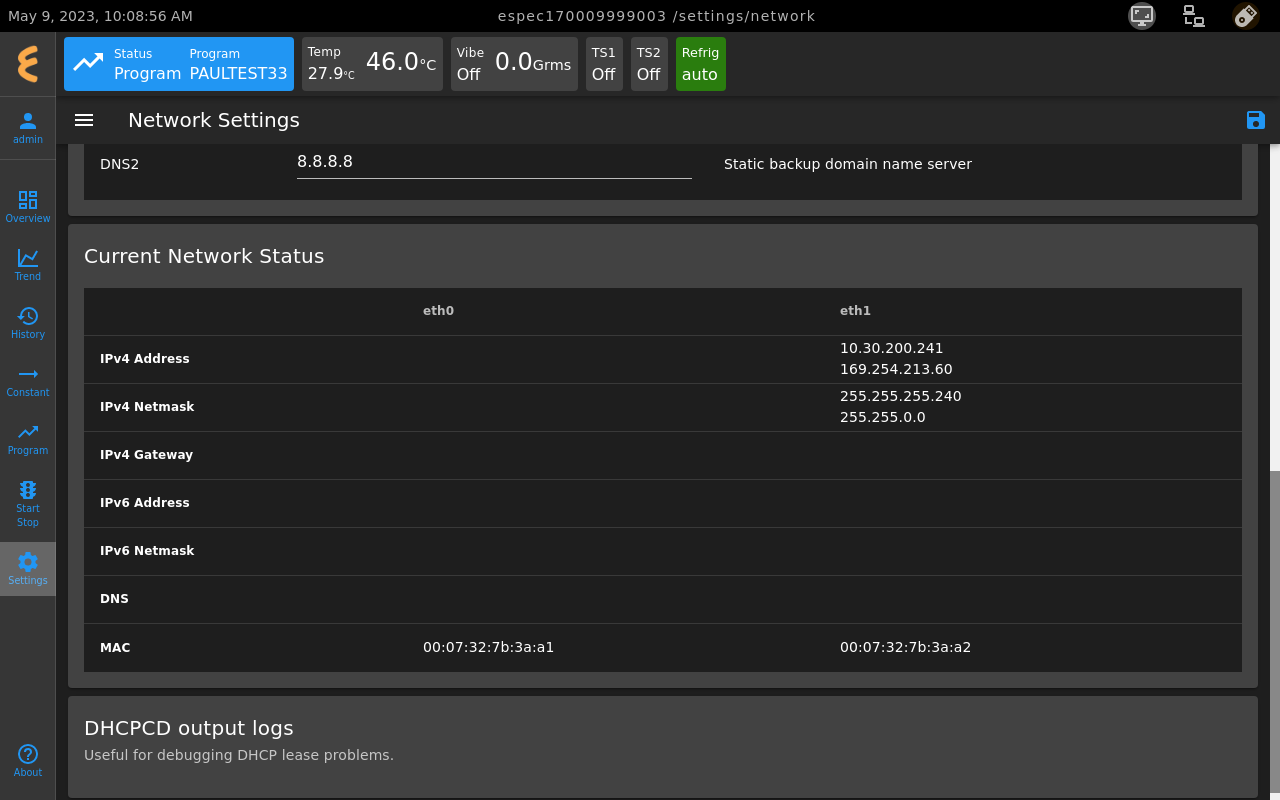
11.12.2 Set Hostname
A unique and descriptive hostname for EWC may be configured by editing the Hostname field. Complete the following steps to set a new hostname:
- Click Hostname field.
- Delete the existing hostname.
- Enter a desired hostname (using alphanumeric).
-
Click the Save button as shown in the following figure.
The setting will take effect immediately after the Save button is applied. It will then try to resolve and refresh the Web page. However, if EWC was accessed via its now old hostname, it may not be able to resolve and refresh the Web page. If the Server is Offline message (shown in the figure) took more than several minutes, a new Web browser (or tab) is required to access EWC via its new hostname.
11.12.3 Set Static Network
A static network configuration can be accomplished by unchecking the DHCP box and entering a desired IP address and its static protocol settings, which includes the appropriate Subnet Mask (or Net Mask), Gateway and DNS values specific to the Network Class (such as, Class A, B or C).
- Uncheck the DHCP box.
- Enter a desired IP address.
- Enter the appropriate Net Mask.
- Enter the appropriate Gateway.
- Enter the appropriate DNS1 and DNS2.
- Click Save to apply the setting.
EWC first validates the new settings before it applies them. after validation, EWC immediately applies the new settings. It will then try to resolve and refresh the Web page. If EWC was accessed via its IP address (which is now obsolete), it may not be able to resolve and refresh the Web page. If the Server is Offline message took more than several minutes, open a new Web browser (or tab) and navigate to EWC via its new IP address (step 2 above). The following figure depicts an example of a static network setting.
WARNING!: EWC has and uses its own predefined static IP network (called fallback static network) based on a Class C configuration. If you decide to stop using the above static network setting, it is highly recommended to reset the fallback static IP address to EWC's predefined setting. To do this, complete the following procedure to revert EWC back to its fallback IP address:
- Check the DHCP box.
- Enter 192.168.0.83 in the IP address field.
- Click Save to apply the setting.
This configuration will ensure two things: 1. When EWC connects to a DHCP network, it will be able to join it with a new leased IP address assigned by the DHCP server. 2. When EWC connects directly to a PC, it will use its expected fallback static IP address (192.168.0.83).
11.12.4 Set DHCP Network
If EWC has been configured to use a static IP address, as shown in the following figure, it is possible to revert the setting back to DHCP.
Complete the following steps:
- Enable the DHCP box with a check mark.
- Click the Save button.
The system moves immediately to apply the setting. The Server is Offline message appears while EWC tries to resolve and refresh its Web page. If the Server is Offline message took more than several minutes, a new Web browser (or tab) is required to access EWC via its hostname.
11.12.5 Fallback Static IP
As discussed in the Initial Setup and First-Time Use section, EWC applies a DHCP protocol as its default setting. In the absence of a DHCP server, EWC falls back to use its preconfigured static IP address based on Class C network protocol:
- IP Address: 192.168.0.83
- Subnet Mask: 255.255.255.0
- Gateway: 192.168.0.1
However, if your EWC has been configured to use a static IP address, as described in the previous section, when connected to any network (static or DHCP), EWC will continue to use the static IP address previously configured by you. That is why it is important to revert your EWC back the DHCP mode before moving it to a new network so that if or when it connects to any network, it will be able to join a DHCP network or use its fallback static IP address.
11.13 Server Settings
The Server Settings page is the ``flight control center'' for EWC, where the entire set of operations and system processes can be monitored, managed and controlled. This page contains a long list of different groups of services to support EWC maintain a smooth operation. Different services are categorized as tabs in the service bar (indicated by the arrow in the figure).
By default, the Server Settings page displays the Server tab (see the following figure) that provides the status of hardware and software resources of EWC, grouped into five separate panes: (1) Processor, (2) Memory, (3) Storage, (4) Processes and (5) Miscellaneous.
The Processor pane provides a quick summary of the CPU clock speed, its status and current utilization. Available physical memory (called RAM) displayed in the Memory pane can be used to assess EWC's performance if it suddenly becomes non-responsive.
Information about the embedded system and EWC itself is revealed in the Storage pane which lists the partitions and their current usage. The embedded system is kept secured with the root partition (called /) mounted as read-only, designated under the Mode column as RO. The first root partition being used by the embedded system is /dev/mmcblk0p2. The second root partition (inactive and thus not listed) uses /dev/mmcblk0p3 as its device name. This partition will be used to perform a system update to switch EWC to run on it upon a successful update; and the process perpetuates between /dev/mmcblk0p2 and /dev/mmcblk0p3 indefinitely for as long as update requires.
Data collected from the chamber will be stored on a separate storage device with 8GB of storage capacity mounted as /appdata. An operator can use this information to determine when the logged data will use up all the available storage space and when it should be deleted to free up storage space. EWC also monitors the size of the data file to ensure there is always enough storage space for it.
A list of different services (i.e., processes) is depicted under the Processes pane, showing all currently running processes that are supporting EWC and its operations. All of which are being managed (or controlled) by the services in the SERVICE tab. The Miscellaneous pane keeps a log of EWC operation, such as uptime or downtime.
The second tab in the service bar is SERVICE API-CHAMBER. This tab (indicated by the arrow) manages a process called wsgi which is responsible for defining a standard interface for communication between an application or framework and a web server. It basically defines an API interface to support other protocols.
Over time, disruption by various conditions may affect these services. Sometimes, a certain set of services (called daemons) running in the background may get interrupted or hung and must be restarted to bring them back to normal operation. Individual services that hang can also be restarted. To help manage these services, the Server Settings page has three buttons (indicated by the arrow in the upper-right corner) labeled and described as follows:
-
Download Service Logs: To help the operator determine issues related to the performance of EWC, these issues are collected and stored as service logs. To download service logs, click the Download Service Logs button. The log file (named response.html) will be stored in the Downloads folder which can be viewed using a Web browser, as depicted in the following figure.
-
Factory Reset: This button will reset EWC to its factory setting.
-
Restart Services: If any service got hung, this button can restart all the affected services by initiating all services in the proper order to restore operation.
-
Reboot Server: Rebooting EWC will be the last resort when individual services cannot be restarted in the proper order to restore operation.
11.13.1 Restart Services
EWC has a list of different services (called daemons) running in the background to manage the overall operation of the system. These daemons caused by various conditions may stop running to provide the service, such as losing connection with the chamber. When that happens, that particular daemon responsible for maintaining connection to the chamber can be restarted without rebooting EWC.
When an error has occurred, EWC flags that error message in the status bar and a pop-up error message at the bottom of the main display, as depicted in the following figure.
The pop-up error message can be expanded (via the + button) to reveal detail of the actual error. As depicted in the following figure, EWC has lost communication with the chamber; this error must be resolved before EWC can resume its operation.
The Server Settings page is the place to look for the culprit.
- Log in as admin.
- Click Settings in the menu bar.
- Click Server Settings under the System Settings group in the submenu.
- Click each tab in the service tab to view any error messages.
The SERVICE BROKER, whose job is to monitor the communication status between EWC and the chamber, has reported a communication error, as depicted in the following figure.
This error causes a chain reaction on other daemons, such as SERVICE API-CHAMBER which prevents EWC from "controlling" the chamber, SERVICE TASKS which monitors and manages different tasks. The error message reported by the SERVICE BROKER indicated a timed out error. That error was echoed in the SERIVCE API-CHAMBER, as depicted in the following figure.
The issue illustrated here is caused by a loss of communication/cable connection. To re-establish communication between EWC and the chamber, complete the following steps:
-
Check for loose cable connection between EWC and the chamber.
-
EWC will reestablish connection with the chamber automatically, as depicted in the following figure.
Depending on the type of chamber (such as T-series) EWC resumes its operation in Standby mode; other may resume according to the status of the chamber itself.
If the above procedure did not work, the affected services need to be restarted by applying the Restart Services (cycle) button in the upper-right corner. In most cases, for a system such T-series or F4T chamber, restarting a network connection is all that is needed to get EWC and chamber working again. It is rare that other services become corrupted and stop working for no reason.
11.13.2 Reboot Server
Sometimes, certain services may stop working and refuse to respond to the restart request. In this case, rebooting EWC is the only option to bring the entire system back to normal operation.
The following procedure is an example of restarting EWC on the T-series chamber.
-
Click the Reboot Server button and click Yes.
-
Reboot action will commence as depicted in the following figure.
-
If EWC is not back online, after 3-5 minutes, refresh the Web page or open a new Web browser to access EWC on the new page. Upon refreshing the Web page, EWC is back online.
11.14 User Settings
The User Settings submenu allows the system administrator to manage user accounts and access privileges on EWC. The layout of the User Settings is depicted in the following figure.
The UI and nomenclature of the User Settings are described as follows:
-
Show/Hide: The Show/Hide button can be used to show or hide the Settings submenu. As illustrated in the above figure, the Settings submenu is hidden. Click this button to show the submenu in order to access other submenus from the list, as depicted in the following figure.
-
Username: All accounts with username on EWC are listed here.
- Password: The password field(s) can be used to reset a password or create a password for a new account (to be explained below).
- Access Privileges: Different privileges can be assigned to each account on EWC. These policies are applied to the accessibility on the menus in the menu bar. A user can be granted access to these menus as No Access, Read Only and Read Write.
- ADD: The ADD button can be used (by the administrator) to add/create a new account.
- Delete: To delete a user account, click the trash bin to the right of that user account (on the same row).
- Save: Use this button to save the current settings as well as new accounts just created.
11.14.1 Add User Account
Complete the following steps to create/add a new user account. Refer to the following pictorial diagram for detail.
- ADD: Click the ADD button (shown in the above figure).
- Username: Enter username under the Username column.
- Password: Enter the password for this user in the Password fields (twice).
- Access Privileges: Click and select access privilege (No Access, Read Only, Read Write) for each menu. Repeat the process for the rest of the menus.
- Save: Click the Save button at the upper-right corner to save the settings.
This new account will be available for use immediately after the Save button is applied.
12 About
The last menu of EWC in the menu bar is the About page. It provides information about the EWC software, its version number, terms of service to end-users, online manual, ESPEC software support and download options.
12.1 LEGAL
By default, the menu opens and displays the LEGAL tab that provides an overview of the software license, its legal aspect, and its practical application and usage that all end-users must acknowledge and abide to in order to use the product. Important notes are outlined as follows:
-
LEGAL: The LEGAL tab consists of a one-page view containing complete information of EWC software, version number, registration information, chamber, and license for end-users (customers). The bottom portion of this page contains user agreement and terms of service, a list of different modules and functions used in EWC software which are governed by various license terms. End-users are encouraged to view this page in its entirety, including the respective licenses applied to each of them. This page implies that, by using this software (i.e., EWC), end-users have read, understood and accepted all the terms outlined herein.
-
User's Manual: EWC User's Manual is available in two different formats: (1) online and (2) PDF. Item 5 (below) provides a link to the fully online manual on the Internet (hosted by bitbucket via the wiki public access). The PDF format is available under this tab. Users can browse through the table of contents to select and view a specific section or chapter regarding a particular topic.
-
EWC Version: This firmware version number can be used to check against the current release of EWC by ESPEC to ensure your system is current and up to date. This firmware can also be used to check against the original version shipped with the chamber (see Item 7).
-
New Features: After a software update/upgrade, a quick flash video pops up to highlight the new features on the system, as depicted below. This flash video can be launched again any time by its link.
-
Support and Download Page: If your EWC has access to the Internet, this link points to ESPEC website that provides support for software download and other requests. Note: On a touchscreen (HMI), this link is blocked (inoperative), even when the system (EWC) has access to the Internet.
-
Firmware Information: This section displays a number of important pieces related to our EWC, which includes package name of the firmware that was last updated, the time (UTC time) it was last updated, and ID numbers for each package that was/were pushed from the cloud service.
-
Registration Information: The serial number of your chamber is found here, including initial firmware and registration date.
-
Chamber Controller Information: The last section displays information of the chamber, such as part number and PLC ROM.
12.2 MANUAL
The MANUAL tab as depicted in the above figure (item 2) offers an online operation manual of EWC. This User's Manual covers all aspects of ESPEC chambers. When EWC is accessed via a Web browser, the operator can use the Tables of Content on the left, as depicted in the following figure, to navigate through the manual for a specific type of chamber and PLC (indicated by the arrow).
If you have a T-series or custom F4T chamber, on the touchscreen, the manual can be navigated to a specific chamber via the PDF menu properties on the right as shown in the figure by the arrows.
Updated


