Wiki
Clone wikitutorial-edinburgh2016 / Applications / Applying CoCo-MD to BPTI
Introduction
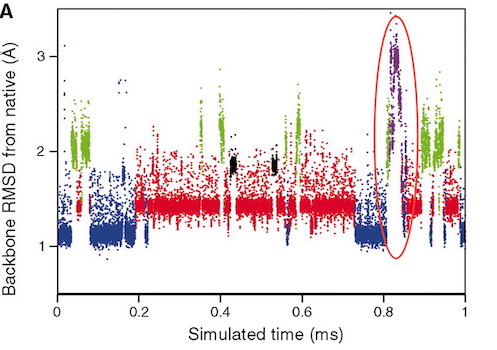
In their 2010 Science paper, the Shaw group describe a 1 millisecond MD simulation of BPTI. Remarkably, after 800 microseconds they observe a novel transition in the structure to a new local minimum, which it stays in for about 20 microseconds before reverting to the more commonly-sampled states (see Figure 4A in the paper, reproduced below).
 |
 |
|---|---|
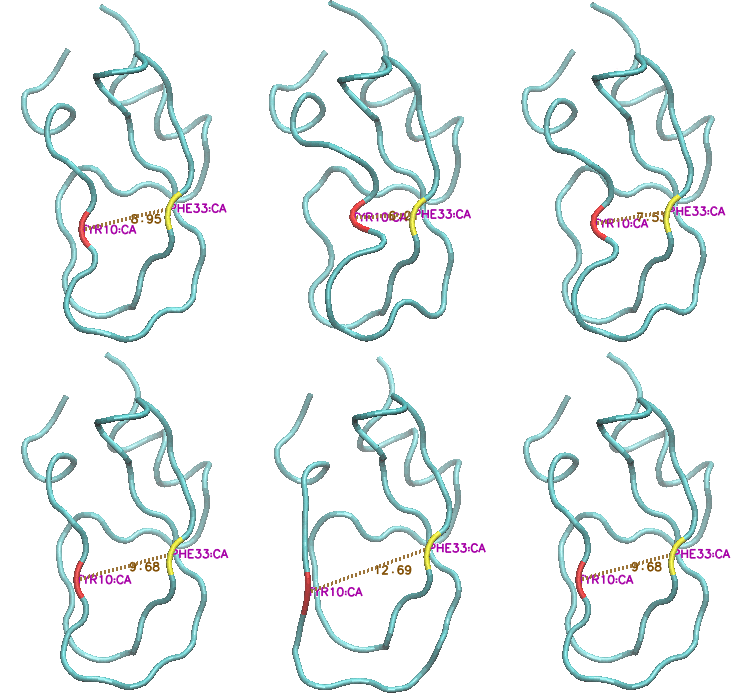
This state is characterised by a major increase in the solvent-exposed surface area, as the protein 'uncurls" and residues Y10 and F33, in particular, move far apart from each other (CA-CA distance increasing from c 9 angstroms to c. 15 angstroms).
The question is, could enhanced sampling methods such as CoCo-MD reveal such states more quickly? In this part of the workshop you have the opportunity to practice adapting the ExTASY workflows to tackle new problems such as this.
NB: we assume a good level of familiarity with GROMACS in this tutorial
Start point: the Gromacs-CoCo workflow for alanine pentapeptide
If it's not already installed for you, the tutorial data is available here
In the folder ./gmxcoco-ala5-on-stampede you will find the ExTASY workflow for CoCo-MD enhanced sampling of the alanine pentapeptide. This is the Gromacs-based equivalent of the Amber-based workflow you studied earlier.
To remind you, the key steps in the workflow are as follows:
- An initial ensemble (which might actually just be a single structure) is analysed by CoCo and N new structures, representing so-far unsampled regions of conformational space, are generated.
- These N new structures are geometrically approximate, so cannot be used immediately to start new rounds of simulation. There is therefore a (in the Gromacs case) two-stage relaxation/equilibration process, where each CoCo-generated structure is used as the target for restrained energy minimisations, begun from a separate, well-equilibrated, conformation.
- Once equilibrated, the 'production' MD is run.
- The trajectory data is added to the growing ensemble, and the workflow either ends or goes back to step 1.
Key data files
In the directory ./inp_files you will find all the input files required for this workflow. They are:
grompp-em1.mdp: .mdp file for the first energy minimisation stage.grompp-em2.mdp: .mdp file for the second stage of restrained energy minimisation.grompp-verlet.mdp: .mdp file for the 'production' MD (implicit solvent).helix.gro: initial coordinates for Ala12tool.top: Gromacs topology file for the system (just protein - using implicit solvent)posre.itp: itp file defining those atoms (actually, all of them), included in the restrained EM stages.
In the directory above are the resource and workflow configuration files (stampede.cfg and gmxcoco.wcfg respectively), and the actual ExTASY workflow python script (extasy_gmxcoco.py). This last, in turn, loads definitions of the custom simulation and analysis kernels from the directory kernel_def.
Adapting the workflow for BPTI
Initial considerations
The Ala5 workflow uses an implicit solvent model, but we will simulate BPTI in explicit solvent, so there will be significant changes to several stages in the workflow:
- Not every atom in the system will be used for the CoCo analysis - we will just use protein heavy atoms.
- The equilibration process will need to be significantly adapted. Because of solvent viscosity we will need to replace the restrained energy minimisation steps with restrained MD steps to ensure the correct starting structure for the production MD is generated. The restraints will need to be on exactly the same atoms used in the CoCo analysis.
However, because of the flexibility of the ExTASY workflow approach, no adaptations will be required to any of the python scripts.
The BPTI workflow
In the directory ./gmxcoco-bpti-on-stampede you will find a prototype workflow based on the considerations above. First have a look at the files in the inp_files directory.
- As a sign of their generality, the three .mdp files are now just called
run1.mdp,run2.mdp, andrun3.mdp. Run1.mdpdefines a restrained MD stage. Note how the file includesposre_10.itp, which in turn defines position restraints on all protein heavy atoms.Run2.mdpis very similar, but includes a different restraints file,posre_100.ip, with larger force constants, to finalise the process of molding, through restraints, the initial protein conformation to that suggested by CoCo.Run3.mdpdefines the 'production' MD run. You will see that, to keep the turn-around reasonable for this demonstration, these MD runs are shorter than they probably should be.
Now in the directory above, examine the resource configuration file - stampede.rcfg. You will see that the only change is to increase the size of the pilot job, to 128 cores.
Examine the workflow configuration file, gmxcoco.wcfg. As an exercise, we leave it to you to compare with the corresponding file from the Ala5 workflow and see the changes.
Refining the BPTI workflow
Feel free to tinker with the configuration and input files. You might feel that the .mdp files could be improved. You might want to think about how many cores you would want to run each simulation job on, and therefore adjust the size of the pilot job and other parameters defined in the configuration files.
Running the BPTI workflow
The workflow is run just by executing the file runme.sh. Depending on the system load, and changes you might have made to simulation parameters, the job might take a fair time to complete -`if it seems very slow perhaps you would be better off cancelling it, and making some of the MD simulation steps shorter before trying again.
Extension work
- Easy: Adapt the workflow to run on ARCHER rather than Stampede.
- Harder: Adapt the workflow so that the CoCo analysis is based just on BPTI C-alpha atoms. Be aware you will need to adapt the restrained MD steps too for this...
Updated