Wiki
Clone wikinbandroid / Installation
How to install
NetBeans AutoUpdate is the best approach to install NBAndroid plugin into your IDE. It installs everything and also provides a way how to keep it uptodate.
- You will need NetBeans version 7.3 or newer installed (7.3, and 8.0 were tried successfully).
- Java version 7 is required as the JDK used by NetBeans (you can still build your Android applications using older version of Java).
- Android SDK needs to be installed separately too.
Installation using AutoUpdate center
Add updatecenter URL to plugin manager
Open plugin manager. To do this go to Tools | Plugins. Here you need
to navigate to Settings tab and add an address of our update center that
is
- http://nbandroid.org/updates/updates.xml if you use NetBeans version 7.3 - 8.0
- http://nbandroid.org/release81/updates/updates.xml if you use NetBeans 8.1 (or newer)
Previous update center hosted at kenai.com site is removed now as it caused confusion about current version and what is supported and what not.

Tip: keep 'Check for updates automatically' option selected to get the updates.
Tip: latest version compatible with NetBeans 7.2 is available at http://nbandroid.org/release72/updates/updates.xml
Install the plugin
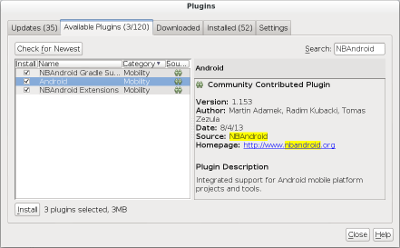
Once the URL is added navigate to Available Plugins tab in the same dialog. Find Android plugin here and select it for installation. Optionally you can install NBAndroid Extensions as well to get some extra functionality. Note that subscription is required to enable features provided by NBAndroid Extensions.

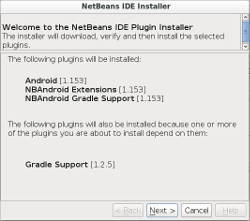
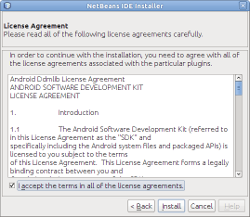
Click Install to initiate the installation. Shortly after you will be guided through a series of steps:
- to confirm selection of plugins to install

- to accept license

- to verify the certificate (the plugin is signed with a certificate that is not trusted).

and finally finish the installation
Installation from downloadable archive
This is an alternative useful if you cannot connect to our download area directly from IDE.
Download a snapshot of project binaries from
archives folder. Then go to
Tools | Plugins | Downloaded and add NBM files from unzipped archive.
The rest is the same as described above.
First Steps
Android SDK Location
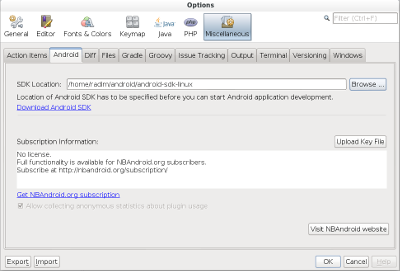
Most of the functionality in Android support requires a path to Android
SDK to be configured. Go to Tools | Options dialog and its
Miscellaneous category. Here you will find Android tab where you can
specify the location of Android SDK.

Note: Android SDK folder is a folder containing SDK tools, platform
tools, and platforms among the other things. It usually contains
sub-folders names build-tools platforms platform-tools tools.
Note: Make sure both Android SDK Tools and Android SDK
Platform-tools packages are installed in your Android SDK. Some SDK
downloads do not contain platform tools and you need to install them.
Simply run $ANDROID_SDK_HOME/tools/android and install it from this
UI.
Subscriptions key
If you've installed NBAndroid Extensions you need to upload subscription key in this dialog to activate the functionality. Of course this is optional.
That's all what you need to configure at the beginning and you are ready to open your existing project or create a new one - Android command line projects are described at http://developer.android.com/tools/projects/projects-cmdline.html
Specifically note that there is no Java platform definition needed or possible. This concept was abandoned a while ago yet there are still some pages and outdated tutorials mentioning this.
Updated