Wiki
Clone wikiscl-manips-v2 / Kuka lwr Operation
These are instructions for running the kuka lwr (i.e., the orange kuka).
Starting up the robot
- Turn the power knob on the control box below the table.
- Watch the control panel and wait for software to start up.
Familiarize yourself with the control panel
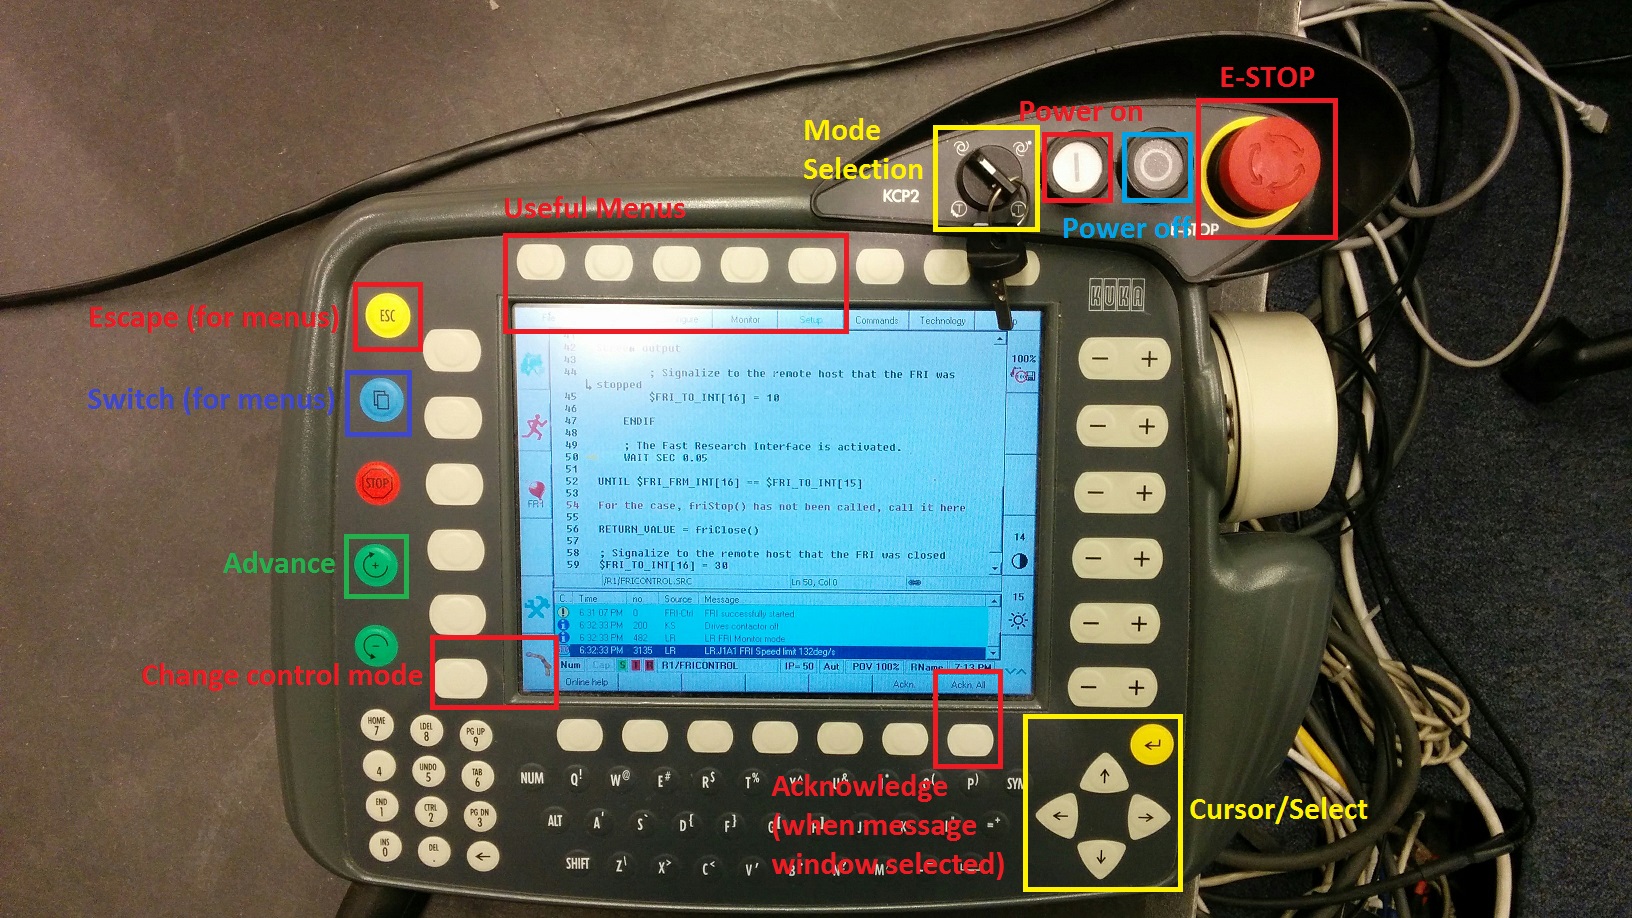
The image below shows the control panel with the essential buttons labelled.

Some explanation of the buttons:
- "Switch" cycles the cursor between the open windows.
- "Acknowledge" clears all the messages in the status window (bottom). It is only available when the status window is selected.
- "Change control mode" changes what control the lwr is running. Unlike the other robots, the lwr can run its own control, and so sometimes we need to set this manually.
- "Power on" turns on the motors at each joint, preparing the robot to run.
- "Power off" is a soft shutoff. HOWEVER, since the brakes in the joints are bad you will usually want to ESTOP.
- "Mode Selection" is the knob which controls how autonomous the system is, i.e., the number of buttons you need to hold/press to run the robot. Keep it pointing to the top-left always.
- "Useful Menus": each button opens a submenu when you click on it. You can select options using the numpad or using the cursor.
- "ESTOP": Not enough can be said about the power of this button. Use it!
Initialize the robot settings
- Acknowledge the warnings to clear the unimportant messages.
- If you see the message "VALIDATE LOADDATA" then it is necessary to change the load settings. Otherwise, continue to the next section.
- Check that the correct tool is selected by selecting Config -> Set Tool under the "Useful menus".
- Set the tool to 1 (the flange adapter) and save.
- From the programs, menu select "validate_loaddata" to run this program.
- Press the "Power On" button, then press the "Advance" button to step through the program. If it seems stuck, it helps to hold the "Advance" button.
- When completed, select "Program" from "Useful menus" and then select the "Cancel program" option.
Connecting to the computer
- Use the "Change control mode" button and set the control mode to "Position".
- Be sure that all the messages are cleared (besides the ones shown below).
- Select and open the program FRIControl.
- Press "Power On".
- Press "Advance" repeatedly until the program gets the the line "Wait 1.0".
- The lwr is now waiting for a connection from the connected computer. You will repeat this process each time you stop the robot (which is frequent).
Setting up the server
- On the lwr PC, go to the directory ~/manips-kuka-lwr-driver/applications-linux/kuka_lwr_shmem_serv.
- After the lwr has reached the line "Wait 1.0", run "sh run.sh". This starts the robot and moves it to a default position. Note, this will often error the first time you run it. In this case, wait for the program on the computer to timeout, and repeat the process (including starting the robot again).
- Watch the output on the control panel. Once it stops and remains at "Wait 1.0" again you are ready to run the client application.
- In another terminal, go to ~/manips-kuka-lwr-driver/applications-linux/kuka_example_app.
- Run "sh run.sh". This starts an example opspace application.
Developing your own app
The easiest way to do this is to copy the kuka_example_app and modify it with your control code.
Updated