Wiki
Clone wikipreside-ext-apple-services / MapkitSnapshots
Generating map snapshots (static map images)
For some applications, you will not need fully interactive maps, but a static map image will suit your purposes. MapKit allows the generation of Snapshots: static maps delivered as PNG images.
The extension provides a simple helper to create a snapshot object which can then be configured (and validated!). The snapshot can then either output a unique URL to embed that image on your web page, or retrieve the image binary which you can then save as an asset for use later.
Usage
The mapkitSnapshot() helper returns a newly-instantiated Snapshot object. This has a number of setter methods which allow the snapshot parameters to be set, and these setters can be chained as shown in the example below.
At its most basic, you need to provide a size for your image (any size between 50x50 and 640x640), and a centre point (a comma-separated string in the format lat,lng or other coordinate format):
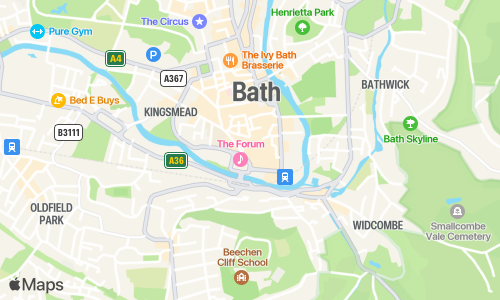
snapshot = mapkitSnapshot()
    .setWidth( 500 )
    .setHeight( 300 )
    .setCenter( "51.379053,-2.359723" );
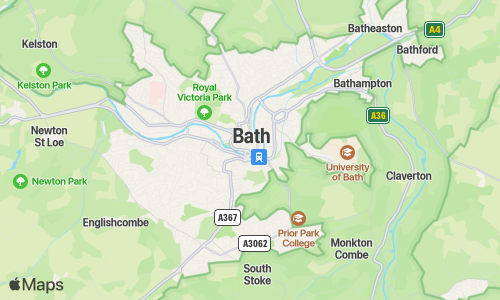
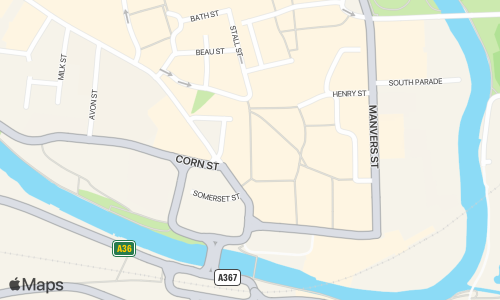
You now have a map snapshot object (this one is centred on Bath, UK), from which you may either get the URL or retrieve the image as a binary:
snapshotUrl    = snapshot.getUrl();
snapshotBinary = snapshot.getBinary();
Setter methods
.setWidth()
An integer pixel width (between 50 and 640) for the generated snapshot.
snapshot.setWidth( 600 );
.setHeight()
An integer pixel height (between 50 and 640) for the generated snapshot.
snapshot.setHeight( 600 );
.setScale()
An integer scaling value, one of 1 (default), 2 or 3. Use for generating an image for use with Retina or hi-dpi displays.
For example, setting a scale of 2 for a 400x400 snapshot will return an 800x800 image, which can then be displayed on your webpage at 400x400 to give high-resolution imaging.
snapshot.setScale( 2 );
A 300x200 map at scale 1 (88kB):
A 300x200 map at scale 2 (actual size 600x400, 217kB):
A 300x200 map at scale 3 (actual size 900x600, 339kB):
.setCenter()
Set the centre-point of the map. This can be any of:
- A coordinate value, as a comma-separated string in the format
lat,lngor other coordinate format - A text address, which will be geocoded to the appropriate map location
- The special value
auto, which will centre the map to fit any annotations and overlays that have been defined.
snapshot.setCenter( "51.179070,-1.826204" );
snapshot.setCenter( "10 Downing Street, London" );
snapshot.setCenter( "auto" );
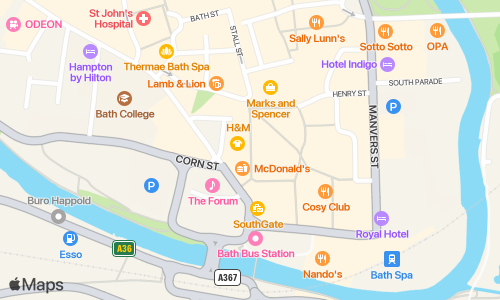
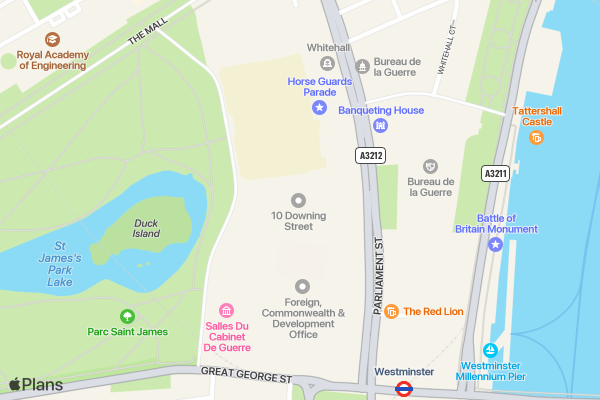
For instance, this map is centred on the text address "10 Downing Street, London":
.setZoom()
A number between 3 and 20 (decimals are permitted) which sets the zoom level of the map. If omitted, the default zoom level is 12.
Will be ignored if using auto to center the map, or if you have set a span.
snapshot.setZoom( 18 );
Default zoom level (12):
The same map, with zoom level set to 14:
.setSpan()
A comma-separated string of latDelta,lngDelta - defines how many degrees of latitude and longitude should be displayed around the map's centre.
- The
latDeltamust be a positive number between 0 and 180 - The
lngDeltamust be a positive number between 0 and 90.
Setting a span will override any zoom level you have set.
snapshot.setSpan( "0.5,0.5" );
The same map, but with a span of 0.2,0.3:
.setType()
The type of map to generate. The four possible values are:
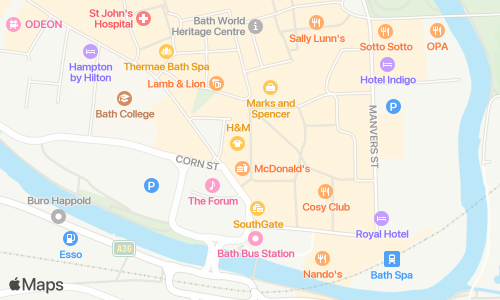
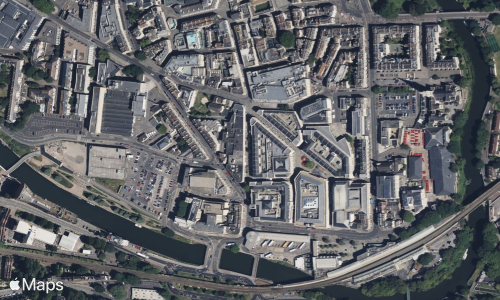
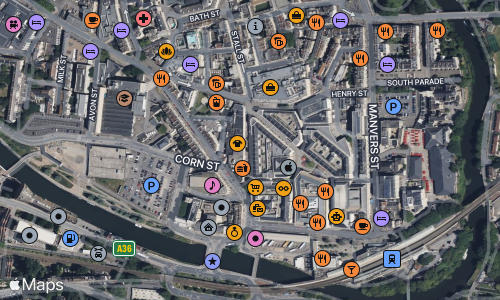
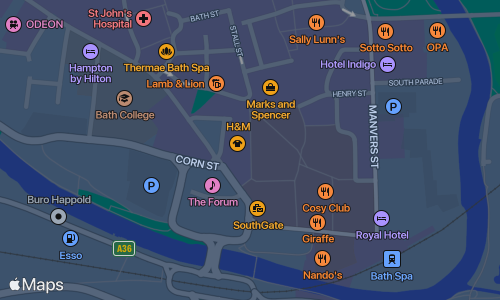
standard(default): a street map that shows the position of all roads and some road nameshybrid: a satellite image of the area with road and road name layers on topsatellite: a satellite image of the areamutedStandard: a street map that emphasizes your data over the underlying map details
snapshot.setType( "hybrid" );
Four different views of the same map: standard, mutedstandard, satellite, hybrid:
.setDarkMode()
A boolean value. If set to true, the map will be generated with a dark background colour scheme. By default, dark mode is not enabled and standard light maps are generated.
snapshot.setDarkMode( true );
.setShowPoi()
A boolean value. If set to false, the generated map will not show points of interest (default is true).
snapshot.setShowPoi( false );
.setLanguage()
The language that is used for labels on the map and the Apple Maps attribution. Supported values are locale IDs, such as en-GB or es-MX, or simple two-letter language codes, such as fr or de.
snapshot.setLanguage( "fr-CA" );
(Note that not all points of interest will have a translation.)
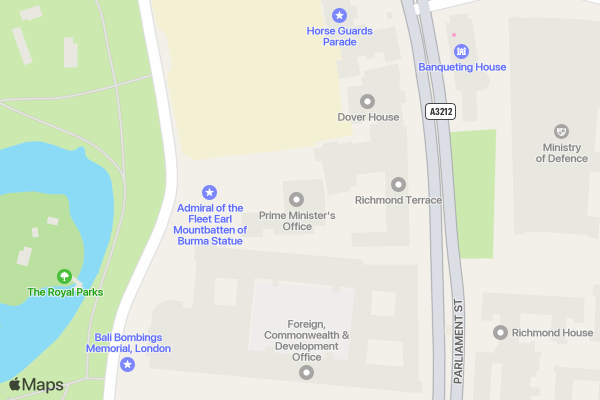
Annotations
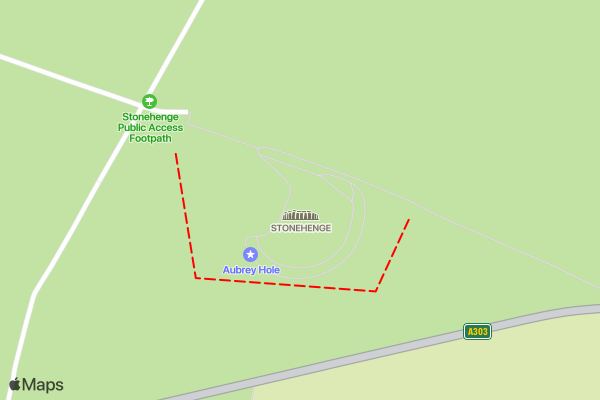
Annotations, or markers, can be placed on the map using the addAnnotation() method, which takes four arguments. You may add multiple annotations.
point(required): a comma-separated string in the formatlat,lngor other coordinate format at which to place the marker. May also be a text address, or the valuecentertop place the marker at the map's centrecolor: a hexadecimal value (without the#) or HTML colour name, setting the colour of the markermarkerStyle: the style of the annotation's marker, one ofdot,balloon,largeorimgglyphText: a single alphanumeric character from the set{a-z, A-Z, 0-9}, displayed inside the annotation. If the annotation has adotorimgmarkerStyle, the API ignores this parameter
NOTE: the
imgmarker style is not yet supported by this extension
snapshot
    .setCenter( "51.179070,-1.826204" )
    .addAnnotation(
          point       = "center"
        , color       = "rebeccapurple"
        , markerStyle = "large"
        , glyphText   = "1"
    )
    .addAnnotation(
          point       = "51.179070,-1.826204"
        , color       = "darkgreen"
        , glyphText   = "2"
    );
This map shows the Stonehenge site, with markers showing the monument (1) and the visitors' centre (2):

Overlays
Annotations, or markers, can be placed on the map using the addAnnotation() method, which takes four arguments. You may add multiple annotations.
points(required): an array of comma-separated strings in the formatlat,lngor other coordinate format which define the polyline points. May also be provided as a string encoded with the Encoded Polyline Algorithm FormatstrokeColor: a hexadecimal value (without the#) or HTML colour name, setting the colour of the line between each pointlineWidth: the width of the line, in CSS pixelslineDash: an array that defines a line's dash pattern, where numbers represent line and gap lengths in CSS pixels. For example, `[ 10, 5 ]`` means draw a line for 10 pixels, leave a 5-pixel gap and repeat. The default (an empty array) draws a solid line.
snapshot.addOverlay(
      points      = [ "51.17969,-1.82887", "51.17802,-1.82844", "51.17784,-1.82458", "51.17886,-1.82383" ]
    , strokeColor = "990000"
    , lineWidth   = 3
    , lineDash    = [ 10, 5 ]
);
Validation
The snapshot can be validated to ensure the parameters it has been provided are not invalid.
There are two methods:
.validate()
Returns a boolean, true if the object's parameters are valid, false if they are not.
isValid = snapshot.validate();
.getErrors()
Returns an array of error messages detailsing which paramters are invalid, and why.
snapshot = mapkitSnapshot()
    .setWidth( 800 )
    .setHeight( 480 )
    .setScale( 4 )
    .setCentre( "51.179070,-1.826204" );

errors = snapshot.getErrors();
Would return the following array:
[
      "Width must be an integer in the range 50 to 640. Actual value: [800]"
    , "Scale must be one of 1, 2 or 3. Actual value: [4]"
]
Generating snapshots
There are two methods which can be used to turn your snapshot object into an actual image.
.getUrl()
This method will build, sign and return the URL to the snapshot image.
It may be given an optional expiresIn argument, which should be a timespan. If provided, the URL will be valid only for that period of time. The default is 20 minutes.
Setting a longer expiry (or retrieving the image and storing it locally) should be considered if your page is cached for any period of time.
// Get the URL with the default 20 minute expiry
snapshotUrl = snapshot.getUrl();

// Get the URL with an expiry of 7 days
snapshotUrl = snapshot.getUrl( CreateTimeSpan( 7,0,0,0 ) );
.getBinary()
Builds the URL and immediately retrieves the generated image, returning it as a binary.
This could be coupled with AssetManagerService.addAsset() to store a local copy of the generated map for future use (and to reduce traffic to the API).
mapImage = snapshot.getBinary();
Updated