Wiki
Clone wikiRealSense for Singularity / Home
TOC
What is this?!?
This is an experimental version of the Singularity viewer for Second Life and OpenSim virtual worlds, extended to support Intel's RealSense technology.
If you have never used a Second Life / OpenSim viewer before, you may want to watch this brief (< 3 minute) introductory video. The buttons and menus seen in the video differ from Singularity's, but those are cosmetic differences. A more detailed, written introduction, with screenshots of the "classic style" user interface favored by Singularity, is here.
!!! IMPORTANT !!!
RealSense functionality is disabled by default. To enable it, you need to open the viewer's RealSense Setup dialog. To do so, you can:
- Use the keyboard shortcut Ctrl-Alt-Shift-R.
- Use the main menu (1): click Edit | RealSense
- Use the main menu (2): click Edit | Preferences to open the Preferences dialog, select the "Input & Camera" tab, then click the "RealSense Setup" button at the bottom of the dialog.
Either way, you should get a tabbed dialog with RealSense options:
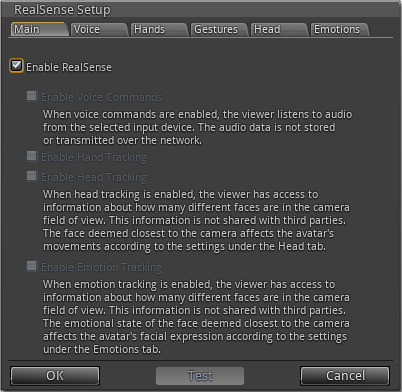
Check "Enable RealSense" under the Main tab. Click the OK button at the bottom of the dialog to actually enable RealSense (changes to settings are not committed until you click Apply or OK; they are not saved unless you click OK).
If you haven't logged in to a virtual world yet, the "Enable RealSense" checkbox is the only available control. All other settings are account-specific, so you can have a different RealSense profile for each virtual world account. You must be logged in to an account in order to see and edit its RealSense settings.
The "Enable RealSense" setting is global, i.e. it applies to all virtual world accounts. This allows RealSense to be disabled from the login screen, before it can have any effect on your online presence.
RealSense functionality is also automatically suspended when the viewer loses input focus. This simplifies switching to and from other applications featuring e.g. speech recognition, and can be useful for keeping your avatar from going on a rampage whenever you turn around to face somebody else in the room.
Where to go
- If you are new to Second Life and OpenSim, the easiest option is to set up a free Second Life account and go through the orientation for new users with the expected controller (your keyboard) before enabling the viewer's RealSense support.
- There are also many OpenSim-based worlds (commonly referred to as "grids") where you can create a free account. The following are all hypergrid-enabled, i.e. they support "teleporting" between different grids, including ones where you do not have an account. It is therefore sufficient to sign up for one to visit them all, and many more; some of the most interesting OpenSim destinations are only accessible through the hypergrid:
- http://hypergrid.org/ (English & German)
- http://www.osgrid.org/
- http://lpgrid.com/
- http://lfgrid.com:8002/wifi
- http://www.craft-world.org/ (English & Italian)
- https://www.jogrid.net/wi/?lang=en(English & Japanese)
- http://dorenas-world.de/ (German)
- http://vibe.bio-se.info/
- If you want full control, you can run your own OpenSim server. A particularly convenient option is to get a ready-to-run virtual machine (for VirtualBox and VMWare Player) with lots of avatars and content.
RealSense features
When you are logged in to a virtual world (see !!!IMPORTANT!!! above) you can:
Check "Enable Voice Commands" on the RealSense Setup dialog's Main tab
This activates a large number (> 900) of default voice commands mapped to avatar and user interface actions. Simple examples are "Go", "Run", "Climb", "Descend", "Stop", "Left" and "Right" to move around; and "Chat", "Friends", "Minimap", "Map", "Teleport history" and "Build" to toggle (open and close) common dialogs.
You can also define your own voice commands. This is done under the Voice tab, where you can also select input device, temporarily pause command processing, adjust audio input level and set the confidence threshold above which recognized commands are acted upon:

Each voice command definition consists of a triggering sentence, an action to be performed when the sentence is recognized, and an optional argument (more on actions and arguments below). Double-click a command in the list at the bottom of the dialog to load its definition into the edit fields above the list; click the "Add to list" button to turn the contents of the edit fields into a new voice command and append it to the list.
Click the column headers to sort the list on the contents of each column. Be careful with duplicate commands: those only make sense when all but one of them triggers a "XUI click" action, which, in brief, means "simulate a mouse click on the user interface element specified by the argument". When a spoken sentence is recognized, all matching XUI clicks are tried first, until one succeeds or all have failed; if none work (because the associated user interface elements are not currently on screen) the first alternative match is tried. If there is more than one non-XUI click match, there is no telling which one will be triggered.
The default voice command to open the RealSense Setup dialog is "Real sense".
Check "Enable Hand Tracking" on the RealSense Setup dialog's Main tab
This tells RealSense to watch your hands for two things: position and gestures.
Go to the Hands tab to adjust position tracking:
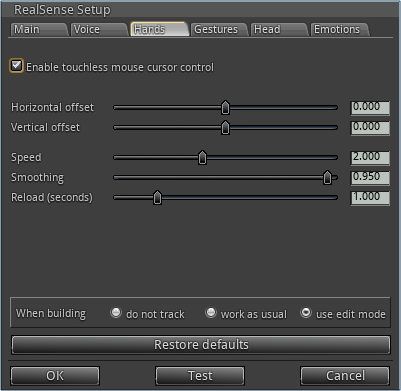
It's convenient to keep "Enable touchless mouse cursor control" checked while doing so. You can then get quick visual feedback on your choice of settings by looking at how the mouse cursor tracks your hand movements. Too jittery? Increase Smoothing. Too slow? Increase Speed.
The Reload slider arguably crosses the line into the next tab: it determines how many seconds must pass before an action triggered by a hand gesture can be triggered again. This is particularly useful for simulated clicks, drags and keystrokes, which can be fired in rapid bursts (e.g. causing a dialog to open and close repeatedly) without such a delay.
Gestures recognized by the RealSense camera are mapped to actions according to the settings under the Gestures tab:
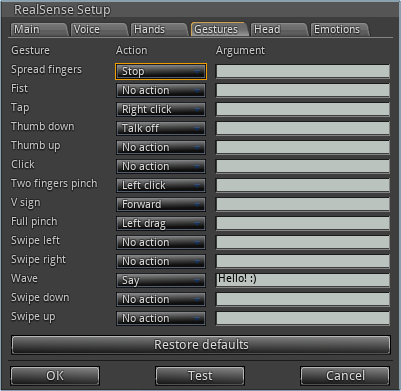
The principle is the same as for voice commands: for each hand gesture there is an associated action which may take an argument. Hand gestures have the same action palette available to them as voice commands.
Check "Enable Head Tracking" on the RealSense Setup dialog's Main tab
This lets you control your avatar's orientation (by turning your head, a.k.a. yaw), sideway movement (by tilting your head; roll) and vertical movement (pitch: look up to jump, more to fly; down to crouch or fly down).You may need to adjust the Offset values under the Head tab, depending on your position relative to the camera:
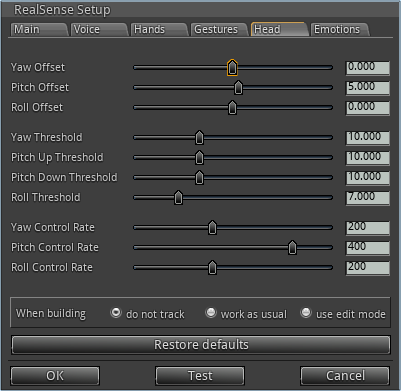
For instance, if the camera is looking down at you from the top of a large desktop screen, it may think that you are looking down when you are actually looking straight ahead, causing your avatar to crouch, so you may want to add a compensating positive offset (positive pitch is up; all offsets and thresholds are in degrees).
The Threshold levels under the Head tab determine how far you can turn your head without affecting your avatar. You don't want them to be too small, or you'll have to hold perfectly still to avoid jittery movement; you also don't want them to be too large, or you'll have to turn your head so much that the camera starts losing track of your face.
When adjusting offsets and thresholds, it can be helpful to open a RealSense Camera View window. It displays the visible light image seen by the RealSense camera and can be toggled on/off with the keystroke Ctrl-Alt-Shift-V, from the main menu (View | RealSense Camera View) or, when default voice commands are enabled, by saying "Camera":
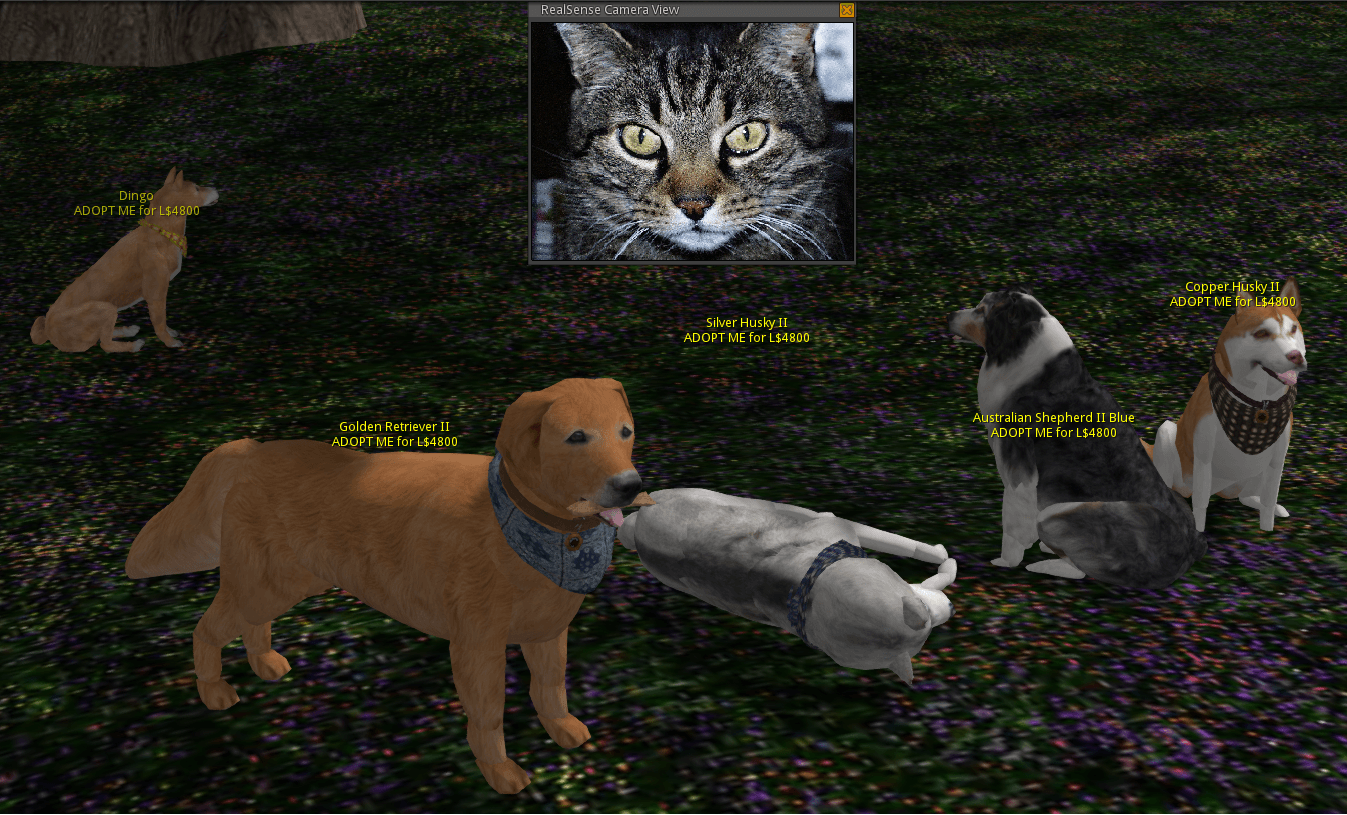
Head tracking or Emotion tracking must be enabled, or there will be nothing to display. Hand tracking does not use visible light.
The Control Rate settings under the head tab are rough gauges of responsiveness: make them larger and the avatar will be nudged more frequently (in Second Life and OpenSim, avatars don't move continuously; they are "nudged" around in small steps). You can think of them as amplification factors. The further you go beyond a threshold level, the faster the rate becomes at which the avatar is nudged. The Control Rate determines how fast the avatar is nudged at a given angle above threshold.
Check "Enable Emotion Tracking" on the RealSense Setup dialog's Main tab
This causes emotions inferred from your facial expression to trigger animations on your avatar, according to the settings under the Emotions tab:
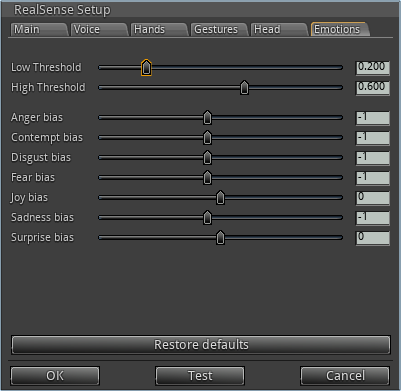
The Low Threshold value determines the minimum intensity at which any emotion is recognized. The High Threshold value determines the difference between frowning (low intensity) and crying (high intensity) for negative sentiment and between smiling (low intensity) and laughing (high intensity) for positive sentiment. You may want to adjust these values depending on how easily the camera seems to pick up your emotions.
The bias settings affect the identification of emotions. You can think of biases as starting scores assigned to each emotion: the highest scoring emotion is deemed dominant, and assigned the highest observed intensity among all emotions. You can use this to map an actual emotion, e.g. joy, into another, e.g. anger: turn the anger bias way up and the other biases way down, and your avatar will look angry when you're smiling and laughing. This can be useful e.g. for roleplaying and machinima.
Remember that changes to settings are not committed until you click OK at the bottom of the dialog. You can abandon all changes by clicking Cancel instead, or restore the default settings specific to each tab by clicking its "Restore defaults" button.
"Enable RealSense" must be checked in the RealSense Setup dialog for the other settings to have any effect.
Actions and arguments
RealSense watches your hands for gestures and listens to your speech for voice commands. Every recognized gesture and voice command is mapped to one of the following actions:
| Again | Repeat the latest action (before the latest Again). Optional argument: number of repetitions (max 10, defaults to 1). |
| Step | Unless sitting or already moving forward, take one step forward. |
| Step back | Unless sitting or already moving backward, take one step back. |
| Forward | Unless sitting or already moving forward, start moving forward. |
| Backward | Unless sitting or already moving backward, start moving backward. |
| Run | Unless sitting, start running. |
| Run back | Unless sitting, start running backward. |
| Stop horizontal | Stop moving (walking, running, flying) horizontally. |
| Left | Turn left (equivalent to hitting the left arrow key once). |
| Right | Turn right (equivalent to hitting the right arrow key once). |
| Turn left | Start turning left (equivalent to keeping the left arrow key down). |
| Turn right | Start turning right (equivalent to keeping the right arrow key down). |
| Stop turning | Stop any ongoing "Turn left" or "Turn right". |
| Slide left | Unless sitting, take one step to the left. |
| Slide right | Unless sitting, take one step to the right. |
| Up | Unless sitting, jump (if standing) or increase altitude one step. |
| Down | Unless sitting, crouch (if standing) or reduce altitude one step. |
| Climb | Unless sitting , start flying upward. |
| Descend | Unless sitting, start flying downward. |
| Stop vertical | Stop any ongoing climb or descent. |
| Fly | Start hovering in place. |
| Stop flying | Unless standing on something, start falling. |
| Stop | Terminate any horizontal or vertical movement, except free fall. |
| Slow | If running, walk. If turning fast, turn slowly. |
| Fast | If walking, run. If turning slowly, turn fast. |
| Talk on | If voice chat is available, start sending audio to it. |
| Talk off | Stop sending audio to voice chat. |
| Dictate | Translate the next spoken sentence to text and paste it into the user interface control with input focus. Abort if the control can not handle text input. |
| Clear | Clear the focused user interface control (e.g. the chatbar). |
| Whisper | Send the argument1 to text chat, visible within 10 meters. |
| Say | Send the argument1 to text chat, visible within 20 meters. |
| Shout | Send the argument1 to text chat, visible within 100 meters. |
| Regionsay | Send the argument1 to text chat, visible within the entire region. |
| Keystroke | Simulate keyboard input (typically user interface shortcuts). Argument: the keystroke to simulate.2 |
| Left click | Simulate a left mouse button click (button down and up) at the current mouse cursor location. Triggered by the default voice commands "Click" and "Do it". |
| Right click | Simulate a right mouse button click (button down and up) at the current mouse cursor location. Triggered by the default voice commands "Context", "Context menu", "Menu", "Pie menu" and "Right click". |
| Left drag | Simulate a left mouse button down event at the current mouse cursor location. Only available when touchless mouse cursor control is enabled. By default, triggered with the "fist" hand gesture. Terminated by performing any other action; convenient choices include Stop and Left click. Can be used to move dialogs around and (with the Focus tool or by holding down the Alt key) to zoom, orbit and pan the camera. |
| Right drag | Like left-dragging, but with the right mouse button. |
| XUI click | Simulate a (left) mouse click on a specific user interface element. Argument: the XUI name3 of the element to click. |
- For actions involving chat (Whisper, Say, Shout and Regionsay) the argument can include a chat channel number, e.g. "/-5 Hello to channel -5" and can be used to trigger complex behaviours by scripted objects (see LSL_Chat and llListen). It can also be used to trigger predefined sequences of animations, sounds and chat (somewhat confusingly also known as gestures). If you are an ordinary user, Second Life handles Regionsay like an ordinary Say (administrators willing to give it a try are welcome to report their findings).
- Keystrokes are written in human-readable form, like "Ctrl-C". Individual keys are separated by hyphens, multiple keystrokes by whitespace; "Ctrl-C Ctrl-P" describes a sequence of two keystrokes. Case is not important (for capital A, use "Shift-A"). There is some tolerance for keyname variations (e.g. "Ctrl", "Ctl", "Control" all work) but try to follow examples known to work (look at default voice commands with Keystroke action). Special characters can be escaped with a backslash ("\" is an escaped space character) or hex-encoded ("0x20" is a hex-encoded space character).
Some convenient default voice commands mapped to key strokes are "Enter" (and the equivalent "Confirm"); "Go up" and "Go down" (up and down arrow keys, good for menus); "More" and "Less" (up and right arrow keys, down and left arrow keys; good for spin boxes and sliders).
Keep in mind that the effect of keystrokes can be mode- and focus-dependent; a certain menu may need to be open, or a certain dialog to have input focus, for a keystroke to work as intended. A XUI click might be a better alternative in such cases. See below.
- XUI is short for "XML User Interface", the file format and framework used by Singularity (and other viewers derived from the original Second Life viewer) to describe their user interface.
One consequence of using XML is that every user interface element can, in principle at least, be identified by an XML path starting at the root view (the main window). In practice, there are exceptions (which could be cleaned up with a moderate amount of work), but it is true sufficiently often to make such paths, known as XUI names, quite useful for identifying user interface elements.
Support for finding the XUI name of a control is built into the viewer. If the Advanced menu is not visible in the main window's menu bar, click Ctrl-Alt-D to enable it, then check the menu option Advanced | XUI | Show XUI Names. With that option checked, hovering the mouse cursor over a user interface element causes its XUI name to be displayed in a tooltip. For instance, the XUI name of the menu item you just checked should be displayed as "/Menu Holder/XUI/Show XUI Names":
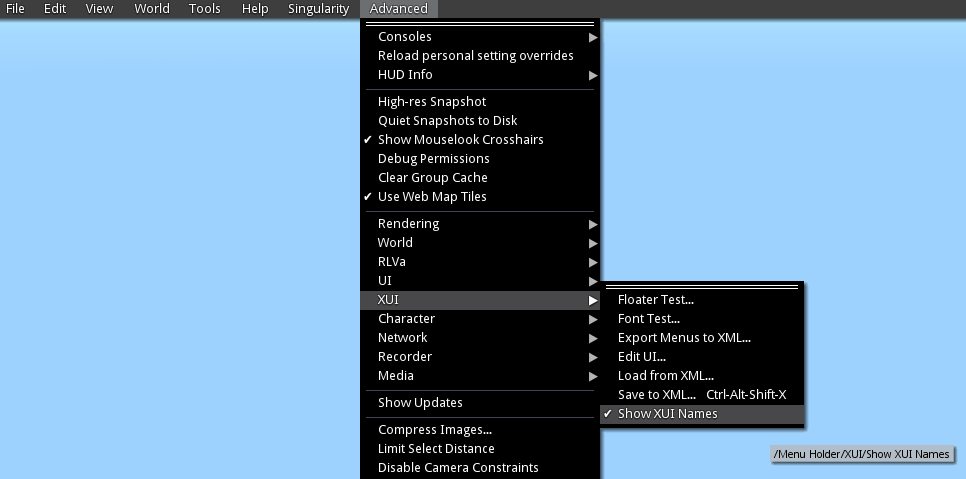
Exceptions to the rule will appear as you hover your mouse cursor over user interface elements which only report a bare XML filename. Such elements are generally not reachable by a XUI click. In such cases, it is sometimes possible to get a usable XUI name by cycling the "Show XUI Names" menu option (uncheck, then check again) while the element is on screen.
With the XUI name of a user interface element in hand, you can generate simulated mouse clicks on that element by triggering a XUI click action with the XUI name as argument. Most default voice commands are defined this way.
A particularly nice property of XUI clicks is that they can be overloaded. As an example, there are six "Cancel" among the default voice commands, all XUI clicks. Closing a dialog and abandoning its contents is a common operation, and having to remember a different "Cancel" command for each possible dialog ("Cancel RealSense setup", "Cancel color selection" and so on) would be unworkable. Instead, when you say "Cancel", the command processor goes through all associated XUI names, longest to shortest, and checks if the specified user interface element is visible and enabled. The first successful match is clicked. Failing that, it uses any other matching action (of which there had better only be one, since only XUI clicks are overloadable; if you use the same voice command for different actions of any other type, there is no telling which one will actually be triggered).
Since longer XUI names are tried first, overloaded XUI clicks will generally go to the last applicable element in a chain of open dialogs, menu items or similar.
Building
When the Tools dialog is open, the viewer is said to be in building mode:

How hands are used in building mode is determined in the "When building" panel at the bottom of the the RealSense Setup dialog's Hands tab. There are three possibilities:
| do not track | Hand positions and gestures are completely ignored. |
| as usual | Hand positions and gestures are treated as usual. |
| edit mode | Hands affect cursor position (if touchless mouse is enabled), but only click and drag gestures work (mostly) as usual; a set of special, built-in gestures supersede all others. |
There is also a "When building" panel at the bottom of the the RealSense Setup dialog's Head tab. It is quite analogous to the one on the Hands tab. When "use edit mode" is selected, moving your head in build mode leaves your avatar unaffected; instead, looking around makes the camera orbit its focus point, moving closer to the camera zooms in, and tilting your head causes the camera to pan sideways. If things get too crazy, you can always get back to normal by clicking the Escape key (or saying "Reset view" when default voice commands are enabled).
To familiarize yourself with edit mode, make sure that it is enabled in the RealSense Setup dialog, then go to a location where building is allowed, e.g. a sandbox in Second Life or your own OpenSim server. If default voice commands are enabled, it's enough to say "Create tool" for the Tools dialog to open and the "magic wand" cursor to appear. Say "do it", and it will create a new primitive object, highlight it and switch the Tools dialog to the Edit tool.
- With the object highlighted and the Edit Position tool selected, as in this screenshot,
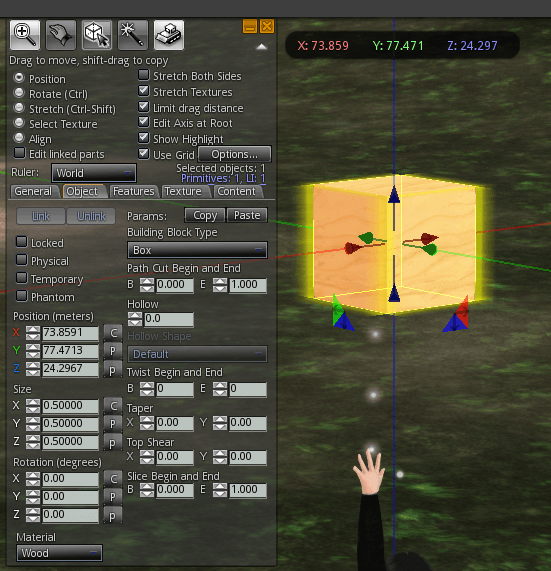
put an open hand in front of the RealSense camera and close it to form a fist, as if grabbing the object:

The Tools dialog will vanish from view, but it's not closed, it's just staying out of the way. The yellow silhouette will also vanish, but the axes and arrows should remain visible, along with the coordinates at the top of the window.
The object should now track your hand's movement. Open your hand again to make the Tools dialog reappear and stop moving the object.
In case something goes wrong, Undo and Redo (Ctrl-Z and Ctrl-Y, "Undo" and "Redo" if default voice commands are enabled) are your friends. Also do not hesitate to use the Del key ("Delete" with default voice commands) and start over from scratch.
- With the object still selected, again put an open hand in front of the RealSense camera, then fold the three last fingers to form a "gun":

The Tools dialog and yellow silhouette will disappear again, but this time the axes and arrows will be replaced by rotation rings, and the numbers at the top of the screen will switch to Euler angles:

Move your "gun" hand slowly in front of the camera, keeping the other hand out of view: the object will rotate around the axis most closely aligned to the direction of your hand's motion. To change axis of rotation, open your hand, hold it still a second or two, form a "gun" again, and move it along the new direction.
(In this simple example, there is only one sensible choice of reference frame, the world coordinates. When objects are linked together and/or worn by avatars, other choices may be more convenient. Use the "Ruler" combo box in the Edit tool to select coordinate system. When default voice commands are enabled, you can say "Ruler" to go there, "Go up" and "Go down" to navigate the menu and "Enter" or "Confirm" to commit to your choice.)
When the Edit tool reappears, note that it has now switched to Rotate mode.
- Put both your open hands in front of the camera, 20 cm (8 inches) or so from each other, and close both of them to form fists:

Once again, the Tools dialog and yellow silhouette will vanish. The rotation rings will be replaced by resizing markers, and the numbers at the top of the screen will switch to displaying the object's size:
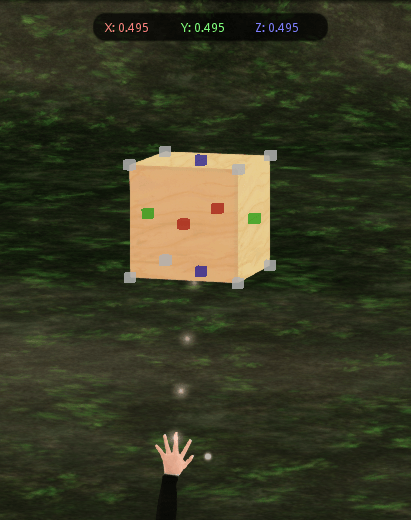
Slowly move your hands apart to enlarge the object. Move your hands closer together to make it shrink. Open both hands to make the Tools dialog reappear and stop resizing the object. Note that the Edit tool has now switched to Stretch mode.
- Put both your open hands in front of the camera again, but this time turn them into "guns":

As you move your hands apart, the object will grow along the axis most closely aligned to an imaginary line drawn between them. Move your hands closer together to make it shrink along the same axis. To resize along another axis, rotate your camera to a position perpendicular to it.
- The last exercise is the hardest one to pull off, since it involves two gestures to get wrong. Close one hand to form a fist, keep the other one as a "gun":

As you vary the distance between your hands, the object will be resized along the same axis as before, but only on the side of the "gun" hand.
Summing up, hand gestures can be used to do the same things as the traditional, mouse-operated manipulators (positioning arrows, rotation rings and resize handles). They also share the same limitations: good for rough edits, not so much for precision jobs.
When accuracy is required, the Edit tool controls remain the best choice. RealSense makes them easier to use than ever: instead of moving your mouse cursor back and forth between manipulators and dialog, you can simply call out the name of the control you want, and have it focused and ready to accept your input. The default voice commands cover all Edit tool controls and most subdialogs; the remaining exceptions are rarely used media setting and object content permission dialogs.
System requirements
RealSense functionality aside, this is Singularity 1.8.6 (released September 4, 2014) for 64 bit Windows Vista or later; the release notes apply.
Official Second Life viewer system requirements, including supported graphics cards, also apply. In practice, any mainstream graphics card from the last few years should be fine.
A broadband internet connection (DSL, cable or better) is needed to connect to Second Life or OpenSim-based virtual worlds, unless you run your own local server. The RealSense runtime installer retrieves the necessary components from Intel's site, so your computer also needs to be online upon installation.
On a system without RealSense hardware, the only significant difference vs regular Singularity is at installation time, when the RealSense runtime installer is launched. After installation, RealSense-related controls will be present in the user interface, but will have no effect, and the viewer will work just like regular Singularity.
Official system requirements for RealSense include (at the time of writing) 64 bit Windows 8.1, a 4th generation Intel Core CPU and an Intel RealSense 3D Camera F200.
Installation
Launch the installer (Singularity_1-8-6-????_x86-64_Setup.exe). It will suggest an installation directory. If you already have the regular Singularity viewer installed and do not want it to be overwritten, select a different installation directory. When you are satisfied with your choice of installation directory, click the Install button.
You should see a list of files being written to disk, followed by a splash screen announcing that the RealSense runtime is being installed or updated. The RealSense files are retrieved from Intel's web site, so the computer must be connected to the Internet at installation time.
Upon completion, the installer will offer to launch Singularity. It should also have created a launch icon on your Windows desktop, labeled "Singularity (64 bit) Viewer".
To uninstall
- From the Windows Control Panel: navigate to "Uninstall or change a program" ("Control Panel\Programs\Programs and Features" in Windows Explorer), find the entry "Singularity (64 bit) (remove only)" and double-click it.
- From the installation directory (by default, "C:\Program Files\Singularity"): double-click "Uninstall Singularity (64 bit) Viewer".
Tommy Anderberg
February 20, 2015
Updated April 13, 2015
Updated