Wiki
Clone wikisftpgateway-public / Azure Getting Started
Getting Started with SFTP Gateway on Azure
Table of Contents
Getting started:
Overview
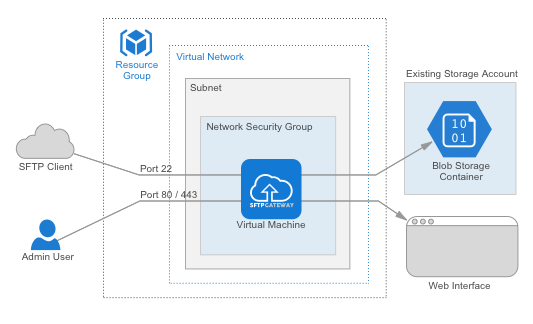
SFTP Gateway is a pre-configured SFTP server that transfers files to Azure Blob Storage. You can use the SFTP Gateway admin interface to create an SFTP user. After that, the SFTP user can upload a file to the server, which in turn pushes the file to Azure Blob Storage. Once successfully transferred to Azure Blob Storage, the file is deleted from the server.

Figure 1: An admin user connects to the web interface and creates an SFTP user. The SFTP user connects to SFTP Gateway and uploads a file. The server uploads the file to Azure Blob storage.
1. Launch a VM
To begin, launch the SFTP Gateway virtual machine from the Azure Marketplace. You will need to configure your network security group with access to port 22 for SFTP, as well as ports 80 and 443 for the web management interface.
See: https://help.thorntech.com/help/azure-launch-a-vm
2. Initial configuration
Be sure to configure SFTP Gateway with your Storage Account access keys. This allows the server to write to Azure Blob Storage.
See: https://help.thorntech.com/help/azure-initial-configuration
3. Create an SFTP user and log in
After completing the one-time setup, you can start using SFTP Gateway. Provision an SFTP user, and then log in as that user. Upload a file, and that file will automatically appear on Azure Blob Storage.
Updated