Wiki
Clone wikisftpgateway-public / Getting Started with SFTP Gateway 2.0
Getting Started with SFTP Gateway
Introduction
SFTP Gateway is a pre-configured SFTP server that will transfer uploaded files to an Amazon S3 bucket. To start, you need to create a user and an SSH key. This can be done through the SFTP Gateway admin interface. After that, you can upload your files to the SFTP server which in turn will push them to an Amazon S3 bucket. The SFTP server will not hold onto your files, so you will need to use the S3 console to view them.
This guide will focus on getting started with a Highly Available (HA) SFTP Gateway setup for testing.
Before you begin
Subscribe
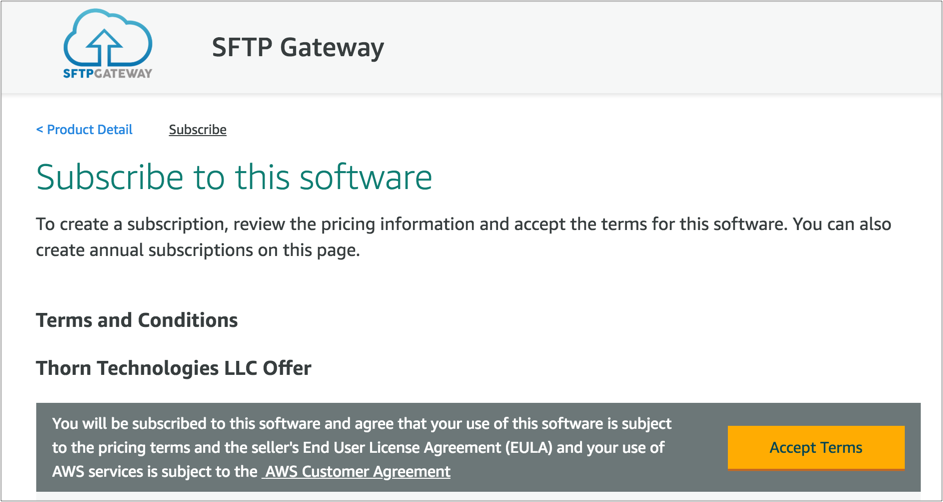
You first need to subscribe to the SFTP Gateway product. Doing so allows your AWS account to use the SFTP Gateway AMI.
Click here to open the AWS Marketplace page for SFTP Gateway.
Click the Continue to Subscribe button.

Click the Accept Terms button.

Once the Terms and Conditions have been accepted, you will have access to the SFTP Gateway AMI. The software is billed at $0.05 per hour for each instance. This is in addition to the cost of the EC2 instance itself.
You don't need to purchase an Annual Subscription. But, this is a cost-savings option worth considering when running SFTP Gateway full-time in production.
EC2 Key Pair
You will need to create an EC2 Key Pair in order to SSH into your instances. Although most SFTP Gateway configuration is via the web interface, there may be times when you need command line access.
To create an EC2 key pair:
-
Log into AWS and go to the EC2 console
-
In the navigation panel, under the Network & Security section, go to Key Pairs
-
Click Create Key Pair
-
Enter a name for the new key pair and click Create
Note: When you click Create, your browser will download a private key file. This must be kept secure in a place where you can always find it. If this file is lost or deleted, it is difficult to regain access to your EC2 instance.
Spinning up an SFTP Gateway stack
To start an HA stack of SFTP Gateway:
-
Download the HA CloudFormation template
-
Log into AWS and go to the CloudFormation console
-
Click Create Stack
-
Choose Upload A template to Amazon S3, browse to the template that you downloaded earlier, and click Next
Note: This creates a cf-templates bucket in S3 to store the CloudFormation template for later use.
-
Enter the details for the stack:
-
Stack Name.
-
Default bucket name: The name of a new or existing S3 bucket in your AWS account.
-
Desired Capacity: The number of EC2 instances you would like to have in your Auto Scaling group.
-
Disk Volume Size (GB): This must be 32 (the volume size of the AMI) or higher. You can always increase this at a later time (see Resizing an EC2 instance volume).
-
EC2 Type: A t2.small instance is generally sufficient for testing.
-
EFS Encryption: SFTP Gateway (HA) uses Elastic File System (EFS) to store files. The EFS volume can be encrypted for compliance reasons.
-
InputCIDR: An IP range that allows inbound SSH and SFTP traffic to your EC2 instance. We recommend obtaining your computer's public IP from http://checkip.dyndns.org/ and then appending /32 (a CIDR range of a single address). Although you can use 0.0.0.0/0 to allow all traffic, this weakens your security posture.
-
Key Pair. Choose the EC2 key pair you created in the Before you begin section. You will need the private key in order to SSH into the server. For more information on public and private keys see, SSH Key Pairs.
-
VPC ID Range Pick a Class C private IP address range from the drop-down. CloudFormation will provision resources inside this subnet range.
-
Web Admin Password: Used to log into the user management web console.
-
-
Stack Options: The stack options page can be left as is. Scroll to the bottom of the page and click Next.
-
Review and create stack.
- You must check the box that reads I acknowledge that AWS CloudFormation might create IAM resources to give CloudFormation permission to create IAM resources.
The stack creation progress can be monitored by selecting the stack and viewing the Events tab. Any errors that occur during creation will appear in the event log.
Access Admin Interface
To access SFTP Gateway admin interface, go to the output tab of the stack in your AWS CloudFormation console and copy the Hostname value (Fig-1).

Fig-1
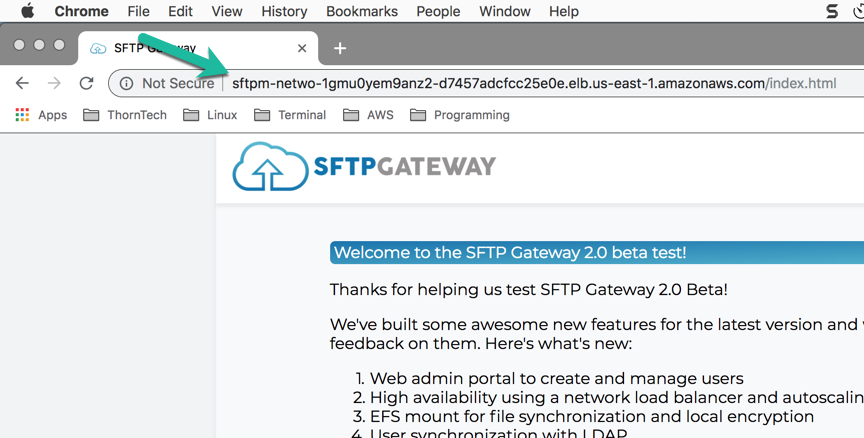
Paste the url in the address bar of your browser (Fig-2).

Fig-2
Log into the user interface
-
Use
adminas your username. -
Use the password that you chose during the setup process.
-
Click Sign In.
You can learn more about the user interface here.
Create a new user
To add a new user, click on the ![]() button in the top right corner.
You will be taken to the Create User form
(click here to learn more).
button in the top right corner.
You will be taken to the Create User form
(click here to learn more).
-
Enter a username.
-
Select Generate new SSH key pair to generate a new key pair for the user. The private key will be downloaded when the user is created. Alternatively, you can select Upload user-provided SSH key to upload an existing public key.
-
Click Save. You will be presented with connection instructions that you can copy and paste into an email to the user, along with their new private key (if generated).
By default, files that SFTP users upload will end up in the default S3 bucket that you specified during the setup process.
SFTP via command line (Linux/Mac)
Find the private key in your Downloads directory (typically, the name of the file is <username>.key). Before using
this key, you need to first tailor down permissions:
chmod 600 <username>.key
If you skip this step, you will see this warning: UNPROTECTED PRIVATE KEY FILE.
Next, log into SFTP Gateway as the new user:
sftp -i <username>.key <username>@<public_dns>
where <username> is the username of the user you created, and <public_dns> is the Public DNS you copied from the
AWS CloudFormation console earlier in the tutorial (Fig-1). Once you log in, you will be able to transfer files to S3
the following way:

Fig-3
Note: the files will get transferred to S3 and will not remain in the uploads folder.
SFTP via FileZilla
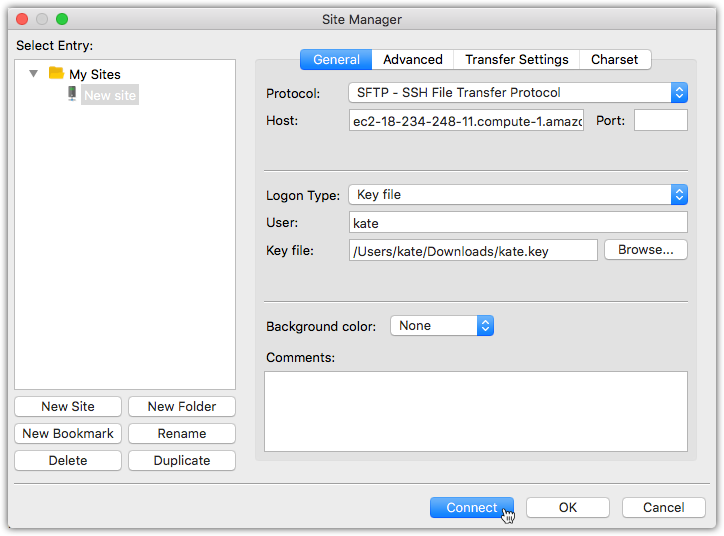
To transfer files to S3 using FileZilla, first connect to the SFTP Gateway server:
- Open FileZilla;
- Go to Site Manager;
- Click New Site
- Choose protocol: SFTP - SSH File Transfer Protocol
- For the host, use Public DNS copied from the AWS CloudFormation console earlier in the tutorial (Fig-1)
- Choose logon type: Key file
- For the User, type the username you created earlier
- For the key file, point to the
<username>.keyfile you generated earlier - Click Connect.

Fig-4
Now you can drag and drop your files to the uploads directory. Note: the files will get transferred to S3 and will not remain in the uploads folder.
View your files on S3
Once you are done transferring the files, go to S3 in your AWS console and navigate to your default SFTP Gateaway bucket that you specified earlier. If you forget the name, you can see it on the settings page in the admin UI).
Inside the S3 bucket, you should see a folder for each user. Inside each folder is an uploads folder containing the file you just transferred.

Fig-5
Updated