Wiki
Clone wikiqatrackplus / v / 0.2.9 / deployment / windows / iis
Deploying QATrack+ with IIS, CherryPy & SQL Server
This guide is going to walk you through installing QATrack+ on a Windows Server 2012R2 server with IIS 10 serving static assets (images, javascript and stylesheets) and acting as a reverse proxy for a CherryPy web server which serves our Django application (QATrack+). SQL Server 2014 will be used as the database.
The steps we will be undertaking are:
- Installing and configuring git
- Checkout the latest release of the QATrack+ source code from bitbucket.
- Setting up our Python environment (including virtualenv)
- Making sure everything is working up to this point
- Setting up a database with SQL Server
- Configuring CherryPy to serve our QATrack+ site.
- Configuring IIS
- Wrap up
1. Installing git
Go to http://git-scm.com and download the latest version of git (msysgit) for Windows (Git-2.10.0 at the time of writing). Run the installer. I just leave all the settings on there defaults but you are free to modify them if you like.
Step 1 done ;)
2. Checkout the latest release of QATrack+ source code from bitbucket
From the Start Menu look for the Git folder under All Programs and select Git Bash. This will open up a console window which we will be using fairly heavily for the rest of the process. (Note: this is a fairly full featured bash shell and is a lot more powerful than the default windows command prompt).
To create a home for QATrack+ and check out the source code, use the following commands:
#!bash

mkdir /c/deploy
cd /c/deploy
git clone https://bitbucket.org/tohccmedphys/qatrackplus.git
3. Setting up our Python environment
Note all Python packages should be 32 bit versions even on 64 bit machines
Go to http://www.python.org/download/ and download the 32 bit Python 2.7.X Windows Installer for Python (current version is 2.7.12 at the time of writing -- QATrack+ does not currently support Python3). Go through the installer using the default options (Install for all users).
You will also want to add Python to your PATH environment variable. * Open the Control Panel * Select System & Security * Select System * Select Advanced System Settings on the left hand side * Select Environment Variables * Select Path under the System variables section and then click edit * Append ;C:\Python27;C:\Python27\Scripts to the end of the path. Don't overwrite the existing value! * Click Ok/Ok/Ok
Close the git bash command prompt you had open before and then open a new one (this will give you access to the updated PATH variable).
In your new git bash window the command which python should return
/c/Python27/python. If it doesn't then your PATH variable has not been set correctly.
We now need to download numpy, Scipy and pywin32. * Go to http://www.lfd.uci.edu/~gohlke/pythonlibs/#scipy and download scipy-0.18.1-cp27-cp27m-win32.whl * and then go to * Go to http://www.lfd.uci.edu/~gohlke/pythonlibs/#scipy and download numpy-1.11.2+mkl-cp27-cp27m-win32.whl * * https://sourceforge.net/projects/pywin32/files/pywin32/Build%20220 and download pywin32-220.win32-py2.7.exe *
*Note the versions on that page are regularly updated, so the exact versions listed here may not be available: just grab the one that looks closest, e.g. numpy-1.11.3+mkl-cp27-cp27m-win32.whl is fine!
We're now ready to install all the libraries QATrack+ depends on.
#!bash
cd /c/deploy
pip install virtualenv
mkdir venvs
virtualenv venvs/qatrack
source venvs/qatrack/scripts/activate
cd qatrackplus
easy_install ~/Downloads/pywin32-220.win32-py2.7.exe
pip install ~/Downloads/numpy-1.11.1+mkl-cp27-cp27m-win32.whl
pip install ~/Downloads/scipy-0.18.1-cp27-cp27m-win32.whl
pip install -r requirements/base.txt
pip install -r requirements/optional.txt
pip install -r requirements/win.txt
4. checking everything is functional so far
Getting everything installed was a pain, so lets take a minute and check everything is now functioning as it should. create a directory called 'db' in the main qatrackplus directory and then setup a temporary database for testing (answer 'yes' and create a super user when prompted).
#!bash
cd /c/deploy/qatrackplus
mkdir db
winpty python manage.py syncdb
winpty python manage.py migrate
winpty python manage.py loaddata $(PWD)/fixtures/defaults/*/*
winpty python manage.py collectstatic
You should now be able to run the built in test server and access your QATrack+ site for the first time! At the command prompt type the following to start the server:
#!bash
winpty python manage.py runserver
You should then be able to open a browser window and visit http://127.0.0.1:8000 where you will be redirected to a login page (you can login using the superuser you created earlier).
In the terminal hit Ctrl+C to kill the server.
5. Creating a database with SQL Server
Open SQL Server Management Studio and enter 'localhost' for the server name and click Connect.
In the Object Explorer frame, right click the Databases folder and select "New Database...".
Enter 'qatrackdb' as the database name and click OK.
Back in the Object Explorer frame, right click on the main Security folder and click New Login... Set the login name to 'qatrack', select SQL Server Authentication. Enter 'qatrackpass' (or whatever you like) for the password fields and uncheck Enforce Password Policy. Click OK.
Back in the Object Explorer frame, expand the qatrackdb database, right click on Security and select New->User.
Enter 'qatrack' as the User name and Login name and then in the Database Role Membership (or Owned Schemas) region select 'db_datawriter', 'db_datareader' and 'db_owner'. Click OK.
Configuring QATrack+ to use your new database
Create a file called local_settings.py in /c/deploy/qatrackplus/qatrack/ and add the following contents:
#!python
DEBUG = False
TEMPLATE_DEBUG = DEBUG

DATABASES = {
    'default': {
        'ENGINE': 'sqlserver_ado', # Add 'postgresql_psycopg2', 'mysql', 'sqlite3' or 'oracle'.
        'NAME': 'qatrackdb',                      # Or path to database file if using sqlite3.
        'USER': '',                      # Not used with sqlite3.
        'PASSWORD': '',                  # Not used with sqlite3.
        'HOST': 'localhost',                      # Set to empty string for localhost. Not used with sqlite3.
        'PORT': '',                      # Set to empty string for default. Not used with sqlite3.
        'OPTIONS': {
            'provider': 'sqlncli11'
        }
    }
}

ALLOWED_HOSTS = ['127.0.0.1', 'localhost']  # See local settings docs
Once again, we will configure our new MS SQL database from the command prompt (answer 'yes' and create a super user when prompted):
#!bash
winpty python manage.py syncdb
winpty python manage.py migrate
winpty python manage.py loaddata $(PWD)/fixtures/defaults/*/*
6. Configuring CherryPy to Serve QATrack+
Django's built in web server that we used earlier is not meant to be used in production. Instead we will be using CherryPy to serve QATrack+.
Copy the file cherrypy_deploy.py from the deploy/ directory to the root qatrackplus directory and run it like so:
cd /c/deploy/qatrackplus
cp deploy/cherrypy_deploy.py ./
python cherrypy_deploy.py
That command won't appear to do anything but you should be able to visit http://127.0.0.1:8080 in your browser and see the login screen. (Don't worry if it looks different than before...CherryPy is not setup to serve the style sheets and images)
Back in the terminal window hit Ctrl+C to kill the server.
Installing CherryPy as a Windows Service
In order to have CherryPy start when you reboot your server, or restart after a crash, you may wish to install your CherryPy server as a Windows service.
#!bash
cd /c/deploy/qatrackplus
mkdir logs
cp deploy/QATrackCherryPyService.py .
python QATrackCherryPyService.py install
python QATrackCherryPyService.py start
Your QATrack+ installation is now installed as a Windows Service. I would recommend configuring your service to auto start. Instructions on how to do that can be found on the Windows Service Wikipedia page. You may also wish to configure the service to email you in the event of a crash (see the Recovery tab of the QATrackCherryPyService configuration dialogue).
7. Setting up IIS
We are going to use IIS for two purposes: first, it is going to serve all of our static media (css, js and images) and second it is going to act as a reverse proxy to forward the QATrack+ specific requests to CherryPy.
Before starting please make sure you have the Application Request Routing IIS module installed. Application Request Routing needs to have the reverse proxy setting enabled: for instructions see the section titled Enabling Reverse Proxy Functionality on this page.
Once you have Applicationn Request Routing installed and proxies enabled, n the left panel of IIS under Sites, select the default Web Site and click Stop on the right hand side.

Now right click on Sites and click Add Web Site
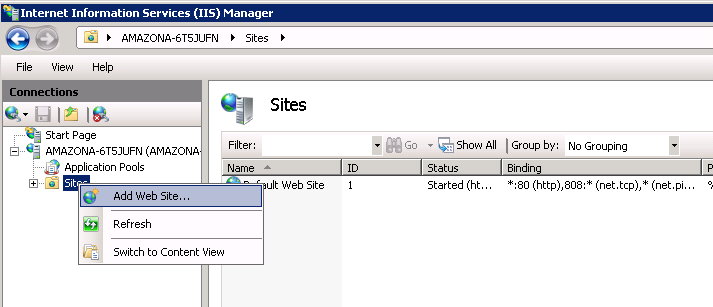
Enter QATrack Static for the Site Name and C:\deploy\qatrackplus\qatrack\ for the Physical Path then click OK and answer Yes to the warning.
To test that setup worked correctly open a browser on your server and enter the address http://localhost/static/img/tux.png You should see a picture of the Linux penguin.
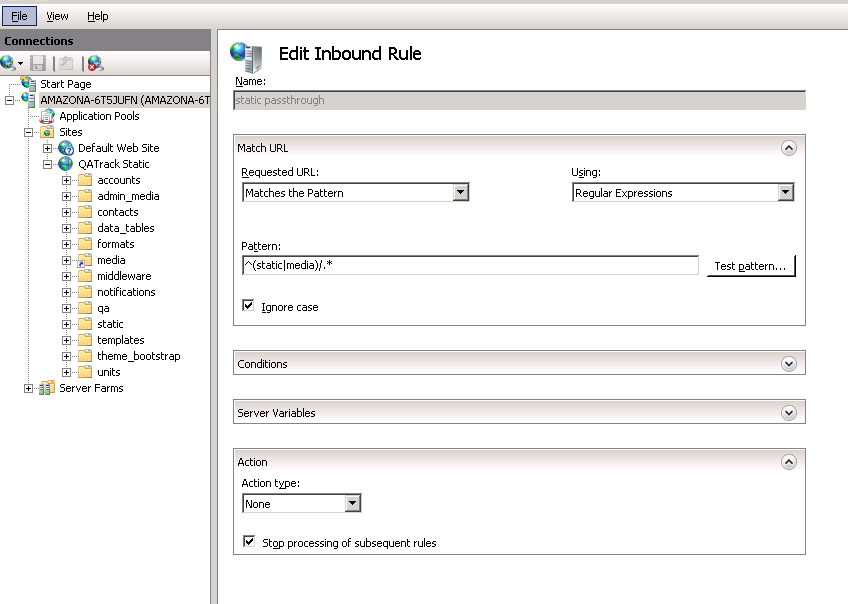
Next, select the top level server in the Connections pane and then double click URL Rewrite

In the top right click Add Rule and select Blank Rule.
Give it a name of QATrack Static and enter ^(static|media)/.* for the
Pattern field, and select None for the Action type.
Make sure Stop processing of subsequent rules is checked.
When finished click Back To Rules and then add another blank rule. Give it a name of QATrack Reverse Proxy, enter (.*) for the Pattern and http://localhost:8080/{R:1} for the Rewrite URL. Make sure both Append query string and Stop processing of subsequent rules are checked.

Your URL rewrites should look like the following (order is important!)

You should now be able to visit http://localhost/ in a browser on your server and see the QATrack+ login page. Congratulations, you now have a functional QATrack+ setup on your Windows Server!
there are many different ways to configure IIS. The method I've used above is simple and works well when QATrack+ is the only web service running on a server.
8. Wrap Up
This guide shows only one of many possible method of deploying QATrack+ on Windows. It is very similar to what we use at The Ottawa Hospital Cancer Centre and it has proven to be a very solid setup. If you're stuck with a Windows stack it will likely work for you too. Hit me up on the QATrack+ Google Group if you want to discuss some other alternatives for deploying on Windows.
References:
Updated