Wiki
Clone wikidsproto_daq / Midas Software Operation
MIDAS SOFTWARE Setup
In the MIDAS framework, programs which communicate with equipment are called MIDAS frontend programs.
The DS-PROTO DAQ is mostly contained in a single frontend program called feov1725MTI00 which reads out the four V1725s card and the chronobox. This code works for the V1725 firmware that does not support ZLE compression. Eventually we may want to switch to firmware that supports ZLE compression, but that will require changes to the readout software.
DAQ Operation
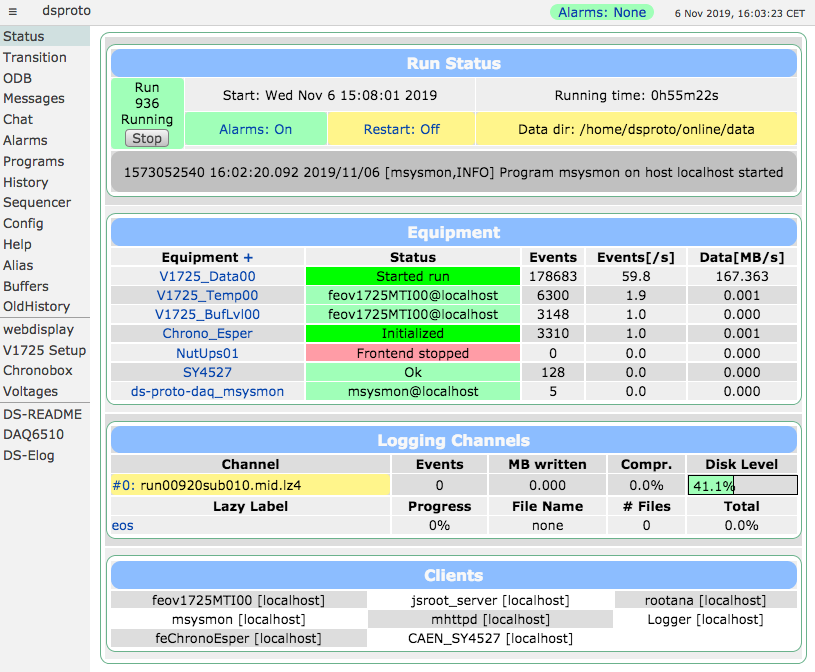
We control the MIDAS DAQ through a combination of a webserver and command-line actions. The main MIDAS status webpage looks like this:

In the current setup, all the equipment should be green, except for NutUps01 (which should be red as the UPS is not installed yet). If any other equipment are red, go to the Programs page and start them.
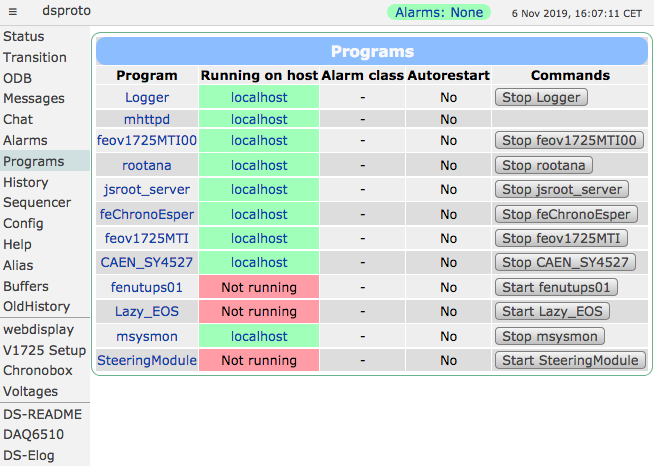
The programs page should currently look like this, with fenutups01, Lazy_EOS and SteeringModule red:

The programs that can be started from this page are:
- Logger : Midas Data Logger (Recording to Disk)
- mhttpd : Midas Web server
- feov1725MTI00 : Midas Frontend (read event-by-event data from ChronoBox, and 4 V1725)
- feChronoEsper : Midas Frontend (read data from ChronoBox periodically)
- CAEN_SY4527 : Midas Frontend (control the HV module)
- jsroot_server : Root web server for data display
- fenutups01 : Midas Frontend (read state of the UPS) - not currently functional
- Lazy_EOS : Midas Lazy Logger (copying files to different destinations) - not currently functional
- msysmon : Midas System Monitor (read disk level, CPU usage etc and store in history database)
- SteeringModule : Midas Frontend (control the proto-0 steering module) - not currently functional
The following programs may also appear:
- rootana : Appears if a user has started the "protoDisplay" GUI for viewing waveforms/plots
- feov1725MTI : Appears when feov1725MTI00 is running
Links on the midas status page
- Transition : Start/stop status page.
- ODB : Midas Online Database, access to all the Midas/experiment parameters.
- Messages : Message log from midas programs and equipment.
- Chat : Communication channel through the web server (messages are logged).
- Elog : Access to the Experiment Electronics LogBook
- Alarms : Alarms status from all possible Midas sources (see Midas documentation)
- Programs : List of possible application related to the experiment with [de]activation option
- History : Chart of predefined variable.
- Config : Display and sound configuration
After booting state
- Both Network (CERN, LAN) are up
- Midas minimal application started (mhttpd, mlogger)
You should then start the programs mentioned in first section of this page (above).
To Start run...
- Internal access (at CERN), open Web browser to https://ds-proto-daq.cern.ch/ ("dsproto status" in Menu bar; also picture above).
-
External access available through [this link]. CERN account necessary!
-
Midas web page should be showing "run stopped".
- Make sure the equipment list is all green (except those mentioned above).
- Press Start on the [Status] or [Transition] pages.
- We often disable the logging of data while we are testing. If you want to log the data to the MIDAS file, make sure to click the 'write data' button when starting.
During a Run
On the main Midas Status page several information can be retrieved by clicking on some of the page elements or from the side menu
- [ChronoBox Statistics]
- [Data Rates History chart]
- V1725 frontend checks the timestamps of the V1725 event fragments and the chronobox event fragments. If the timestamps don't match then the run is stopped.
We recommend making elog entries for important data sets: [Elog] Electronic LogBook
Online analyzer
There is a javascript-based analyzer that can be used to see the waveforms and histograms in real time:
The same plots are also available with the built-in JSROOT display provided by ROOT:
[rootana]
You can also see more plots (and with faster updates) by starting a GUI from the command line:
~/online/dsproto_analyzer/protoDisplay.exe
Adjusting V1725 baselines
The baseline of each V1725 channel is adjusted using the "DAC" value in [the ODB]. A script is provided to automate this process, by measuring the current baseline of each channel, and adjusting the DAC accordingly. Baselines can drift due to temperature fluctuations etc, so re-equalizing baselines may be necessary over time.
For example, to set all the baselines to 15500 ADC, run:
~/online/dsproto_analyzer/equalize_baselines.py --target 15500
Adjusting self-trigger thresholds
The self-trigger thresholds are adjust by setting the "SelfTrigger_Threshold" value in [the ODB]. A script is provided to help you set the thresholds - to a fixed value, to a certain value below baseline, or to shift by a given amount.
To just view the current baselines:
~/online/dsproto_analyzer/threshold_tool.py
To calculate the current baselines, and set the self-trigger thresholds to 40 ADC below baseline for each channel:
~/online/dsproto_analyzer/threshold_tool.py --baseline_offset -40
To shift the current baselines by a certain amount (e.g. you recently set them to -40 and want to change to -200):
~/online/dsproto_analyzer/threshold_tool.py --shift_offset -160
To set a fixed self-trigger threshold (which only makes sense if you've equalized all the baselines to the same value) (e.g. you know that the baselines are at 15500 and you want to set thresholds to 200 below):
~/online/dsproto_analyzer/threshold_tool.py --fixed_threshold 15300
Configuring different run types
For a laser run:
- [Chronobox] - go to the MOD_TDM page, ensure that "External Trigger Enable" is ON, and "Enable Channel" is 0x00000000. Make sure to "unfocus" the text box after changing the value, or else the value won't actually be updated.
- Ensure that the "LASER" cable is connected to CLKIN1 on the chronobox.
- Self-trigger thresholds are irrelevant.
For a noise run:
- [Chronobox] - go to the MOD_TDM page, ensure that "External Trigger Enable" is ON, and "Enable Channel" is 0x00000000. Make sure to "unfocus" the text box after changing the value, or else the value won't actually be updated.
- Ensure that the "CLOCK" cable is connected to CLKIN1 on the chronobox.
- Self-trigger thresholds are irrelevant.
For a regular run:
- [Chronobox] - go to the MOD_TDM page, and ensure "Enable Channel" is 0x3F3F3F7F. Make sure to "unfocus" the text box after changing the value, or else the value won't actually be updated. "External Trigger Enable" can be on or off.
- Set self-trigger thresholds to 100ADC below baseline (see section above)
Taking IV curve data
A run does not need to be in progress when taking IV curve data. The following script is provided to step through different voltages and measure the current. In future it will be able to scan through the different PDMs automatically, but for now you must change which PDM is on using the GUI on the "steering module" laptop. See all the possible options using the help message:
~/online/dsproto_sy4527/iv_curve.py -h
The current command to run is:
~/online/dsproto_sy4527/iv_curve.py --no_steering --custom_v XXX --filename ivcurve_pdm0.txt
Directory for MIDAS software
- ~/packages/... : CAEN lib, Midas, zmq
- ~/online/dsproto-daq/... : Frontend code (feoV1725.cxx, ...) [Bitbucket code]
- ~/online/dsproto-esper/... : Midas/ESPER code [Bitbucket code]
- ~/online/dsproto-analyzer/... : Rootana on/offline analyzer code [Bitbucket code]
- ~/chronobox/tdm/... : Chronobox SW/FW full project
- ~/online/dsproto-sy4527/... : CAEN SY4527 main frame [Bitbucket code]
Updated