3.3 has skin map bleeding **includes custom blender builds by Mike Fischer with fix**
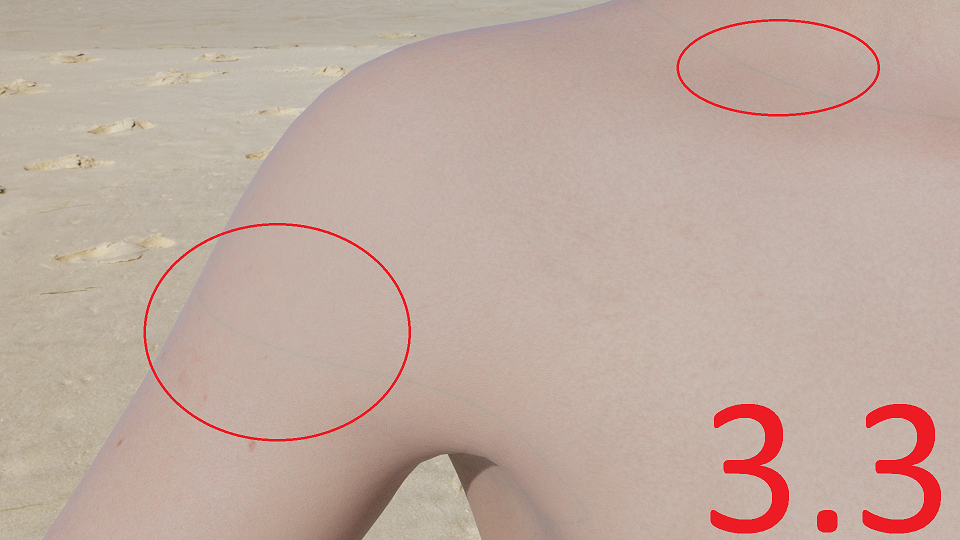
3.3 appears to have texture map bleeding or at least the Daz characters imported with daz importer have. I tried 3.2 and 3.3 clean installs and 3.3 shows a obvious difference. Not sure if that’s a Blender bug or needs adjustment in the daz importer.
I used Arcadia 8.1 for this example but I also tried other textures with the same issue. Imported with BDSF volume.

Comments (85)
-
reporter -
reporter The issues appear to be not visible on the base 8.1F skin.
-
@Maneki The volume bleeding appears in daz studio too for some skins it is a known iray issue. It may be that you have different volume settings for cycles in 3.2 and 3.3 please check. You may try the “full global illumination“ preset for cycles and see if the issue is fixed. Let us know.
It may also be that you use resized textures so the borders may be different depending on the size and filter used. Please check with the original not resized textures. If you use simplify then disable it.
The skin tone for 3.2 and 3.3 doesn’t seem exactly the same though they’re very similar. This could be another clue that you’re using different cycles settings. Of course we trust that you’re using the latest development version of the addon and the same version for 3.2 and 3.3. Please state your exact specs when reporting bugs.
edit. With Arcadia I’m not able to reproduce the issue here, even using low quality settings for cycles. Does it happen with the default hdri or only with specific lights ? Are you using the same render device for 3.2 and 3.3 ? Please provide a test scene as simple as possible.

@Jay Your post is marked as spam because it links to a game.
-
reporter I tried it 3.2 + 3.3 clean install= issue appears in 3.3. I tried it with all my addons and settings in 3.2 + 3.3 = issue appears in 3.3. I tried 2 or 3 different characters and all had the same issue in 3.3 but not 3.2. For my test scene I used a beach HDRI. I removed the HDRI and tried it just with a even illuminated background and the bleeding seems to be gone. When I add a area light to it to illuminate one shoulder the bleeding appears again. I’m aware that bleeding can exist with Daz character but I usually never have a issue with it and with the same character I don’t have these issues in 3.2 but in 3.3. I don’t know how to create a simple test scene for this since it seems to be related to something more specific which can’t be reproduced with a 8.1F base skin. For all the tests I used the same render devices.
-
reporter I played around a bit with the light bounce settings too. Full global illumination is when the bleeding looks the worst. Since the issue is related to volume I’m not really surprised. At default or lower settings it’s basically not visible but the skin generally looks terrible.
-
daz studio 4.15.0.30, blender 3.3.0, diffeomorphic 1.6.2.1185
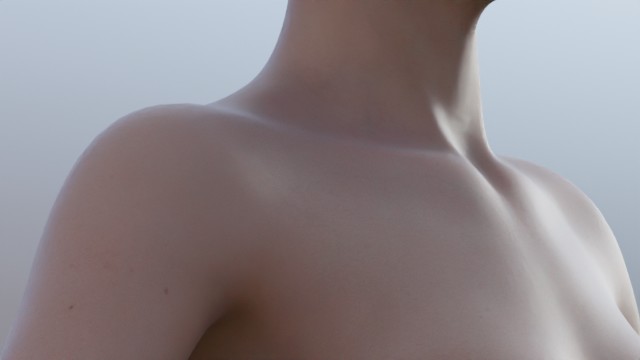
Below it’s the rendering from my test scene arcadia.duf, I don’t see any issue. Let me know if it works for you. You can also provide your test scene with Arcadia 8.1 for me to test.
steps:
- import the test scene arcadia.duf with the bsdf option for materials
- set full global illumination for cycles and turn off simplify
- render
-
- attached arcadia.duf
test scene for volume bleeding, using Arcadia 8.1
-
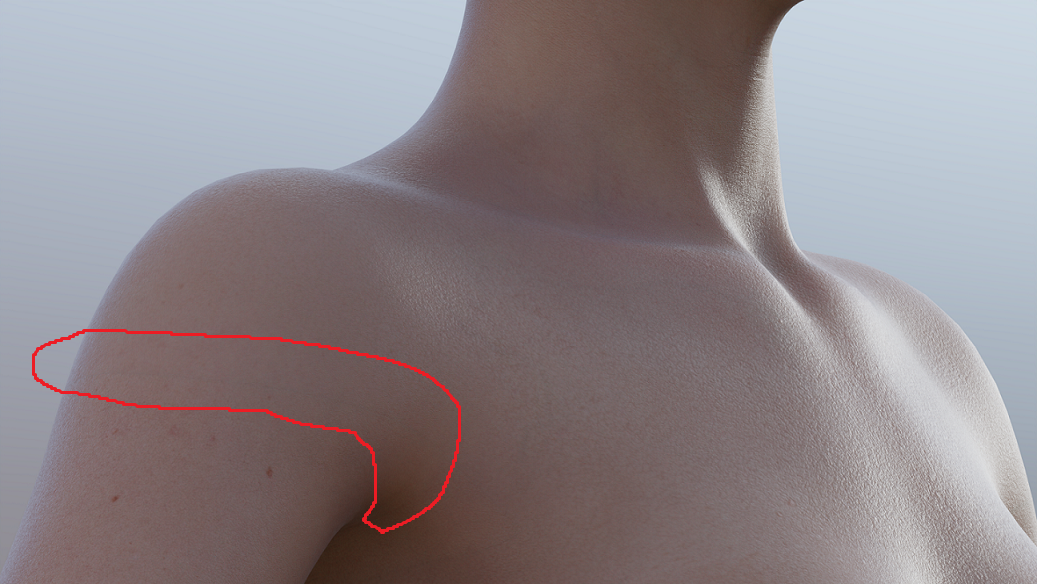
reporter I get a seam with your test scene. It’s badly illuminated but visible. I notice on your image that it’s heavily denoised which most likely hides the seam. The texture is extremely blurry.
-
Yes I can confirm the issue it appears with a high number of steps without the denoiser and only in blender 3.3, not in 3.2.
I always use the denoiser in my renders, because the new cycles is designed to be used with the denoiser and makes little sense without. The “smoothness“ in my render above is due to the low resolution, not to the denoiser. Below there’s a detail of the skin with the denoiser. And a detail of the arm with no seam with the denoiser. So the fix is to use the denoiser.
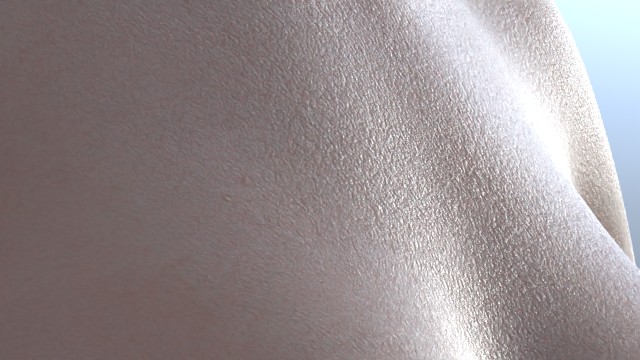
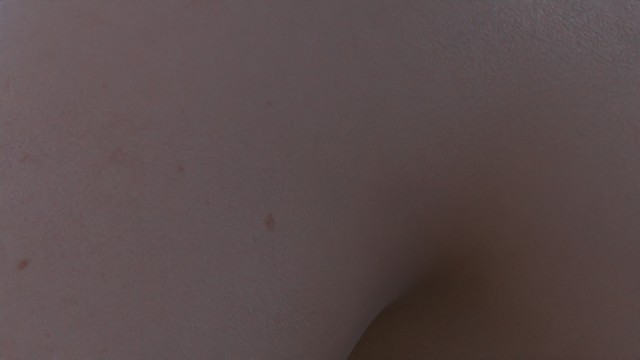
note. As for why 3.2 works fine, I see that in 3.3 they “optimized” the volume for speed so this may be the reason. I found no way to get back the 3.2 precision without the denoiser.
note. This is not a bug in diffeomorphic though, but rather a new “limitation” in blender 3.3 that must be used with the denoiser for better results. You may submit a bug report to the blender team to fix this. There’s no way that @Thomas or I can do something, apart adding a note in the docs to use the denoiser in blender 3.3.
https://wiki.blender.org/wiki/Reference/Release_Notes/3.3/Cycles
-
reporter Yea I would have guessed this is more Blender related. Using the denoiser doesn’t help. I rendered my example image with denoiser at 1080p. Most of my work nowadays I render in 1440p or 4K where the denoiser works even sharper and makes the seam more visible.
-
update.
I got to reproduce the issue with a simple test scene and filed a bug report to the blender guys. Let’s see what they find out.
-
reporter Thank you, it’s really appreciated.
-
@Maneki Out of curiosity, what nvidia driver do you use ? Because mine is 472.84 and I may try to update to see if this fixes the issue. But if you get the issue with a new driver there’s no point for me to go through the hassle.
-
reporter I got the newest studio driver 516.94.
-
update.
It seems Brecht of the blender team doesn’t consider this a bug, that of course I don’t agree and tried to explain. Essentially the new limit in blender 3.3 is that you have to use a single volume material per object. So you may be able to fix this by using udims and merging the body materials.
Unless Brecht changes his mind.
p.s. Again personally I can avoid the issue just by using the denoiser as shown above, but I don’t render 4K.
p.p.s. Of course you can use sss instead of volumes, by the ”sss skin” option in the global settings, though this way you’ll have to fix the skin tone by hand.
-
reporter @Alessandro Padovani Yep, I keep track of the bug report since people seemed to try and keep it alive. There’s no response to it after 2 days though. If they won’t change it in the near future is there some implemented work around in the daz importer addon planned (besides just using SSS)? It’s a pretty significant bug for us Daz content users I’d say. But for me personally it’s probably another reason to get used to SSS. It’s faster to render too.
-
No there’s no other workaround that I can think of apart those already mentioned.
-
reporter - changed status to resolved
A Blender related issue. The team has no plans of fixing it as of now.
-
Is there really no fix possible for this? Without volumetric skin I’m having trouble getting that red glow on the nose and skin… SSS skin is pretty good and 10% faster no doubt but for those who want realism and want to enjoy the speed of blender 3.3 and coming versions over 3.2 this is a big problem
-
- changed status to open
-
This is a blender limitation from 3.3 on, not a bug in the plugin. I’d keep this open because it is a major limitation, same as #382 for limits in multires for example. There are workarounds see
#1295to setup a single volumetric material with udims.The easy way is to use sss though, or use blender 3.2.
-
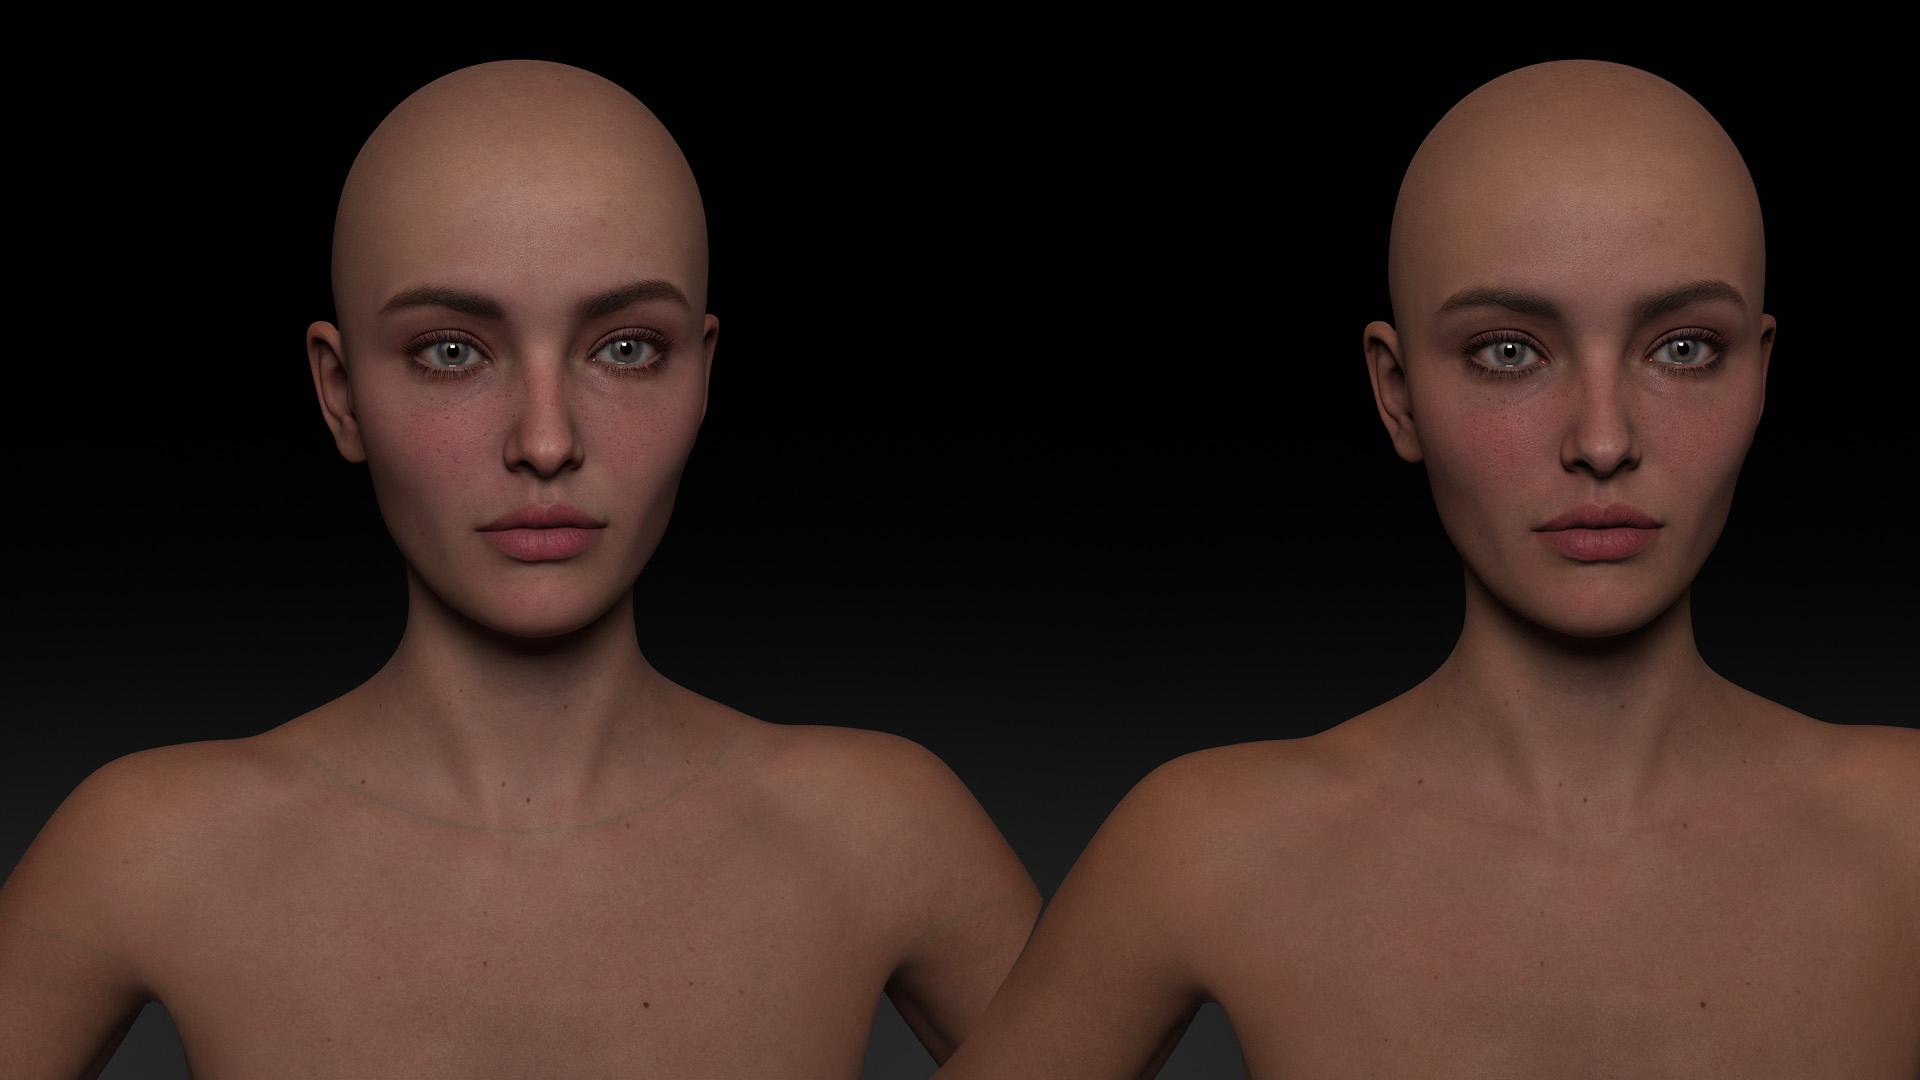
And on some skins it’s so much so that the denoiser isn’t able to remove details from the area without the whole skin becoming airbrushed in the process… With SSS it’s not possible to recreate the red glow in the nose and around ears and SSS also exaggerates the pores of the skin a bit to the point it’s a little unpleasant for hyper-realistic renders… It’s a bit difficult to tonemap SSS skins to look the way volumetric ones do idk why and they somehow still look devoid of blood in their body :( Please fix if possible@Thomas Larsson @Alessandro Padovani Attaching a sample of Volume based skin on left and SSS on right with victoria 8.1…
-
Alright, I’ll try the UDIM fix. Thanks for that Alessandro! Also for some reason blender 3.2 is quiiiiiite slow on my 4090 than 3.3 or 3.4 it increases render times on average by about 25% for no reason…
-
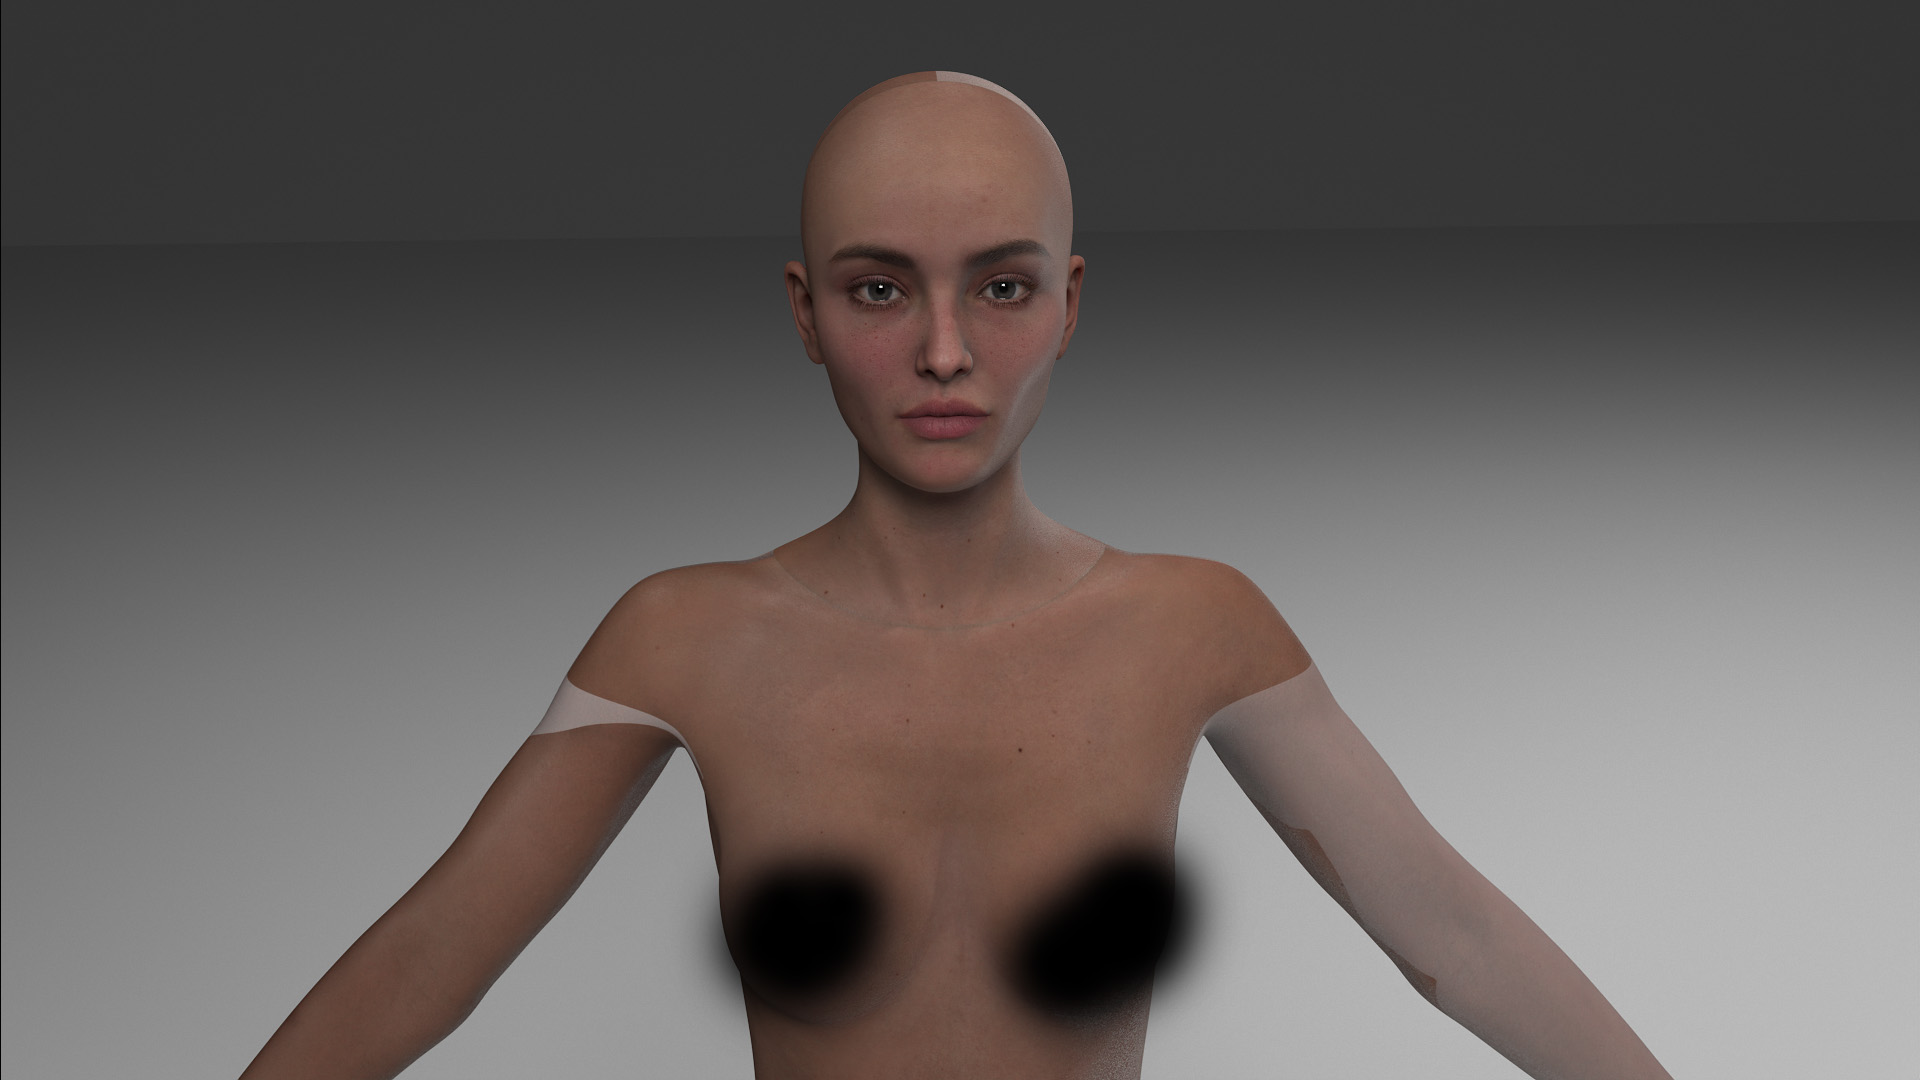
I seem to be doing something wrong…. What I’m doing is
1. Importing with easy import and merge rigs selected.
2. Save blend file and local textures.
3. Make UDIM Materials with merge materials and stack shells selected.Am I doing the order incorrect or missing anything? I’m only importing the base victoria 8.1 model and nothing else
-
update : UDIM materials are absolutely beautiful! They fixed an issue I never knew existed which is the lip borders for some models! :D
They just seem to not work with some 8.1 models most of them being the daz original ones like victoria 8.1 and crow 8.1. I’m assuming it’s because of the additional textures in the torso or neck region. Perhaps this warrants another post but still thanks @Alessandro Padovani :) -
Will try Victoria 8.1 with udims and let you know what I find.
-
From what I found out after trial and error, the bizarre mapping seems to only happen on materials where the active material type appears as ‘Body’ instead of ‘Torso’ when I go to make UDIM materials. Most 8.1 figures show their material type as ‘Body’ in the UDIM section while gen 8 report theirs as ‘Torso’.
-
repo owner The last commit may fix the issue. With the exception of the principled node, I assumed that only at most one texture is linked to any node. But the Victoria diffuse channel (DAZ Diffuse node) had textures linked to both the color and roughness sockets, and the former was lost. There was also some issue when the image of the texture node was not loaded. Both issues should be fixed now.
When debugging this problem I had to save local textures every time, which becomes quite annoying. Now Make UDIM Materials has an option to save local textures, so you (and especially I) don’t have to do it explicitly each time.
-
daz studio 4.21.0.5, blender 3.4.1, diffeomorphic 1.7.0.1338
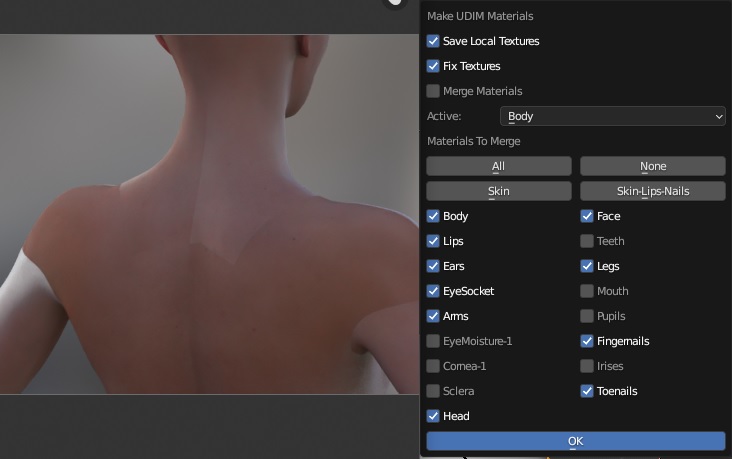
I can confirm the issue with Victoria 8.1 udims. Commit 419d1a9 is much better but not quite right, below what she looks like from behind.
steps:
- import Victoria 8.1 with bsdf materials and merge rigs
- make udims with the default options as shown below, I also tried without “fix textures” but the result is the same, note that I didn’t merge the materials so this is not a issue with merging materials
-
repo owner Yes, I have a similar problem, but it seems to be present already before making udim materials. The plugin didn’t find the normal maps on import. If the normal map node is deleted the udim materials blend seamlessly.
-
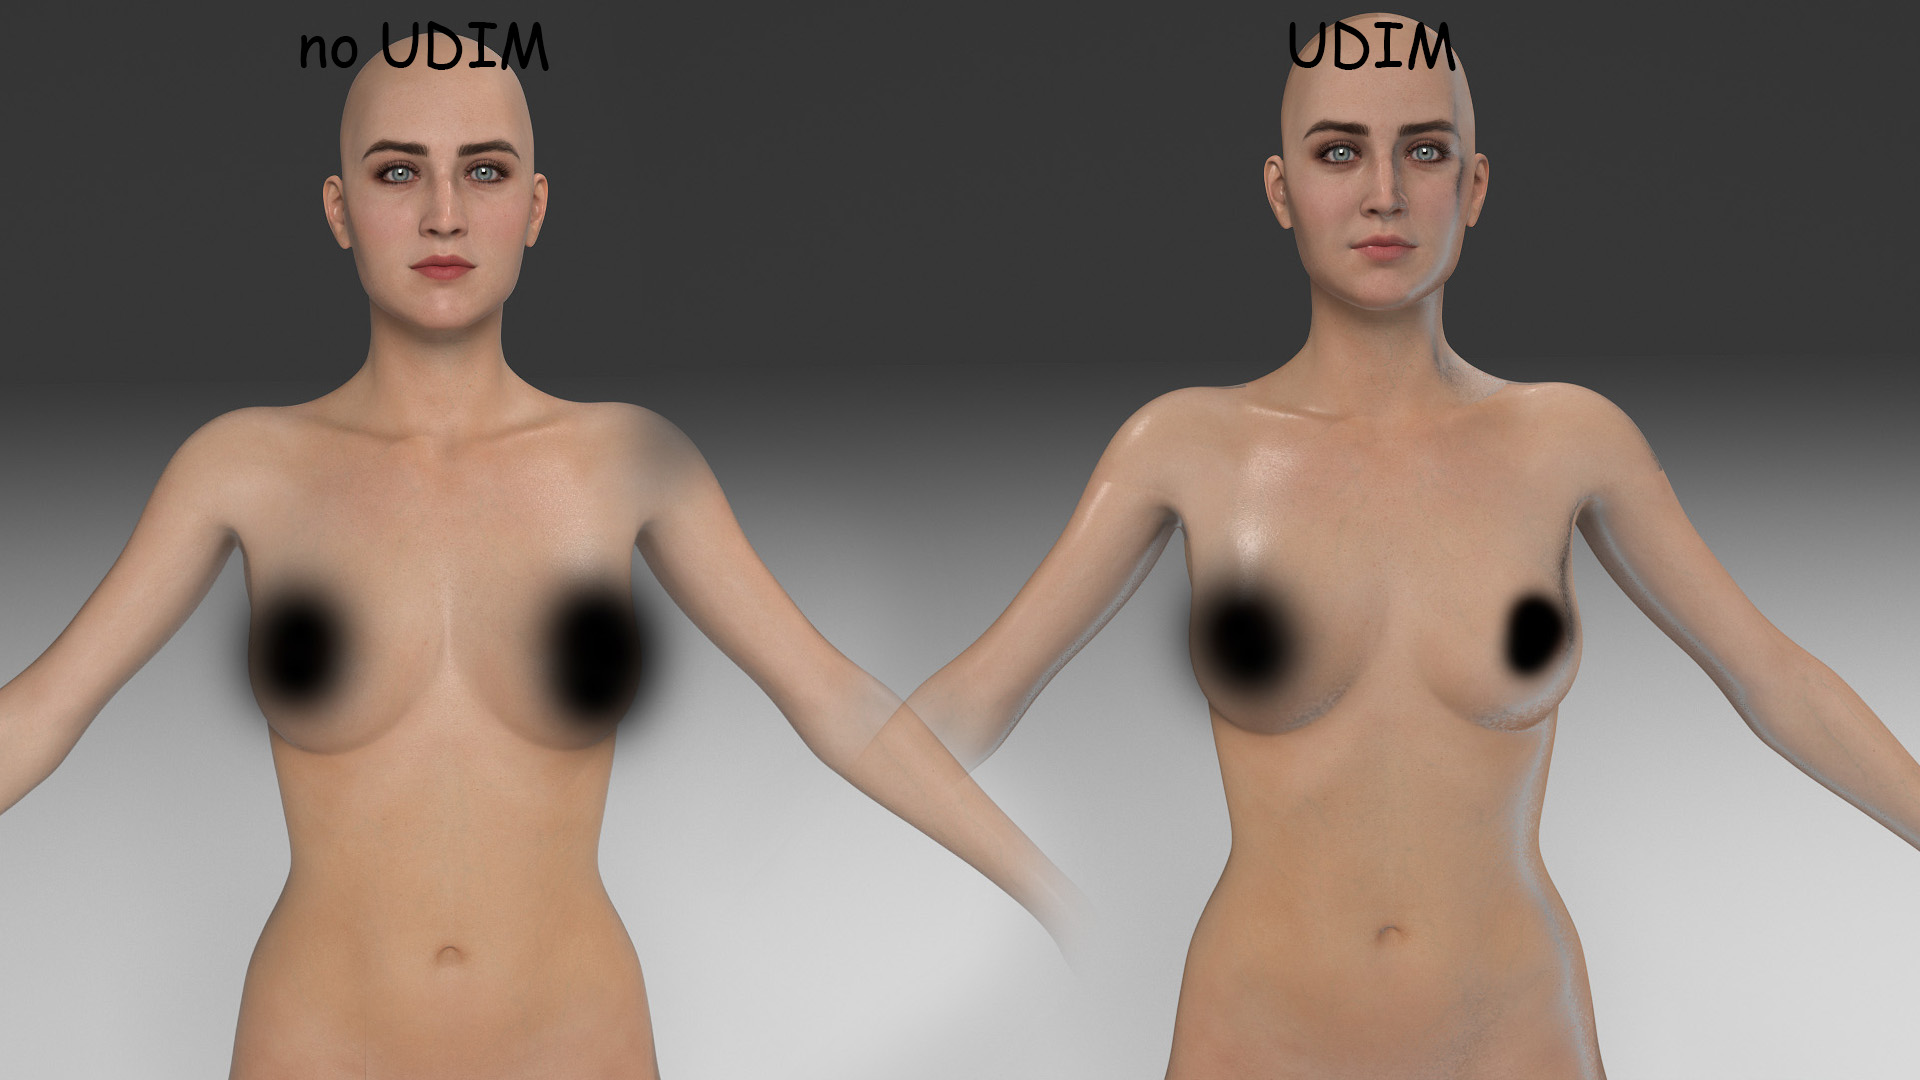
Thanks for adding the save local materials to the UDIM section, that eases life a lot haha! Decided to photoshop the before and after together so Issues can be identified more easily. For Vic 8.1, it seems applying UDIM also causes some issue to the Volumetric material in the sense that the head and body seem to have lost it and 'react differently to light’ as well… It’s a bit more apparent in another model i’m posting where she seems to have gotten black border. The lighting is the same across both scenes.

-
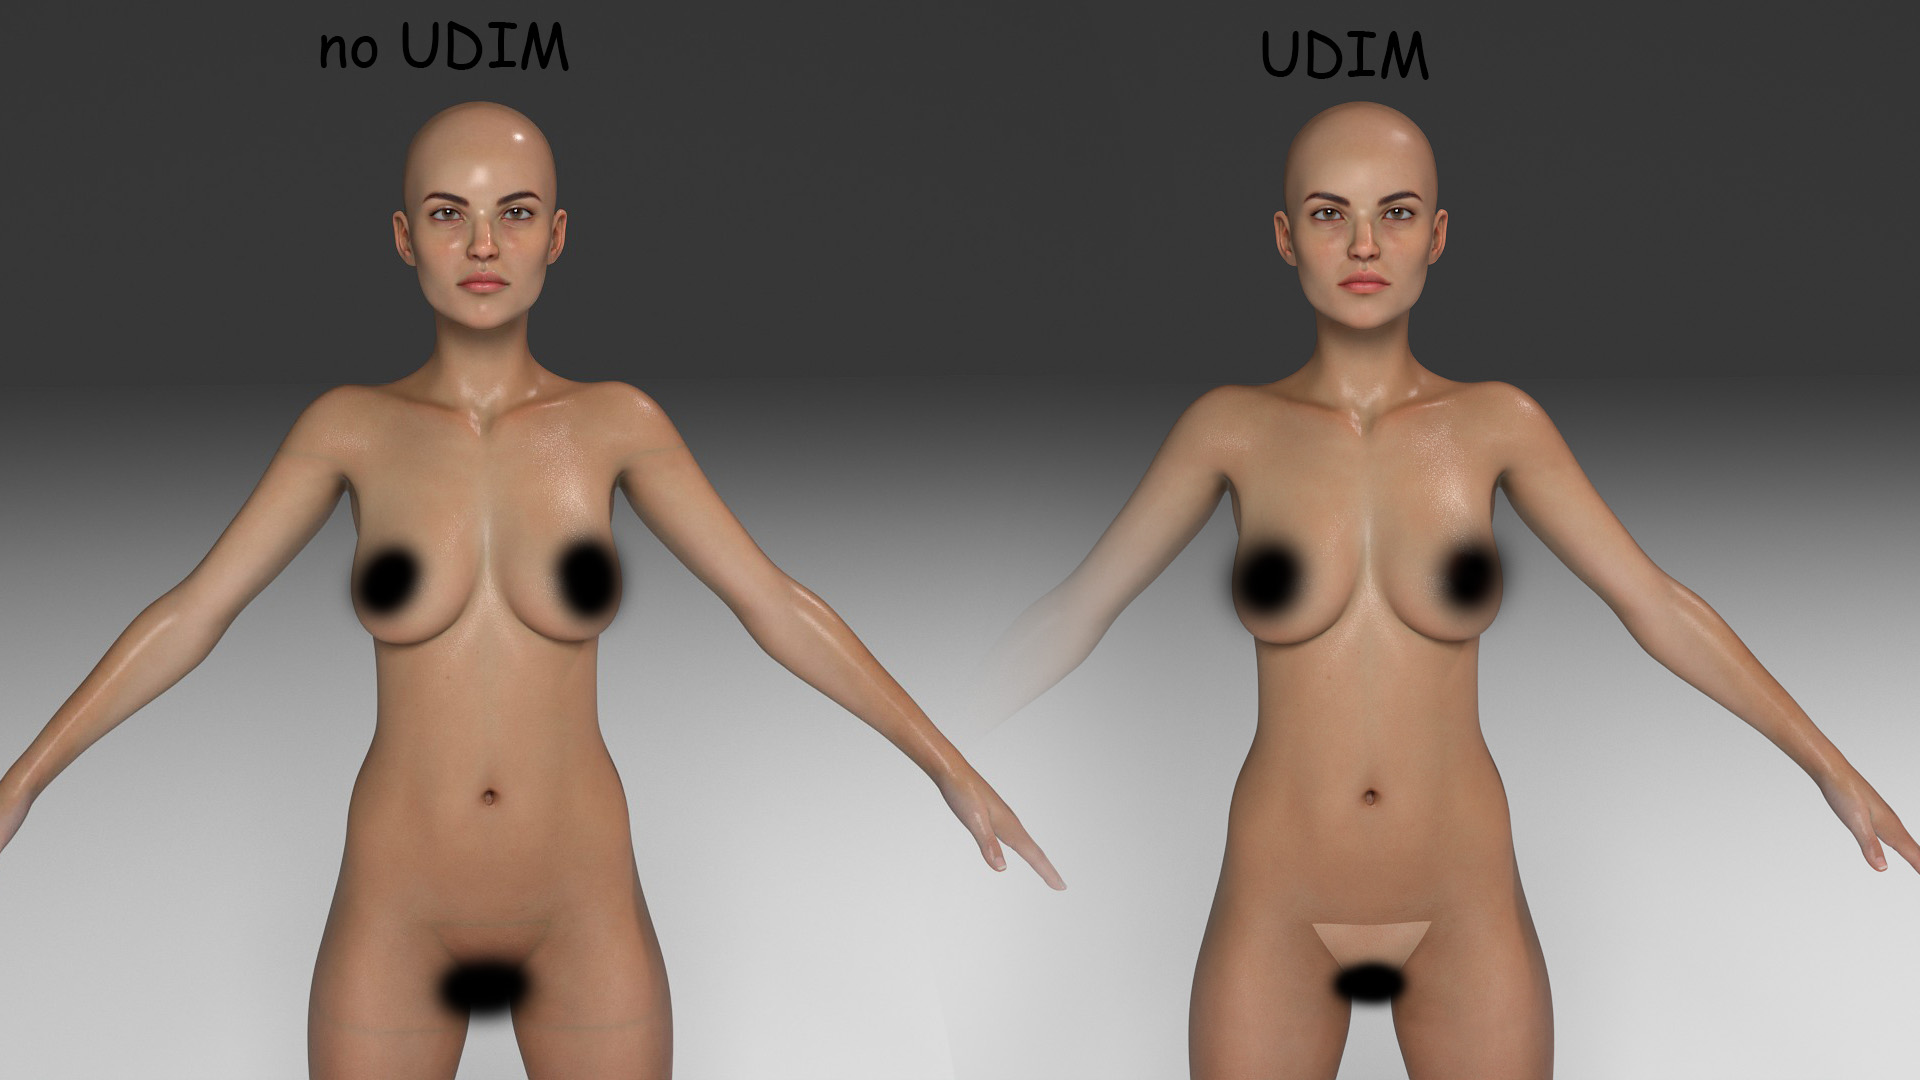
Also another issue I found is that on some genesis 8 models like Aiya HD or any other models by Maelwenn from the daz store, applying UDIM materials seems to break the shell of New Genit*ls for Victoria 8. For 75% of the genesis 8 models UDIM works flawlessly with the New Gens asset. The other 25% when I make UDIM all of the times the New Gens turn into a colorless pale even though before making UDIM materials they were the same materials as body. Even if I ignore the An*s or the genit*ls material in the Make UDIM window and merge only the character skins, they would turn into the color seen on the right
-
repo owner Forget about my previous comment about V81 looking bad already before making udims. I loaded an old model which apparently was corrupt in some way. Generating V81 from scratch works fine before udims are made.
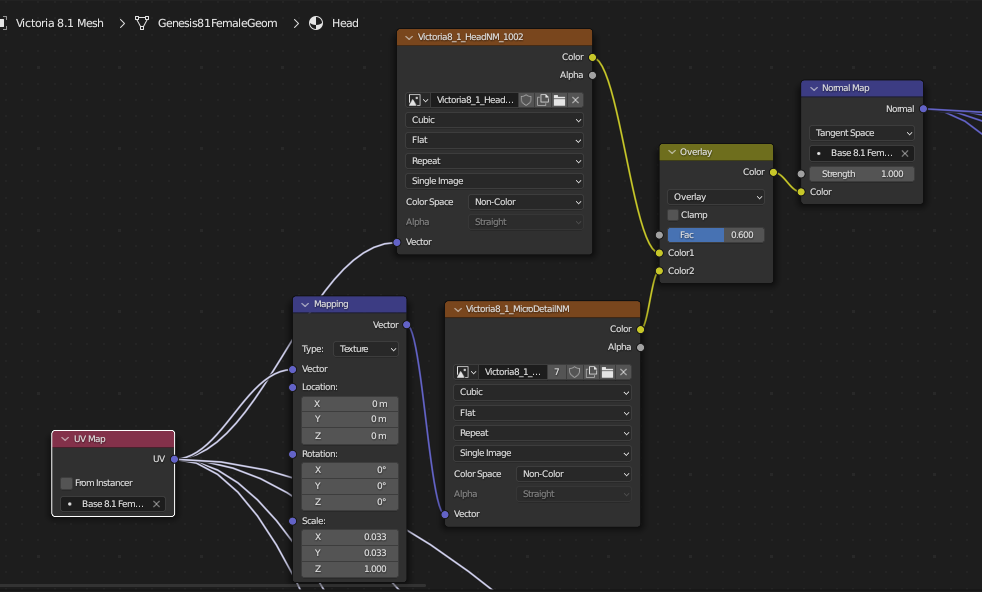
There are still problems with udims, and they have something to do with the mapping node that precedes the microdetail texture. If I shortcircuit the mapping node and connect the texture directly to the uv node, the seams go away.
-
repo owner I have another character from Maelwenn that displayed the same problem. It turned out that he doesn’t adhere to the udim naming convention with the tile at the end of the texture name. Instead he puts the tile second last. Thus, the diffuse texture is called
Lana_Torso_1002_difrather thanLana_Torso_dif_1002. The latest commit is less strict about texture names, and accepts names with a tile number at either the last or second last position.The reason why this mattered for the genitals is that the UVs weren’t moved to the second tile, but remained on the first tile and used the face textures instead of torso.
-
It works beautifully with Gen 8 now. Thanks Thomas! Nothing short of a Christmas miracle from you :)
-
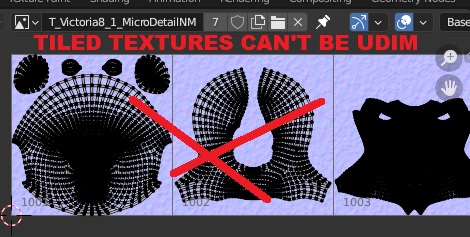
@Thomas Yes of course, tiled textures can’t be udim, when we merge the udim textures we must keep out any tiled texture if there's any. For example for diffuse we can merge all the diffuse textures to a single udim texture because they’re not tiled. But for displacement we can only merge the bump channels that are not tiled, we can’t merge microdetail because it’s tiled.
Keep out all the tiled textures from udim. Can’t be udim if it’s tiled.
Unfortunately this also means we can’t merge udim materials if there’s tiled textures. Unless we provide an option to “ignore” tiling factors same as we ignore the bump strength. So for tiled textures the active material is used as tiling factor same as the bump strength.
Let me know if something is not clear I’ll try to explain better.
-
repo owner No, it is not about tiled textures, that was already taken care of. The new problem was the mapping node before the texture node. In the latest commit textures with mapping nodes are not converted to udim textures, and the plugin does not allow materials to be merged if the target material has such a texture.
-
Does that mean UDIM skins won’t merge for any 8.1 model? Will there be any workarounds possible for the blue seams in G8.1 then?
-
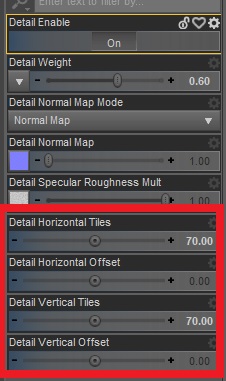
@Thomas The map node is generated because the pbrskin detail has its own uv tiles, apart from the geometry tiling that’s used for other textures. bug. As for commit 41b55e6 it keeps generating the udim for the detail specular roughness, while the detail normal map is not udim that’s correct.
edit. note. important. The bug is that the detail specular roughness not imported as tiled, the mapping node must be used both for the detail normal map and the detail specular roughness.

-
@Shayn udim materials with tiled textures can be merged but Thomas has to allow an option for ignoring the tiling factors as explained above. Or you can always merge materials by hand in edit mode as explained in #1316.
-
repo owner Alessandro, I misunderstood. I thought you meant that the image source = UDIM Tiles.
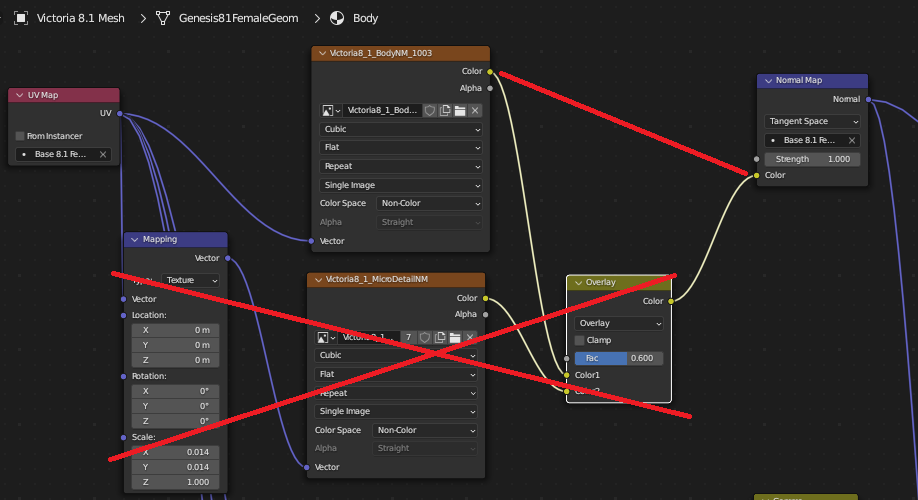
Shayn, it doesn’t make sense to me if the merged material has a mapping node that causes visible seams in the udim material. What you can do is to remove the textures with mapping nodes before making udims, and connect the normal map node to the remaining texture directly. This only has to be done to the target material, i.e. the material that the other materials are merged with. Doing so loses the detail normal maps, but there are no seams.
-
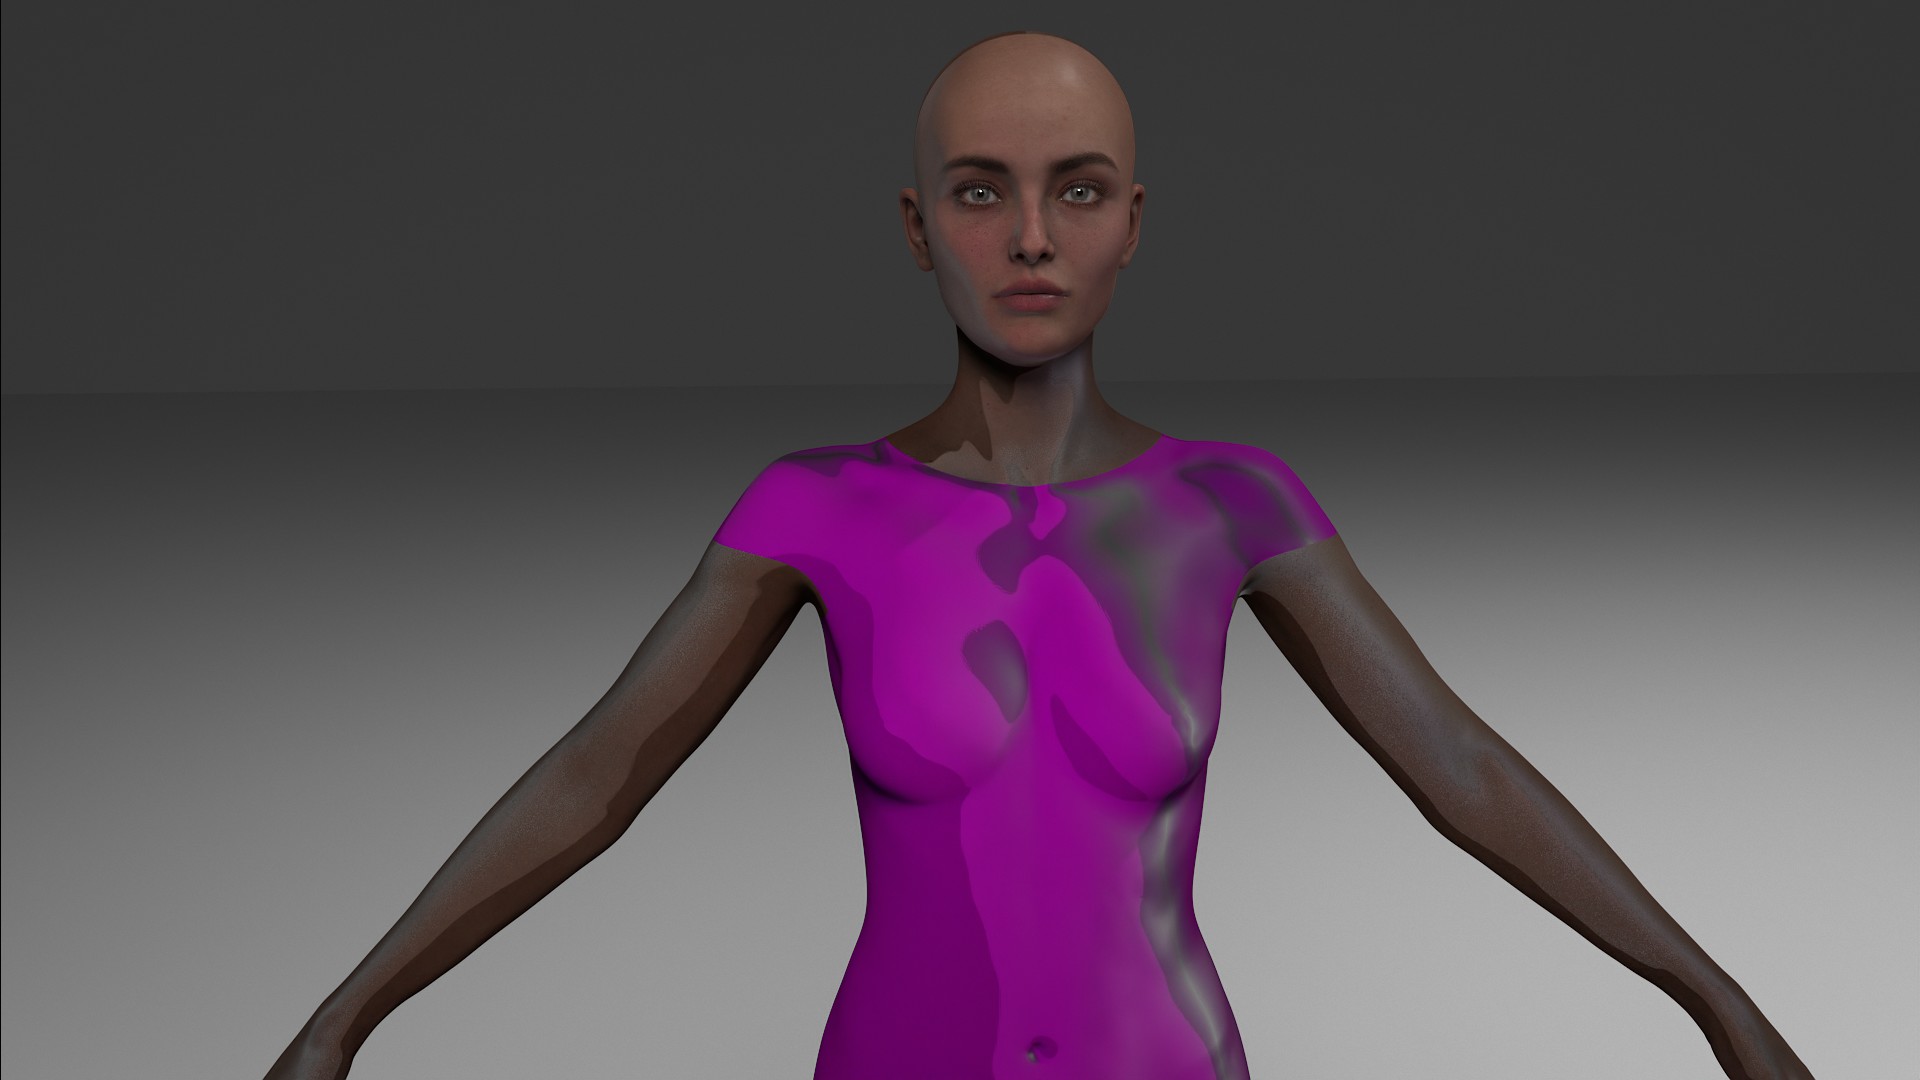
Well I tried to follow the image and deleted those 3 nodes for body and arms and conected the color node to the normal one to begin with and got this abomination haha… It’s like when you read an instruction manual wrong and end-up sticking a fork into the microwave… Anywho… Could you maybe clarify on what I’m supposed to do before making UDIM material? Also if I delete the Micro Detail maps is there visible quality loss in the skin? Currently working with G8 models and they look pretty good, if g8.1 is too much effort I guess I’ll stick to rendering with g8 ones then
-
Silly me, the fix for Genesis 8.1 is quite simple. You just have to turn off the detail maps from daz before exporting the model to blender. Takes about 2 clicks. Works flawlessly with UDIMs afterwards. There’s also no visible loss of detail in the model based on my comparisons. UDIMs are the way to go they fix the lacrimals and the seams of the model’s lips as well! Thanks once again Thomas for hearing us out and making the due fixes.
-
Probably the last issue left is that often times when converting to UDIMs, the make-up of the character would vanish. Are there any solutions or workarounds for this problem? It’s the most visible when there’s a lipstick material applied to that character, it goes away after the UDIM conversion is done
-
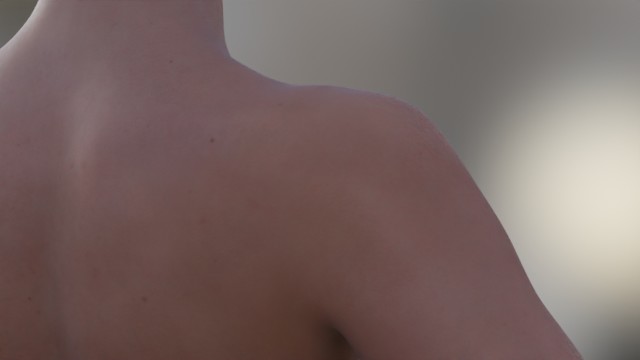
@Thomas In general it is true that merging tiled textures may generate seams. But in this case the tiled textures are for microdetails, so there’s really nothing too visible. It is the same when we ignore the bump strength, in the general case there may be seams because of the difference in bump, but practically it’s acceptable. Then if the user choses to ignore the bump strength and the tiling factors when merging materials then he is aware.
Below an example where I merged by hand the udim materials keeping the microdetails. There’s no visible seams.
-
repo owner There are now three options for merging materials: None, All, and No Mapping Nodes. There details normal texture doesn’t seem to cause seams anymore, since it is a repeated single texture. Apparently the problem was caused by making it into a udim texture.
-
Commit ce8b70e works fine enough.
bug. There’s the detail specular roughness to be removed from udims as reported above, it’s a tiled texture so must not be udim.
suggestion/bug. The “no mapping nodes“ option may be better renamed to “don’t merge tiled textures“. But this is incorrect since we can merge mapping nodes if they have the same factors, so the correct behavior/label would be “ignore texture tiling factors“, same as we “ignore bump strength“ in merge materials.
request. It would be useful to also have these options in the general merge materials tool, so that it can work both with regular and udim materials. Indeed converting to udims and merging materials are two different things, though they are related. Then there’s also #1316 for stack shells.
-
@Shayn It’s not the udim conversion that “deletes“ the makeup, but it’s the merge materials. To keep the makeup you have to select the face as active material instead of the body.
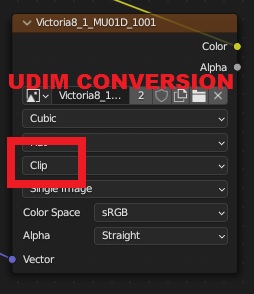
note for @Thomas. udim improvement. When converting to udim we may want to set all the textures to clip instead of repeat. This way textures that are not udim will affect only udim 1001. As a side effect the genesis makeup will work fine when we merge udim materials.
note. important. The clip option must not be set for tiled textures though, otherwise the tiling will not work. Only for non-tiled when we convert to udim.
note. important. Also geografts textures must be excluded from clip since they map at udim 1002. And we need them at 1002 to exclude the zero uvs.
note. On a second though don’t know if this will work for shells. Probably the correct way to mix udims and non-udims is to clip non-udims, unless tiled, and use a map node to set the correct udim tile. For example a shell mapping the torso on 1002 would be clipped and shifted to 1002. But don’t know if this can be automated, if not we have to do it by hand when using udims. Honestly I don’t use udims myself so didn’t spend much time thinking about it.
-
Hi, I would like to share my workflow for achieving normalmap details with merged materials that are correctly scaled across different body parts. This should help to ensure the details look neither too large nor too small.
Since I want to use newer versions of Blender, but also want to use the volumetric shader without "skin map bleeding", I had to find a solution:
-
Merge all UDIM materials where details are used:
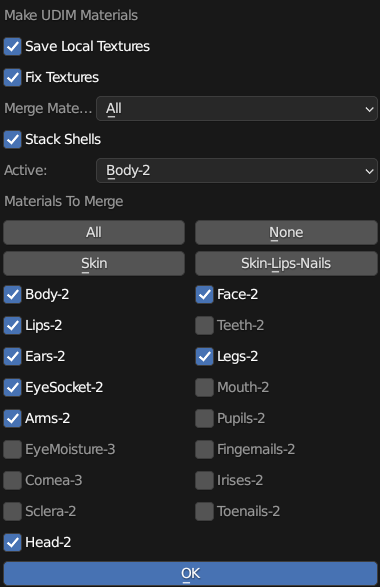
-
Add a new UVMap. I’ve named it “Details”:

-
Select the “Details”-UVMap and select its' UV-Islands. Then go to the UV-Contextmenu and select “Average Islands Scale”. This will average the size of the uv-islands, based on their area in 3D space:
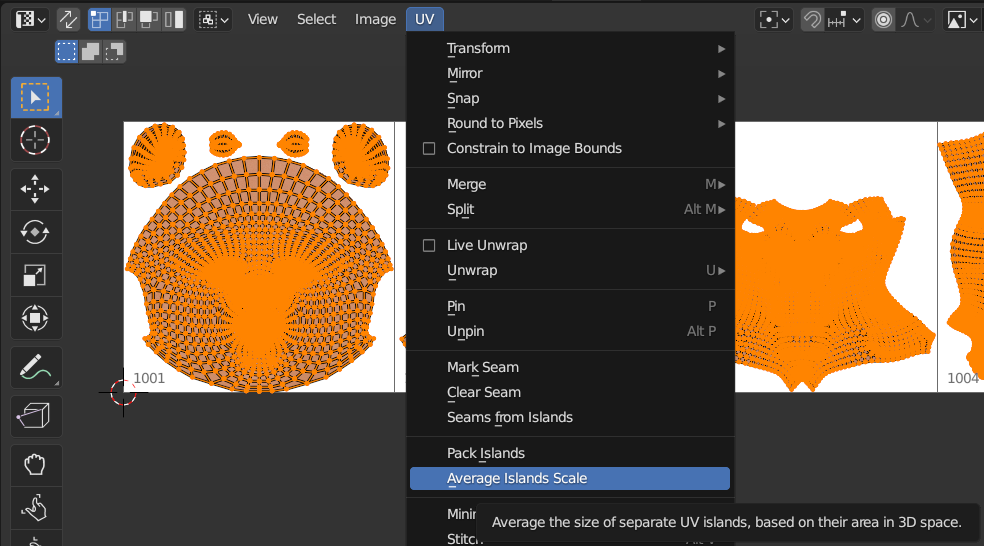
-
Now change the pivot to original origins to keep the uv-islands in their respective UDIM and scale them down until all of them are within their grids:
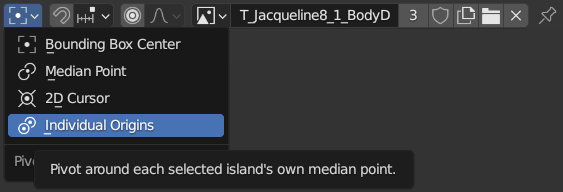
-
It should look like this now:

-
Now go the shader-setup and create a UVMap-Node with the “Details”-UV as its' value and connect it to the mapping node for details:
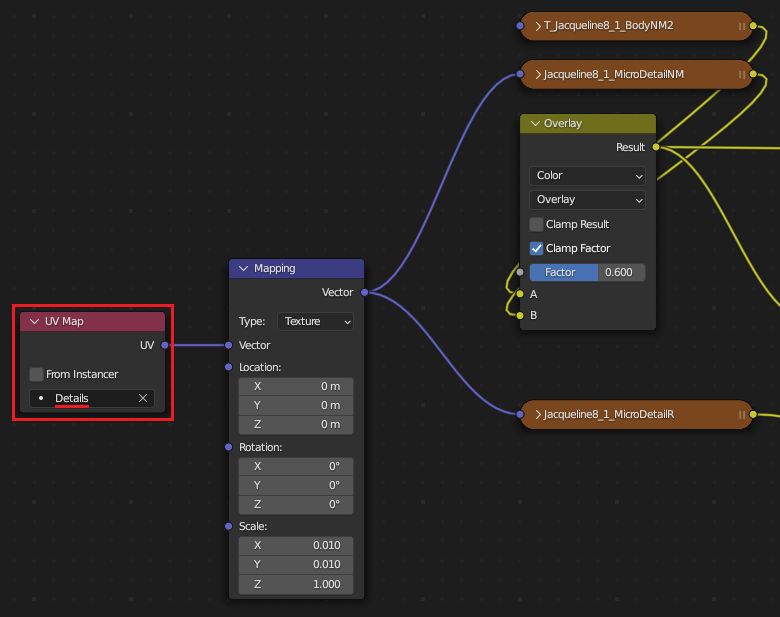
I hope this helps and maybe it can be implemented as an optional feature in the plugin, even if it’s quite “hacky“?
-
-
That’s a nice way to make the microdetail density the same for the whole figure.
But it may not be needed depending on the figure, one may have more density on the face and less density on the body for example. The human skin is not the same for the whole body, and being that microdetail it isn’t so noticeable. It is the same when we merge materials ignoring the bump strength, it works fine enough even if it’s not the same as daz.
Being that you already give up on the bump strength by merging materials, that’s the “major“ bump, it makes little sense to be picky on microdetail that’s the “minor“ bump.
note. If you really want to preserve the daz bumps the way to go is to bake it before merging materials. This means to then replace the original daz bump with the baked one after merging materials. But honestly this doesn’t seem necessary in most cases. Baking materials to a single texture could be useful to export to game engines though, or to optimize background figures.
-
Thanks for your reply!
If you need increased density in certain areas of the body, you can scale the UVs for those body parts. This way you have at least some control…
- I don't know if that can be controlled by some parameters rather than doing it personally though.regarding the bump strength, I personally use multiresolution with hd details at level 4 instead, which in my opinion is good enough for most cases.
The reason I created this workflow is that when doing high resolution close-ups the details are very important. (at least for me).
-
Multires aka displacement and bump are different things. That is, displacement will not compute the bump map as displacement, not even if you set “displacement and bump“ as material settings, see
#1354. So your workflow may be only good for HD figures, unless bump is relevant for the specific figure. That is, if there’s a area of the figure using bump for details instead of HD sculpting. -
You are correct. Certain characters, particularly those with rougher skin that may have numerous surface imperfections, will suffer a great loss of detail when this information is provided by the bump map/shader.
However, I for one use the “hd” surface presets of DAZ (when the characters have one), where the bumpmap is less agressive. These presets are often supplied when an hd morph is available for the respective character.
In this case, the aggressive bump map should not be used anyway when using the respective hd morph. (neither in Daz nor in Blender)When no hd morph is available for a particular character, I can use one from another character and make the necessary adjustments in Blender.
So an automated process that would replicate my workflow would undoubtedly make my life easier.
Maybe there is an alternative workflow that would prduce the same or better results (for example using the already existing mapping values to use them for the uv scale, to get the intended proportions right)However, if I am the only user or one of very few users who needs such a feature, then of course I also understand that a feature like that will not be implemented.
-
As it is now HD requires extensive work “by hand” anyway, especially to get the HD morphs working, so automating minor things wouldn’t benefit much. I myself tend to avoid HD whenever possible.
-
Build your own blender to use the volumetric shader without "skin map bleeding"
Since all current solutions like merging materials are coming with a loss of shader control and quality, I built my own Blender version with ‘fixed’ volumes.
We already know that this one lovely commit by Brecht from the Blender developer team, introduced this problem.Therefore, it is only possible to revert his commit and then build/compile Blender with this change.
This will enable us to use the most recent version of Blender without any skin map bleeding when using the volumetric shader.
Building Blender
Here you can find the official wiki for building your own blender version: https://wiki.blender.org/wiki/Building_Blender
There you can follow all the instructions for your corresponding operating system.
However, you should install Visual Studio 2019 instead of 2022 if you want to use CUDA or OPTIX because you need to install an older CUDA version (11.4) that only supports VS 2019.
Any version above 11.4 will cause problems when building blender.
Also, be sure to install the ‘Desktop Development with C++' workload!
For Optix, I added the OPTIX SDK path to my PATH environment variables. This way you don’t need to add it to the CMakeCache configuration file for every update.
Required file to modify in your cloned Git project
intern/cycles/kernel/integrator/volume_stack.h
Required changes to code
In lines 42 and 64 there is an if clause with conditions. We have to shorten said conditions as follows:
FROM TO if (entry.object == sd->object && entry.shader == sd->shader) { if (entry.object == sd->object) {
Build Blender
Build your Blender version by using the following cmake command within your git project:
make release
Start Blender
After building blender you can navigate to your main Git folder.
Then follow this path: build_windows_Release_x64_vc16_Release\bin\Release
There you will find the blender.exe, which you can then launch.
results
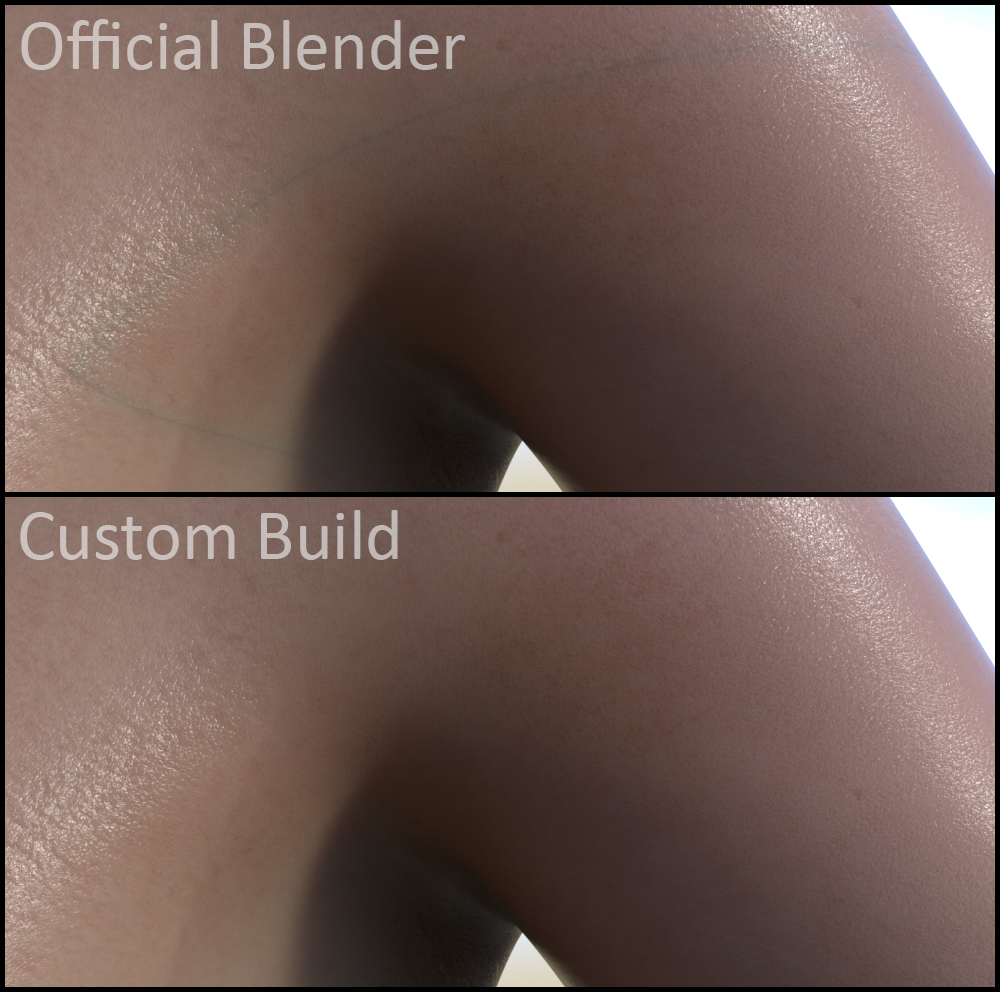
Of course, this solution is quite tedious, but it should be a good solution if you are dependent on new Blender versions but still want to use the volumetric shader without compromises like me.
I hope this can be of help. -
You could upload your custom build somewhere for anyone interested, perhaps a google drive. Since I doubt there’s many people around capable of building blender, even with instructions. The best would be to convince Brecht that his “fix“ brings more damage than benefit, but unfortunately that doesn’t seem an option.
-
Certainly a google drive link would be of great help! @Mike Fischer also did you notice any difference in the render times with the changes you made to the volumetric nodes? Did it make the renders longer?
-
My custom Blender build for download
@Alessandro Padovani I’ve uploaded the release of my build on Mega for anyone interested.
Keep in mind that this is only the release without the necessary files to build Blender for oneself, otherwise the file would have been several gigabytes in size.
Also, I've compressed the file into a ZIP file, which is roughly 300MB to download. Once unpacked, the size will be about 865MB.
download
Here’s the Mega-Folder where you can download the release from: Custom Blender Builds by Mike
Currently I have only built the latest alpha version 3.5.
When there is a new version I may upload a new build to this folder when needed.
Note
When I tested the file myself after unpacking the downloaded file, my operating system gave a warning that I should not open the file if I do not trust the source.
Obviously, I do not possess a Code Signing Certificate, which would verify that the software has not been tampered with. (I’m not the official publisher)I myself manually trusted my build by executing it anyway and that worked out just fine in my case.
To prevent any issues though, I would recommend adding the extracted folder to your antivirus software's exceptions and being a bit more careful when installing addons from unknown sources.
Performance
To answer the question from @Shayn Sn regarding render times with the changes I made to the volumetric shader, I rendered a closeup with 4096 samples in my own version and the official Blender 3.4 version.
Rendering with an RTX 3090 while using optix in my own version took about 5:30 minutes. The official version of Blender took 5:19 minutes.
That's about 3% slower, but since I only tested once, it may have been a compiling shader in my version that caused rendering to start a bit later.That said, there should be no compromise on render time when using my version to render.
-
That is great of course thank you. If possible it’d be better to build a 3.4, possibly without the eevee bug
#1338. Since diffeomorphic is not tested with 3.5. -
p.s. Would you happen to have any interest to help Thomas with the Xin addon
#1369? -
Many thanks Mike! You’ve rekindled my fire for 3d rendering with this lifesaver haha :D
-
@Alessandro Padovani building an older Blender version was a bit trickier but I just had success with the custom build of Blender version 3.4.1.
Version 3.4.1 is now available in the same folder as version 3.5: -
reporter I assume since Alessandro suggested it taking a look at
#1369, you got expierence in that regard? @Mike Fischer
I’d would be insanely appreciated if you could figure something out. -
Thanks a lot Mike for your incredible contribution. Never thought myself it was possible to find someone who can build custom blenders for diffeomorphic.
-
-
- changed title to 3.3 has skin map bleeding **includes custom blender builds by Mike Fischer with fix**
-
@Alessandro Padovani Thank you very much for your praise, Alessandro. I have spent the last 2-3 days trying to figure out how to solve this skin bleeding problem and came up with building blender by myself. It was a little tricky since I've never built a custom blender version before, but I'm relieved that this method finally "solved" the problem.
@Maneki @Alessandro Padovani As for Xin's addon, I can try to look into it, but I can't say for sure if I can help.
I am a learned and active application developer with .Net C# experience, but have rather little to no experience with C++ and Python.
But of course there are some similarities between those languages and I may be able to find my way around more quickly.Nevertheless, I first need to set up a development environment where I can debug properly.
-
Mike, if you dare to try, inside the distribution in
#814there are instructions by Xin to compile the dll, while the instructions for using the addon are in the distribution in#357. I remember Xin had to recompile the plugin for blender 3.2 because at blender they changed some headers.Have no idea why it doesn’t work in 3.4.
Of course this is not to push in any way if you like to try let us know how it goes, sometime help may come from interested people.
-
reporter @Mike Fischer did you already compile a custom 3.5 stable version or is it planned? Thank you in advance.
-
reduce absorbtion density amount to 1000 and scatter anisotropy to -1 to all material might fix the problem.
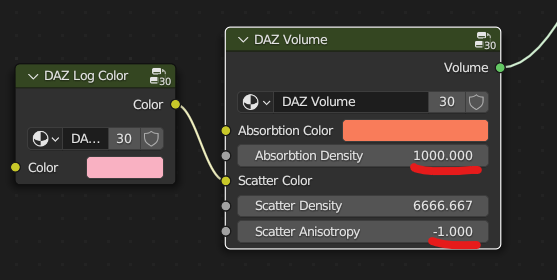
-
Not good. That way will generate a different skin also with a different tint, depending how far is the original skin from the fixed values. Instead of this solution we may as well use sss and fix it as desired, that avoids the bleeding and is also faster to render.
Below an example with a random figure, original skin vs your “fixed” values.
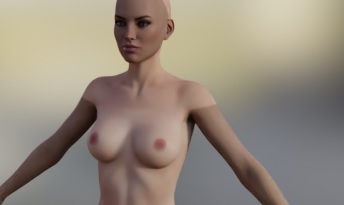
-
Hi @Mike Fischer
I tried to compile Blender 4.0. Blender itself seems to work, but the rendering on the video card doesn't work. I have installed the CUDA library and Optix. Also checked the right checkboxes in CMake and clicked Generate. I didn't get any red warnings. What could be the problem? I checked the checkbox "WITH_CYCLES_CUDA_BINARIES=ON" but on the command line during the build it says OFF for some reason. I need the Blender 4.0 version as it has Light Linking.This is an error message in Blender
Compiling CUDA kernel ...
"nvcc" -arch=sm_86 --cubin "C:\development\build_windows_x64_vc16_Release\bin\Release\4.0\scripts\addons\cycles\source\kernel\device\cuda\kernel.cu" -o "C:\Users\79829\AppData\Roaming\Blender Foundation\Blender\4.0\cache\kernels\cycles_kernel_sm_86_91FC236746BFF634423A808A027330FC.cubin" -m64 --ptxas-options="-v" --use_fast_math -DNVCC -I"C:\development\build_windows_x64_vc16_Release\bin\Release\4.0\scripts\addons\cycles\source" -DWITH_NANOVDB
nvcc fatal : Cannot find compiler 'cl.exe' in PATH
Failed to execute compilation command, see console for details.Unable to compile OptiX kernels at runtime. Set OPTIX_ROOT_DIR environment variable to a directory containing the OptiX SDK.
-
- marked as task
Marked as task since this is a limitation in the volume shader from blender 3.3, to be aware of, but not a bug in the addon.
-
It’s happening again in Blender 4.0.1. ( Diffeo 1.7.2.1925 ) Didn’t have this issue in 3.6.x
Is there any work around for this without changing too much of how the skin supposed to look ?
-
A possible workaround is to use udim to join all skin materials, as explained above. Then you may have to adjust the bump since in iray it depends on the pixel density.
Or bake to a single skin material, that should work the same.
https://bitbucket.org/Diffeomorphic/import_daz/wiki/Setup/Finishing/UDIM Support
-
@Alessandro Thanks for the reply, I went ahead and Compiled blender with @Mike Fischer’s Fixes. If anyone want to download : Google Drive Blender 4.0.3 release candidate
Used CUDA 12.0 / OPTIX 7.3.0 tested fix & build
UPDATE : Build fixed and updated to 4.0.3 rc [Node wrangler and addon script issues fixed]
I’ll update the build again once LTS releases
-
Thank you for providing this, it’s very useful to anyone who wants the best skin from daz studio. Another way is to use blender 2.9 or 3.2 for those who don’t necessarily need blender 4.
-
@Rubber Monkey your custom build is giving me missing script files when going to addons.
missing node wrangler and everything
-
@tokyir yame yes i can confirm the script missing issue
I’ll pull once more and update the build on G Drive to current stable release
Give @Mike Fischer ‘s build a try in the mean time -
@Rubber Monkey
noice thx mate, i have mike’s build tho i have addons that only work on blender 3.6 up.
so would nice to have your build too, let us know when you update it
-
@tokyir yame
Blender 4.0 build updated with fix follow the same link above
-
@Rubber Monkey link above sends me to google drive saying the file is in owners trash
-
@tokyir yame Link fixed, try now
-
@Rubber Monkey seems like everything is working nice now, thanks alot really appreciate it
-
someone can tell if i need this specific version installation of CUDA 12.0 and OPTIX 7.3.0 to improve the perfomance of Blender 4.0.3 candidate or i can use other recent version of them to get better perfomance on this version of blender.
PS: I have a 4090.
- Log in to comment

It appears that the volume node is the trigger of the issue in 3.3