Wiki
Clone wikiACID - Artefact correction in diffusion MRI / ACID_wiki_miscellaneous
ACID-Utilities
This module consists of various tools designed for augmenting spinal cord dMRI pre-processing and analysis:
- Visual inspection
- Image cropping
- Check registration
- ROI analysis
Below, each of these four tools are discussed in more detail.
Visual inspection
The visual inspection tool allows the user to load in and browse through all slices and images of the dMRI data. We recommend to use this tool to assess the quality of the raw dMRI dataset and to identify artifacts. Image and slice numbers with low signal and/or artifacts can be labeled and saved. These labels can then be used e.g. to exclude these low-quality images from ECMOCO (see Exclusion mode in ECMOCO:).
The tool is available under: SPM -> Tools -> ACID-SC -> Miscellaneous -> Visual inspection
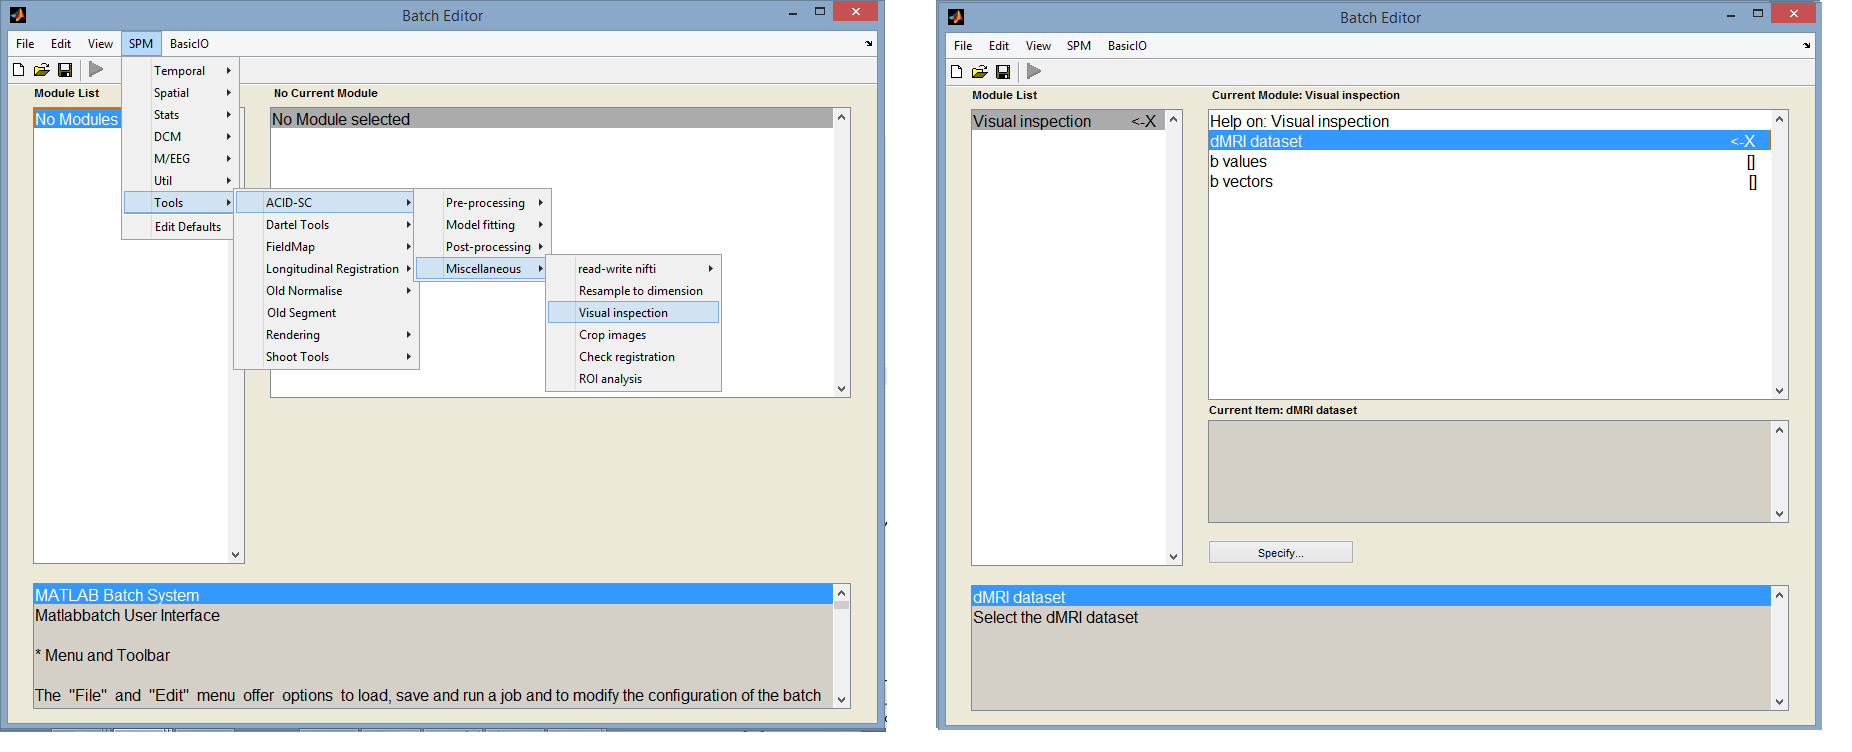 Fig. 1: Image cropping tool within the ACID-SC toolbox
Inputs:
- dMRI dataset: specify the data you want to visually inspect. It must be a single 4d or a set of 3d nifti files.
- b values: enter the corresponding b values as a 1xN array (optional entry).
- b vectors: enter the corresponding b vectors as a 3xN array (optional entry).
Upon running the batch, a window appears with the specified data displayed in the axial view (Fig. 2). The two bars on the left side can be used to browse through all images and slice of the data.
 Fig. 2: Image cropping tool within the ACID-SC toolbox
Output: the single output is a .mat file containing the indices of the labelled slices, where the first raw contains the index of image the slice is located, and the second raw contains the slice number within that image.
Image cropping
Most SC dMRI sequences use reduced-FOV or ZOOM sequences which feature a small FOV in the phase-encoding direction (typically anterior/posterior) and a large FOV along the frequency-encoded direction (typically left/right) (see figure above). This means that the FOV covers a lot of structures outside the SC. As the first step of the pre-processing, it is recommended to crop the SC dMRI dataset, e.g. reduce the field of view (FOV), to exclude much of the surrounding tissue.
Cropping improves the performance of ECMOCO, as structures surrounding the spinal cord (bones, ligaments, etc.) can move independently from the spinal cord, which can result in incorrect estimation of transformation parameters for the spinal cord itself. On the other hand, cropping greatly reduces the size of the dMRI dataset and therefore accelerates all subsequent processing steps, especially the ECMOCO and model fitting. Note that large inter-image movements across the dMRI dataset might interfere with the cropping (i.e. the spinal cord moves out of the cropped FOV after large movement). In this case, ECMOCO should precede cropping. Also note that SC dMRI is typically acquired using reduced-FOV sequences, which already have a small FOV in the phase-encoding direction, so cropping is usually necessary only in the frequency-encoding direction.
The tool is available under: SPM -> Tools -> ACID-SC -> Miscellaneous -> Crop images
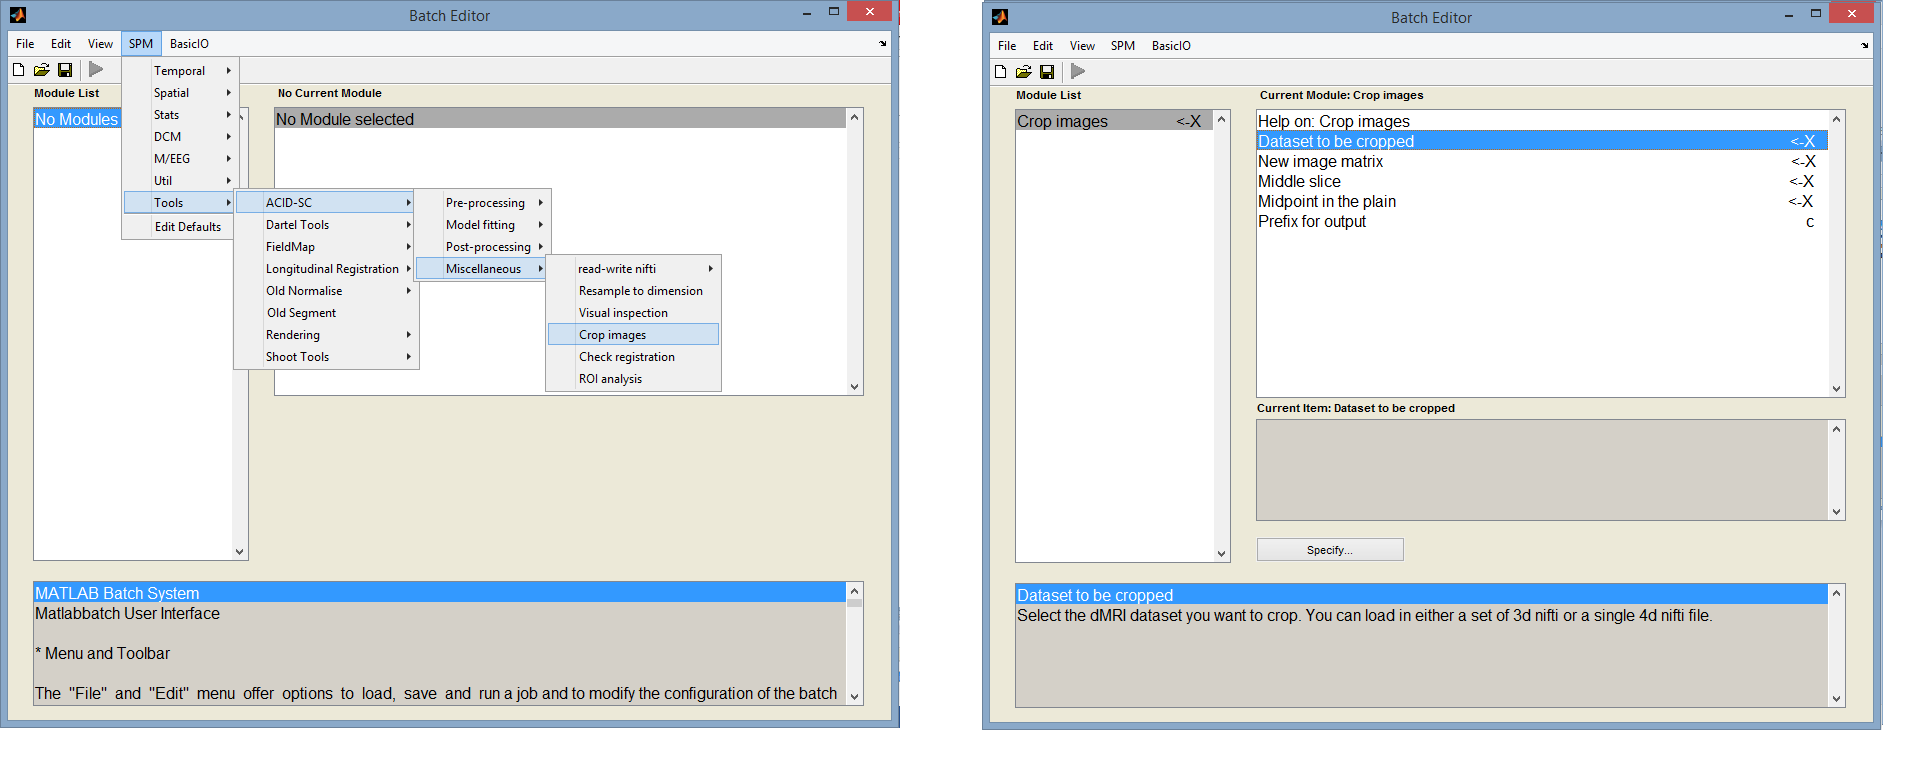 Fig. 3: Image cropping tool within the ACID-SC toolbox
This tool allows the user to crop the dMRI images either automatically by specifying the midpoint (around which the image will be cropped) and the new matrix size, or manually by selecting the in-plane midpoint using crosshairs in the pop-up window (see image below). After specifying the cropped FOV based on the first image, the cropping will automatically be applied on all other selected images of the dMRI dataset.
The following input parameters have to be specified:
- Data to be cropped: select your dMRI dataset. It must be in nifti format and can be 3d or 4d.
- New image matrix: enter a 1x3 array specifying the desired matrix size of the cropped image in the x, y, and z directions, respectively. Enter a large number if you don't want to crop the image along a particular direction.
- Midpoint in the axial plane: the indices of the midpoint voxel in the axial plane, around which the image will be cropped in the axial plane. If left unspecified (click OK without having entered a value), a window will pop up showing the specified middle slice of the first volume. In this window, you have to manually select the midpoint by moving the cursor to the desired point and pressing the left mouse button.
- Prefix for output: prefix for the output cropped image
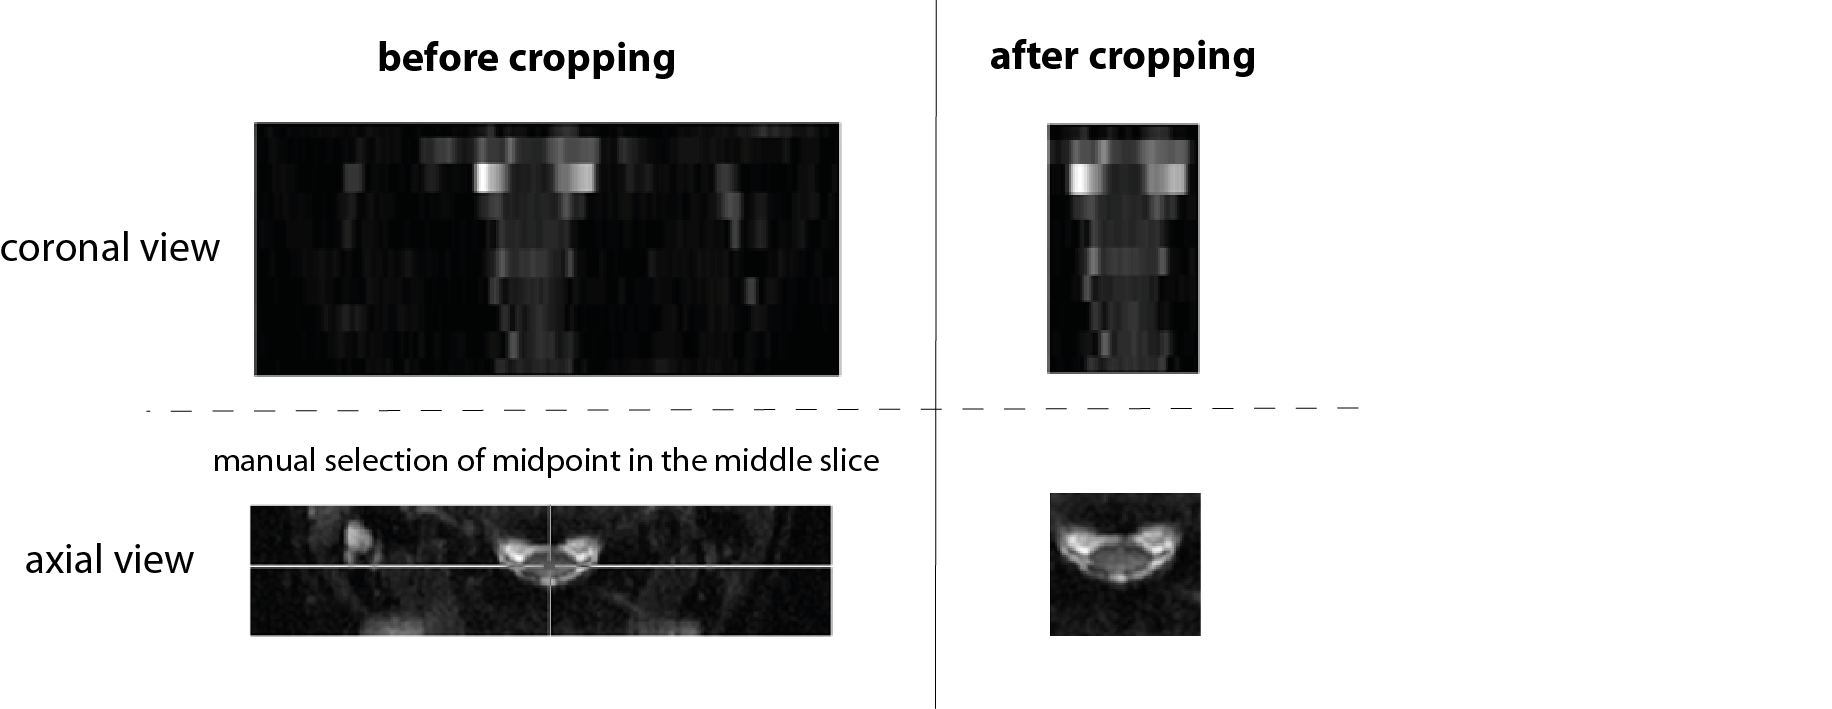 Fig. 2: Illustration of image cropping tool on a typical reduced-FOV axial DTI dataset with an image matrix of 356 x 80 x 10. After entering the matrix size of the cropped image and specifying the midpoint by entering a value or manually selecting it in the pop-up window (shown on the bottom left), the program will generate a cropped 4D dMRI dataset where the specified FOV is applied on all selected dMRI images.
Check registration
This tool is meant to compare the dMRI dataset before vs. after applysing ECMOCO, thereby assessing the performance of ECMOCO. The tool allows the user to simultaneously display and stream the images of up to three dMRI datasets next to each other, where the resulting video can be saved.
The Check registration tool can be found under SPM -> Tools -> ACID Toolbox -> Miscellaneous -> Check registration
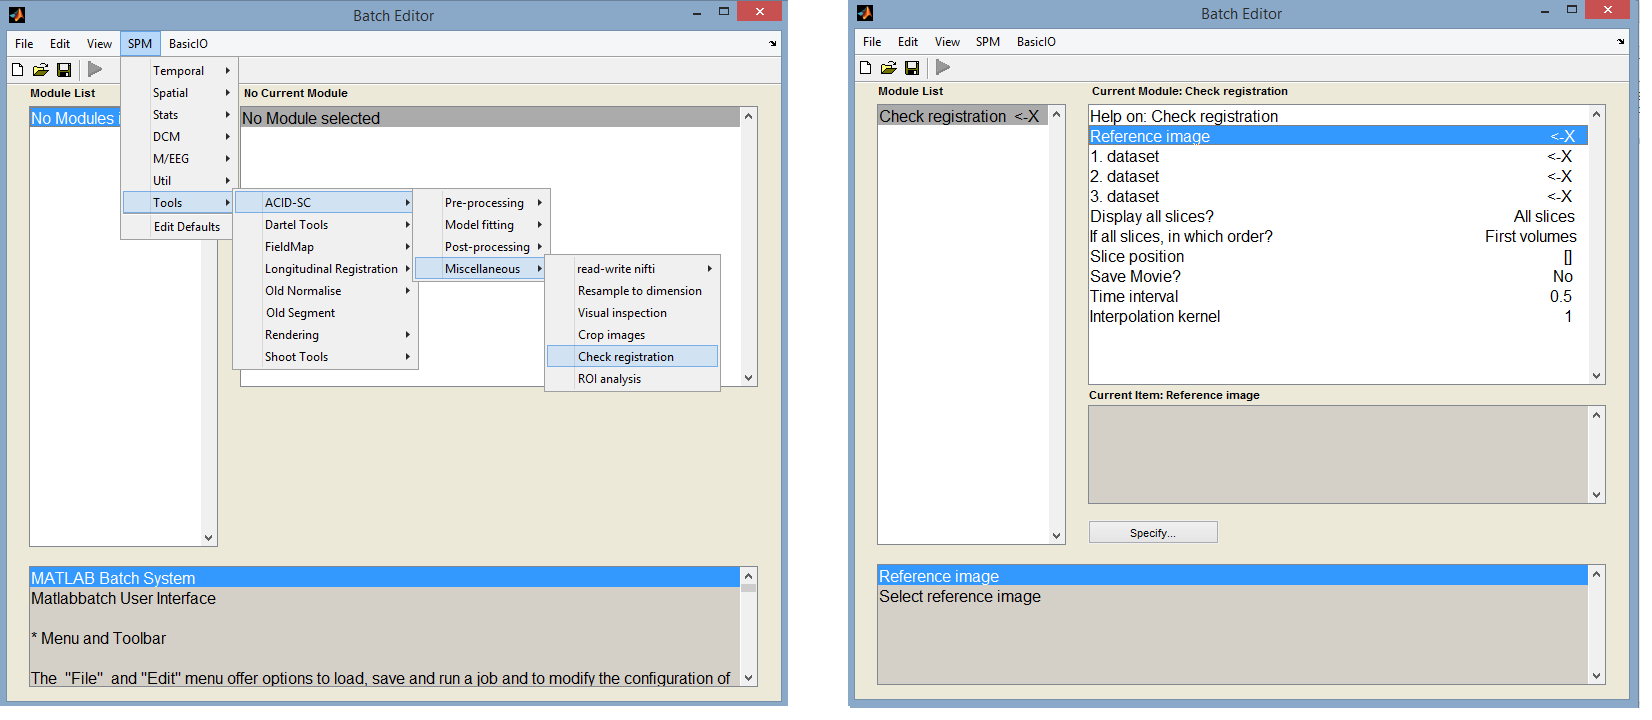 Fig. 3: Image cropping tool within the ACID-SC toolbox
Inputs:
- Reference image: enter a non-distorted file here, e.g. the first volume of the ECMOCO corrected dataset (which is always a b0 volume in Balgrist data). Note that here you have to specify a single volume, not the whole dMRI dataset.
- 1. dataset: enter the raw dMRI dataset here (cDWI_*.nii).
- 2. dataset: enter the ECMOCO corrected dMRI dataset here (rcDWI_*.nii).
- 3. dataset: leave it unspecified by clicking ‘Done’ without having selected any images. Alternatively, you can enter here another EMOCO corrected dMRI dataset if you have used two ECMOCO approaches (e.g. slice-wise and volume-wise) and you want to correct them.
- Display all slices?: Recommended option is ‘All slices’. More information in the GUI help field.
- If all slices, in which order?: Keep default option, ‘first volumes’. More information in the GUI help field.
- Slice position: Leave it unspecified. A value has to be entered only if a single slice is intended to be displayed two fields above.
- Save movie?: Recommended option: Yes. This will save a movie of the display window while streaming through the images. Note: the frame rate of the saved video is very high. I recommend using a video player software that lets you slow down the video (e.g. VLC Media Player).
- Time interval: the time duration between two frames. Recommended: 0.2.
- Interpolation kernel: Leave it default.
After running the batch, a Matlab window will appear with the reference image, 1. dataset, 2. dataset, and 3. dataset from left to right. Then, the tool will stream through the volumes of the dMRI dataset in a video mode. The procedure is repeated for each slice. Compare the raw and ECMOCO corrected dataset in terms of motion across volumes. You should see less motion in the ECMOCO corrected dataset than in the raw images. However, in case of a normal dataset with minimal motion artifacts the difference is quite small. What to do if you notice mis-registration in the ECMOCO corrected dataset? For example you notice slices which are completely off due to an error in the registration process. In this case, I recommend you to try volume-wise registration. Slice-wise registration can be unstable in case of low-SNR data.
Output:
ROI analysis
To aid ROI-based analysis, ACID-SC provides a tool under ACID-SC->Miscellaneous->ROI analysis which extracts mean values of diffusion measures (FA, MD, etc.) from specified ROIs. An important feature of this tool is that multiple types of ROIs can be specified including (i) global ROIs that are applied on all subjects, (ii) subject-specific ROIs that are applied only on the corresponding subject, and (iii) reliability masks. This gives flexibility for a variety of situations. For example, a set of subject-specific ROIs are needed for non-normalized data, while a single global mask is sufficient for normalized data (with optional reliability masks in both cases). If multiple types of masks are specified, the DTI measures are extracted from the intersection of the masks.
The Check registration tool can be found under SPM -> Tools -> ACID Toolbox -> Miscellaneous -> Check registration
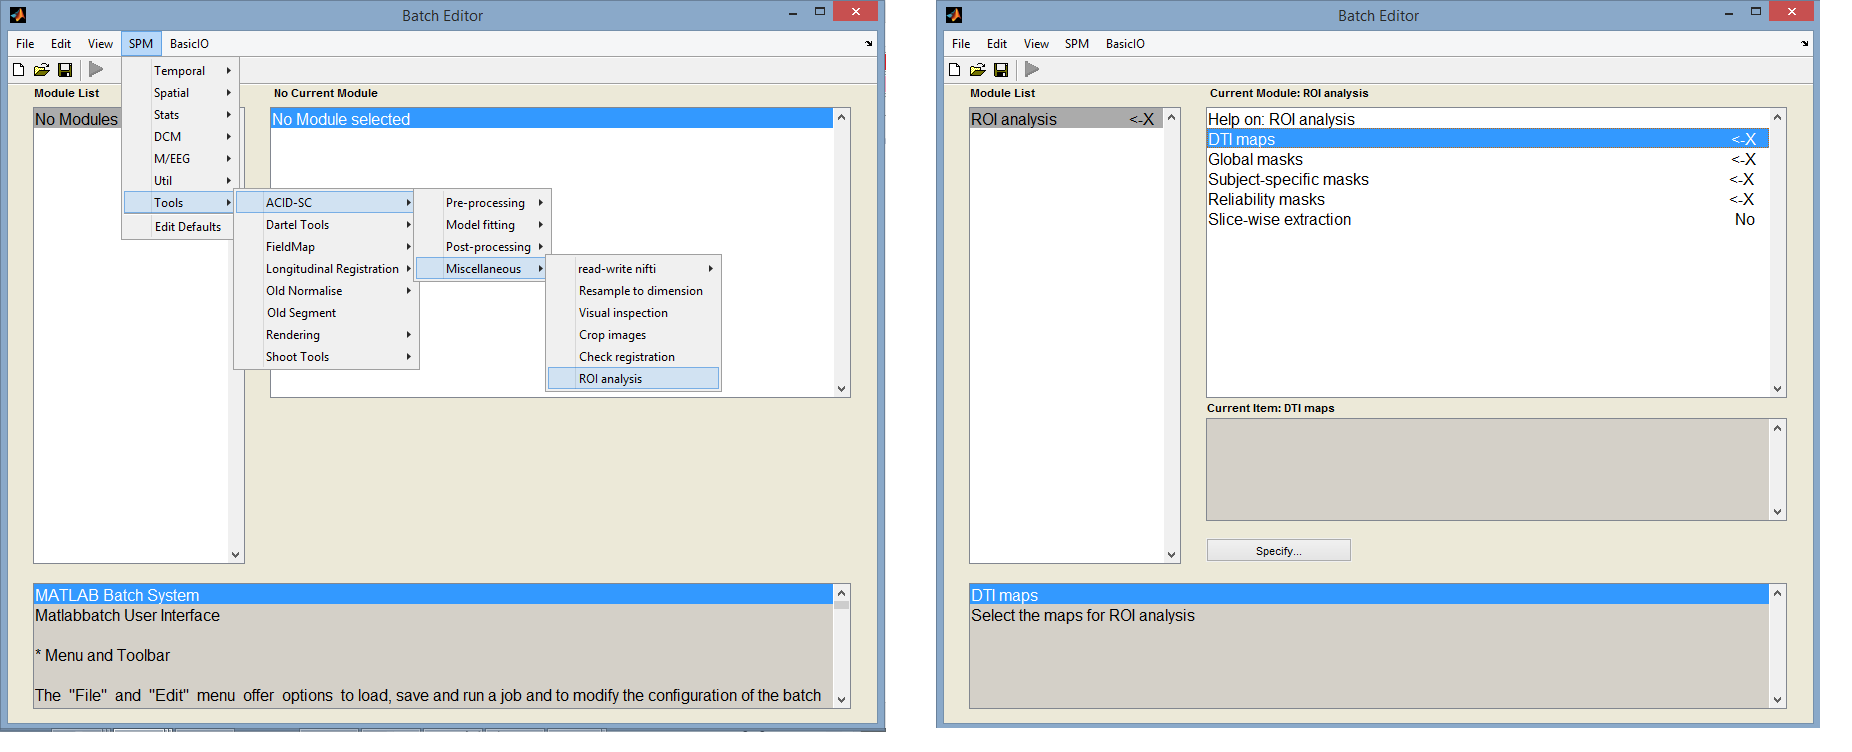 Fig. 3: Image cropping tool within the ACID-SC toolbox
Inputs:
- DTI maps:
- Global masks: select global binary masks in which metrics will be extracted
- Subject-specific masks: select subject-specific binary masks in which metrics will be extracted
- Reliability masks: select reliability masks. More information on reliability masks can be found here:
- Slice-wise extraction:
Output:
Updated